• Can't post after logging to the forum for the first time... Try Again - If you can't post in the forum, sign out of both the membership site and the forum and log in again. Make sure your COG membership is active and your browser allow cookies. If you still can't post, contact the COG IT guy at IT@Concours.org.
  • IF YOU GET 404 ERROR: This may be due to using a link in a post from prior to the web migration. Content was brought over from the old forum as is, but the links may be in error. If the link contains "cog-online.org" it is an old link and will not work.

Auxiliary Light mounts

PeterL

Guest
Guest
I'm creating this as a new thread at the suggestion of several contributors to the OLD thread. I'm also hoping not to do anything that the moderators wouldn't care for, so please let me know if this crosses any lines.

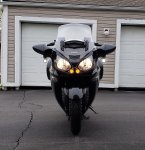
I love my C14. Was still driving my second C10 when they came out. It took a couple years, but I finally found mine courtesy of Craigslist, and a wife patient enough to drive halfway across California with me. And NOT for the first time either!

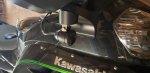
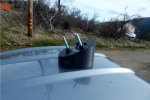
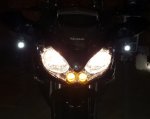
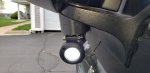
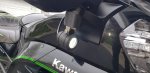
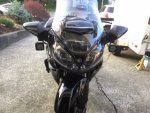
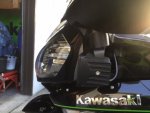
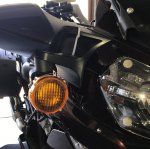
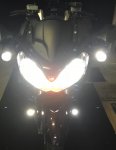
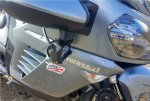
Among all the things Kawasaki did right, there are a few miscues that just cry out "Why?!?" I refer in this case to the fact that their design group evidently made a studied decision NOT to provide anything resembling a plumb, level surface that could be easily co-opted for mounting add-on lights. Right?

For the full history, please check out the earlier thread:
http://forum.cog-online.org/accessories-c14/any-interest/

For those with  no patience for tedious backstory:
https://www.ebay.com/itm/113680847477

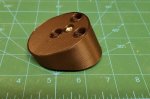
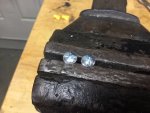
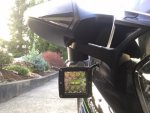
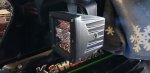
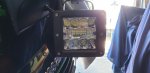
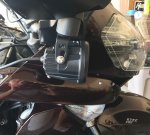
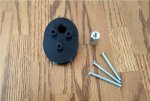
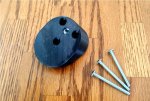
These are 3d printed with a carbon fiber-PLA filament. The exterior surfaces are made thick for strength, and with a 25% infill pattern (technospeak for MORE strength). The hardware is stainless steel. I do not supply the 8mm bolt for actually attaching the lights, because there are just too many variations possible. It's cheaper for us both if I don't include something that you might not need.

My first two units have already been sold. And I'm hoping, nay- pleading, for some honest feedback from their new owners once they've had time to evaluate.

Ride safe folks.


Attachments

  • Mount-001.jpg
    Mount-001.jpg
    153.7 KB · Views: 226
  • Mount-002.jpg
    Mount-002.jpg
    180.8 KB · Views: 215
  • Mount-003.jpg
    Mount-003.jpg
    186.3 KB · Views: 234
  • Mount-005.jpg
    Mount-005.jpg
    174.1 KB · Views: 459
Hi PeterL,

As soon as they get here, I'll put up a review.

Hmm.. I wonder if production #001 will become a collector's item?  :rotflmao:

Chuck
 
You need a catchy name for those Pete.  Pete's EZ Light Mounts or something.  You'll be famous! :great:
 
Yah. Asking me to name something is like standing in lane#2 of the 405, on a Friday afternoon, during an electrical storm, whilst wearing underwear made from recycled Brillo pads. I'm a lifelong unrepentant punster.  My Connie is called "Thunder" because it ROLLS! (Garth Brooks humor)

Great. Now I'll be up until all hours, striving to come up with something capable of making dozens of people groan in perfect synchronicity AND in five-part harmony. Be warned- I've done it before.

This isn't over...
 
Nice

I like the simplicity. THe light snugs up to the inserted nut? Strength is enough to keep the nut from coming through? How is pricing and shipping? Getting ready to add fuzeblock and lights.
 
I designed the structure in keeping with my life philosophy:
      "Anything worth doing is worth OVERdoing"

The top and sidewall are thick, and the internal structure is filled with a grid pattern at a 25% fill rate. (This saves material but insures structural integrity) The bottom plate is made even thicker, so that if you have a light that wants a secondary locating screw, you could actually drill into it for the purpose. Also it helps to absorb vibrational stresses inherent with any suspended mass. I went with a coupling nut, rather than just a regular type, because the added surface area makes a r-e-a-l-l-y strong bond with the internal recess, insuring very low load stress on the wall structure. It also gives a very secure purchase for the mounting bolt for the light itself.

Mine have held up great so far, and showed no stress lines or fractures when I pulled the one off the other day. And where my originals were made with an "ABS+" filament, I'm using a "carbon fiber-PLA" matrix for all my production versions, as it has even greater structural strength.

Please see the eBay link for the commercial info. I don't want to push my luck with the moderators here.

-Peter

 
PeterL said:
Yah. Asking me to name something is like standing in lane#2 of the 405, on a Friday afternoon, during an electrical storm, whilst wearing underwear made from recycled Brillo pads. I'm a lifelong unrepentant punster.  My Connie is called "Thunder" because it ROLLS! (Garth Brooks humor)

Great. Now I'll be up until all hours, striving to come up with something capable of making dozens of people groan in perfect synchronicity AND in five-part harmony. Be warned- I've done it before.

This isn't over...
Somebody had to do it! :nananana: :nananana: :))
 
Whilst I absolutely refuse to bind myself to public opinion, I'm putting this to a vote. Herewith are the three leading contenders for naming rights (preliminary judging was by my wife. YOU argue with her if you like...)

1.  Peter's Perfect Pod Perches
2.  IBuiltThisBecauseKawasakiWouldn't
3.  Phantastic Photonic Pharkles

Voting is now open.

 
Those look great! I ended up fabricating a mount for mine in the same location. You're right, it doesn't seem like there is a flat spot on our C14's!!!!
 
Nice. Elegant in it’s simplicity.
I want to add some driving lights, but I have the Skene Photon Blasters mounted on either side of the front fender, not leaving me a lot of options for aux light mounting. Your nameless widgets look like they’ll do the trick.
 
Well... it looks like they will henceforth be known as "Pod Perches". Putting my name on 'em seemed rather egocentric (I am rather, but I do not generally advertise the fact!), and 'perfect' is often sought but rarely achieved. Or is that just me?

The first few units have shipped, and I hope to be caught up with all orders by this coming Monday. Once that landmark is achieved, I'm actually going to try and print a few ahead, so folks in future won't have to wait quite so long for theirs. The response has been more than I was prepared for, and I hope everyone will be pleased when they receive and install.

Thanks to all,

Peter

 
Just put my order in.  Looks like a cool place to mount a camera as well.
Really looking forward to something else to bolt on my bike.

(Tongue In Cheek}
Or should I mount a loud speaker so Ted can hear my comments about him without his hearing aid?  Never mind he doesn't listen anyway. 
 
Just received mine yesterday.

While I have not mounted them yet, due to cold temps and an unheated garage, I am very happy with the build quality.

The mounts are exactly as described by PeterL.

Having no experience with 3D printed parts, I wasn't sure what to expect as far as the material goes. These feel solid and have a little bit of weight to them. Definitely not generic plastic pucks.

The only problem with them is one of my own making. The mounts for the lights I picked use an M6 bolt as the main fastener, while the Pod Perches are set up for an M8 bolt. All is good, as this gave me an excuse to go to the local "old school" hardware store and do some shopping. ;) Nothing a new drill, bit set, vice and M8 bolt couldn't cure. I'll just drill out the mounts that came with the lights and wait for temps above 25 F to install.

Chuck
 

Attachments

  • mount_1.jpg
    mount_1.jpg
    85.2 KB · Views: 149
  • mount_2.jpg
    mount_2.jpg
    94.6 KB · Views: 144
I'd be interested to know if this is a common issue. I designed these for 8mm because that was what every light I've installed (at least those I can REMEMBER installing) were all M8. I can supply an M6 version as well if enough folks require/request that. It would be a fairly easy modification to my design.

Chuck- I'm glad first impressions are positive, hopefully the long term will be likewise. Looking forward to hearing of your experiences. Also, while I put it in the install notes, I want to stress for everyone's benefit: do NOT use a mounting bolt longer than 25mm. You don't even really need that, as the coupling nut gives you w-a-y more thread area than a 'regular' nut. Anything longer than 25mm would run into the pot metal mirror base piece. It wouldn't end well (for the mirror).

Peter
 
PeterL said:
I'd be interested to know if this is a common issue. I designed these for 8mm because that was what every light I've installed (at least those I can REMEMBER installing) were all M8. I can supply an M6 version as well if enough folks require/request that. It would be a fairly easy modification to my design.

Chuck- I'm glad first impressions are positive, hopefully the long term will be likewise. Looking forward to hearing of your experiences. Also, while I put it in the install notes, I want to stress for everyone's benefit: do NOT use a mounting bolt longer than 25mm. You don't even really need that, as the coupling nut gives you w-a-y more thread area than a 'regular' nut. Anything longer than 25mm would run into the pot metal mirror base piece. It wouldn't end well (for the mirror).

Peter

Just as a side note, I didn't go with any of the big name light manufacturers (Denali, Advmonster...), as I am not made of money.  ;D

Instead I opted for 7watt, 2", 25 degree spot LEDs from SuperBrightLeds:
https://www.superbrightleds.com/moreinfo/led-light-pods/led-light-pod-2-round-led-off-road-work-light-7w-700-lumens/1386/12992/

Little did I realize that they mention the mount bolt size right on the specifications... reading comprehension fail on my part. But, easily fixable.

Chuck

 
MARCH 20, 2019 update
===============

One of my initial purchasers just reported the protruding nubs on the top face do NOT work with his C14. I haven't heard from any others as yet, but I shut down the eBay link until I insure everyone who bought a set is happy.

My test beds were only two bikes, my own 2008, and a 2013 belonging to a riding buddy. Needless to say, both bikes accepted the prototypes with no fit issues or I'd have never offered these to others. Any early-adopter who DOES experience an issue will get a proper replacement or a refund as they wish.

More to come as this is resolved I'm sure.

Peter
 
I just did a little test fit by holding it up against the mirror and the alignment nubs fit just fine on my 2016.

Chuck
 
PeterL said:
MARCH 20, 2019 update
===============

One of my initial purchasers just reported the protruding nubs on the top face do NOT work with his C14. I haven't heard from any others as yet, but I shut down the eBay link until I insure everyone who bought a set is happy.

My test beds were only two bikes, my own 2008, and a 2013 belonging to a riding buddy. Needless to say, both bikes accepted the prototypes with no fit issues or I'd have never offered these to others. Any early-adopter who DOES experience an issue will get a proper replacement or a refund as they wish.

More to come as this is resolved I'm sure.

Peter

You informed me that I got set #2 I will check fitment this weekend and let you know.
 
I test fitted them last night.  They fit my 2015 just fine and I am completely happy with my purchase.  I have privately offered my petty nitpicks to Peter, but they are cosmetic in nature.  Since I have not purchased auxiliary lights yet, no pictures of my install.  And since I am taking a trip to Texas in the next few weeks, and I never violate the 'add stuff to or modify your bike and take off on a 2000 mile trip the next day'.  Let's face it...selling products can be difficult on this forum because we are a tough crowd.  So if I was you, I'd buy a set NOW while you can get them!
 
Managed to test fit mine tonight.

The perches are mounted, but it is still too cold to be removing plastics to wire up the lights.

On my 2016 model, I had to use longer bolts on the outboard screws: 2.25" (~57mm). Other than that, they bolted right up.

As soon as it is warm enough to fiddle with plastics, I'll get my lights and relay all wired up.


Attachments

  • perch_test_fit.jpg
    perch_test_fit.jpg
    171.7 KB · Views: 268
UPDATE- March 25
============

I've just suspended the eBay link once again. One of my customers found the fit on his 2012 C14 to be significantly off level when attached to the mirror base. Obviously, this is not what was promised nor what I wish to deliver. I'm running off a modified set of mounts for him, but am having to just eyeball the needed correction. It will be next week before he can receive and install, so there will be no further sales until he (and I) are satisfied.

Anyone who encounters anything similar can get either a new, revised set (once vetted), or an immediate refund.

Thank you all,

Peter
 
Peter,
Are you saying that these should be level in two planes - meaning "side to side" as well as "front to back"?
Thanks,
Jeffrey
 
Side to side should be essentially level. I left the front-rear axis alone, as the mirror base had a slight downward slope here which seemed to work well for aiming lights. It would not be a huge trick to eliminate that as well. My testbeds were only 2 bikes, so I rather figured that I'd be making revisions. It's the inexplicable  works-on-one-doesn't-work on-another reports that have me perplexed. But I am firmly devoted to making sure everyone gets a product they are happy with. I'm still hoping for more feedback from purchasers, either here or by PM, before I open this up on eBay again. I need to know what is right or wrong with the design as seen through other's eyes.

The photos here I took today, doing a test mount of my new V2 prototype. Shot #1 shows the angle measured atop the gas cap, with my bike on the centerstand. Less than 3 degrees off level. Shot#2 shows the side-to-side angle of the Kawi mirror base- 25 degrees was the angle I used for my design. Shot#3 is of the prototype with screws (2x45mm & 1x40mm) which gives between 17 to 19 mm of exposed thread, which was more than sufficient to secure with room to spare, at least on my 2008. And last- shot#4 shows the puck in place, showing a side-to-side angle basically identical to the gas cap reference point.

This geometry is the same as on the V1. Changes made were to reduce the side-to-side length by about 5mm to reduce the amount the original extended past the mirror base. I'm working on modeling the curvature that Kawi  put there for some reason, I'm just not there yet.  I also increased the depth of the recess for the mounting bolts by a few mm, in response to a request to allow use of allen cap bolts. And I shrunk the diameter of the locating nubs by .5mm, as I had one purchaser that found the original would not work on his 2014. Only one such report, but it doesn't affect the function of the nubs, which is to simply insure a  repeatable and rotation-proof locating key, and I want these to work for ANY C14.
 

Attachments

  • level reference.jpg
    level reference.jpg
    164.4 KB · Views: 176
  • 2008 mirror base lateral.jpg
    2008 mirror base lateral.jpg
    168.2 KB · Views: 173
  • V2 prototype 001.jpg
    V2 prototype 001.jpg
    203.4 KB · Views: 189
  • V2-001 installed.jpg
    V2-001 installed.jpg
    145.2 KB · Views: 157
And.. we're seemingly open for business once again.

I've now sent out V2 Pod Perches to 3 purchasers. All 3 had issues, DIFFERENT issues (!) mind you, with the V1.  In all cases the replacements went on cleanly and everyone seems satisfied. (I hope I didn't just jinx myself)

I've reposted on eBay:
https://www.ebay.com/itm/123747985664
with marginally better photographs.

I did up the price by $5, sorry. It's either that or somehow convince "She Who Manages The Budget" that our last electrical bill was a deliberate fiscal attack by Eco-extremists. After 35 years with me, she doesn't convince all that easily anymore...

Thanks for all the kind words and support from everyone,

Peter
 
Not a customer, but GREAT service and attention to your customers! Well done!    :pDT_Armataz_01_37:  :sign0098:
 
NOW...I am curious after reading....kudos to you for the perfection...but curiosity has me wondering if the mirrors on the 2008 you have picture will have the same geometry as my current 13.

EDIT. NVM I am going to order a pair of these and wire everything up now that the weather is better. Pics are really good ....THANKS
 
Great service and support from Peter on these.

I have a pair of the v1.0 perches that didn't fit too well on my 2016. Mainly the angle was off and there was a gap between the perch and the mirror surface.

Peter sent me the updated version 2.0 perches and they are much improved. There is no appreciable gap between it and the mirror and the angle is level. They will be staying on the bike.  :13:

Attached are pics of a pair of 2" round LED light pods from superbrightleds.com mounted, but not really aimed yet.

Chuck
 

Attachments

  • 20190425_155144.jpg
    20190425_155144.jpg
    69.5 KB · Views: 202
  • 20190425_154736.jpg
    20190425_154736.jpg
    175.5 KB · Views: 208
  • 20190425_154730.jpg
    20190425_154730.jpg
    204.8 KB · Views: 226
  • 20190425_154705.jpg
    20190425_154705.jpg
    89.6 KB · Views: 273
UPDATE- April 29 2019

I've now sent out a dozen sets of the V2 Pod Perches. Everything I've heard back has been positive, which I appreciate, but I really do want to hear of any issues or suggestions for improvements.  Also- Chuck has graciously allowed me to cross-post one of his photos to my listing on eBay. I wanted to let folks see how they work on newer, shiner C14's. Also he's demonstrably a much better photographer than myself, and having only 3 pictures on the page was just sad.  Thanks Chuck!

UPDATE Redux:

The first **6MM** version of the Pod Perch just rolled off the line. Printer. Whatever. I'll  make up a formal listing for these once I figure out why eBay won't let me make a 'pick list' option unless I give them $$$ monthly for the privilege. For now I'm just putting in a 'By Request' note on the existing listing.
 
Finally got my auxiliary lights mounted.
I had a small problem with the heads of the supplied screws being a little to big for the holes.
Easily remedied with a bench grinder. See attached pictures.
 

Attachments

  • 6DF78EAC-AB39-4939-AEB8-43D2674FA8B9.jpeg
    6DF78EAC-AB39-4939-AEB8-43D2674FA8B9.jpeg
    102.3 KB · Views: 173
  • 96ADC82D-510C-4FCA-B6E1-0998CFEE2C15.jpeg
    96ADC82D-510C-4FCA-B6E1-0998CFEE2C15.jpeg
    57.9 KB · Views: 207
  • ABE677D1-EDE5-4D26-A91D-5639506FF1C2.jpeg
    ABE677D1-EDE5-4D26-A91D-5639506FF1C2.jpeg
    44.8 KB · Views: 199
  • E45986F0-4FCB-4507-9964-4C3872CBDBF7.jpeg
    E45986F0-4FCB-4507-9964-4C3872CBDBF7.jpeg
    49 KB · Views: 204
After four years of wanting a set of these (pCA's) I just ordered a set from Peter!  :great:
Immediate response and shipping, thanks Peter!

Trying to decide which lights to get, but leaning towards Denali D4's with Amber Kit.

I'll post up when I'm done with the install....but it may take a week or two.

GREENBIKER:
Which lites are those??
Can you dump a link on the thread please??

Thanks,
gr
 
Bought these lights from Amazon.ca
I am very happy with the light pattern, strength and especially the value.
These might be replaced with something costing more in a couple of years but I am satisfied with the performance.

Here is the link

Flush Mount Led Pod Lights 48W Pencil Beam Offroad Driving Fog LED Light Bar Truck Lights Daytime Running Light for SUV UTV Jeep Tacoma Bumper Boat LED Work Light 2PCS https://www.amazon.ca/dp/B07HKV8YMQ/ref=cm_sw_r_cp_tai_w2NaDbDDKGNJ7


Attachments

  • 3A902DDC-BE30-4337-B7CD-8B0FBA02A0BC.jpeg
    3A902DDC-BE30-4337-B7CD-8B0FBA02A0BC.jpeg
    170.9 KB · Views: 131
  • CD365EB0-5F55-4E16-9785-2EF29B38AC08.jpeg
    CD365EB0-5F55-4E16-9785-2EF29B38AC08.jpeg
    147.5 KB · Views: 146
Very nice
Well since the competition has closed shop, you have a special product here.
You may want to ask about becoming an industry support here on the site, if your going to keep making these.

Great Item!
 
Thought I'd finally post some pics of my install with Peter's Pucks, and my new Denali DR1 lights.

I too have offered my nit-picks to Peter, and he has been most gracious and accomodating!
Very nice product, and so thoughtfully crafted. Can't say enough about his demeanor and responsiveness.
This is a great option for safely and firmly mounting a set of aux. light to the front of your C14.

Not the best pics, but here's how it turned out:


Attachments

  • Dr1b.jpg
    Dr1b.jpg
    129.4 KB · Views: 146
  • Dr1a.jpg
    Dr1a.jpg
    99.9 KB · Views: 150
  • DR1c.jpg
    DR1c.jpg
    86.1 KB · Views: 146
  • Dr1d.jpg
    Dr1d.jpg
    75 KB · Views: 159
I recently picked up a set of Peter's pod perches off of the ebay site.  Nice product, but a ran into a snag when one of the 6 screws wouldnt thread I to any of the 6 holes on the mirror mount.  I contacted peter and he offered to send me a replacement set.  Not 1 screw but all 6.  I told him to hold off and I'd see if i could find one at Lowes.  Lol.  He didnt hesitate and  sent me out the set of 6 screws. 

Talk about customer service!!!  Well done Peter, well done....!!!
 
I just ordered and received my set with the M6 mounting bolt size. They showed up almost instantly and look to be well made and thought out. It will be a month before I get to use them. I have no room in my garage so the bike was shipped and is in my warehouse at work until I sell a few toys to make room. Nice instructions came with them also.
 
I am having increasing difficulty in procuring the Carbon Fiber-ABS filament that I've been using for the Pod Perches.  I have enough on hand for probably another 10 sets or so, but after that things may have to change a bit. Yep, that means they'll cost more. Sorry.

The next best material after ABS looked to be PETG. This is also extremely UV resistant, a primary criteria for anything you plan to mount on a motorcycle IMHO. Unfortunately, and after months of testing, this compound doesn't seem able to produce a smooth surface finish. One of the banes of PETG is a tendency toward "stringing", where when the print head moves from one place to another the material continues to ooze from the print orifice, leaving your machine looking rather like a Tim Burton version of Charlotte's Web.

I've just ordered a new candidate for testing. This is a Polycarbonate filament infused with carbon fiber. PC as you probably know is what they make bulletproof windows out of. So it SHOULD do well attached to your Connie. I'll just have to see how it prints, what modifications I may have to make to put this into production, and honestly- what it looks like once printed. I've had several "Black" filaments come out sort of translucent grey after printing. Not really meeting my target of 'blend with the bike".

I'll try to keep everyone updated on what's happening.

Regards,

Peter
 
Top