
-
WOULD YOU LIKE TO BE ABLE TO POST? REGISTER FOR COG MEMBERSHIP
All registration must be done through the club's main webpage: To register / join COG, click here
For instructions to convert to full membership, click here
-
Can't post after logging to the forum for the first time... Try Again - If you can't post in the forum, sign out of both the membership site and the forum and log in again. Make sure your COG membership is active and your browser allow cookies. If you still can't post, contact the COG IT guy at IT@Concours.org.
You are using an out of date browser. It may not display this or other websites correctly.
You should upgrade or use an alternative browser.
You should upgrade or use an alternative browser.
FREE POWER (you're gonna like this one!)
- Thread starter Steve in sunny Fla
- Start date
revrev
Training Wheels
If you are planning on adding an additional ground wire and would like to keep your wiring with the factory color codes I found this source for Kawasaki black/yellow ground wire on Ebay:
http://www.ebay.com/itm/181238751206?ssPageName=STRK:MEWNX:IT&_trksid=p3984.m1439.l2649
"OEM colored electrical wire that matches original manufacturers colors. Black / Yellow Stripe - Originally used by Kawasaki for ground wire.
13 Foot Long Roll
14 Amp / 12 Volt Capacity"
As I write this there are two 13' rolls left for $8 each.
The wire that Revrev told us about had sold out in December.
It is currently re-listed.
I just ordered a roll.
Thanks Revrev
Ride safe, Ted
It is currently re-listed.
I just ordered a roll.
Thanks Revrev
Ride safe, Ted
Hi all, I did Steve's mod while he's working on my carbs. Easy day just like his video. I also ran the aux ground to the bolt near the
rear brake res.
I did make a change in I went up a size on the wire. I figured it could only help. If that was dumb let me know") . I also wanted to pass on something I found that you might want to take a look at. when I removed the coils to access the valve cover I noticed that the coil ground lug (left coil fwd) was almost completely covered in paint. I find it hard to believe that was working very well. I would have looked right past this before reading of the ground issues. Any way, I removed all of the paint from the lug and when I re-install the coils I'll coat the lug with dielectric grease. Check it out next time you have the tank off. FX
. I also wanted to pass on something I found that you might want to take a look at. when I removed the coils to access the valve cover I noticed that the coil ground lug (left coil fwd) was almost completely covered in paint. I find it hard to believe that was working very well. I would have looked right past this before reading of the ground issues. Any way, I removed all of the paint from the lug and when I re-install the coils I'll coat the lug with dielectric grease. Check it out next time you have the tank off. FX
rear brake res.
I did make a change in I went up a size on the wire. I figured it could only help. If that was dumb let me know
. I also wanted to pass on something I found that you might want to take a look at. when I removed the coils to access the valve cover I noticed that the coil ground lug (left coil fwd) was almost completely covered in paint. I find it hard to believe that was working very well. I would have looked right past this before reading of the ground issues. Any way, I removed all of the paint from the lug and when I re-install the coils I'll coat the lug with dielectric grease. Check it out next time you have the tank off. FXGood Catch..............
I'm still working on the little things for this years Winter Project.
I did solder both ends of the ground wire upgrade for the ignitor.
What I have also done is to find most all of the bullet connectors and cleaned them. Slow process, but found a couple of nasty ones.
Stephen
I'm still working on the little things for this years Winter Project.
I did solder both ends of the ground wire upgrade for the ignitor.
What I have also done is to find most all of the bullet connectors and cleaned them. Slow process, but found a couple of nasty ones.
Stephen
hazy14
Crotch Rocket
Smooooth said:Good Catch..............
I'm still working on the little things for this years Winter Project.
I did solder both ends of the ground wire upgrade for the ignitor.
What I have also done is to find most all of the bullet connectors and cleaned them. Slow process, but found a couple of nasty ones.
Stephen
Geeze SMooooth...winter is over......it's spring!!!!!! :whoo:
You gonna finish this project of what? :19:
secarob
Moped
Hazy said:I think I spoke too soon... 30's most of the week.
:'( Yes you did AND snow on Tuesday
ENOUGH OF THIS WINTER!!hazy14
Crotch Rocket
secarob said:Hazy said:I think I spoke too soon... 30's most of the week.
:'( Yes you did AND snow on Tuesday
Now Secarob, you have absolutely NO EXCUSE not to get in your garage and get those cams done.
Did this mod mid-winter (such as it was here in chilly Northern California) and first day was phenomenal. Bike warms up immediately and even cold it pulls without gasping -- much better than before.
Bike's running so much stronger that it highlighted a clutch maintenance issue I've been ignoring -- bled the nastiest load of gunk yesterday -- and now I'm back on the road with the shiniest performing bike ever!
Thanks. Wish every performance improvement was this easy.
Bike's running so much stronger that it highlighted a clutch maintenance issue I've been ignoring -- bled the nastiest load of gunk yesterday -- and now I'm back on the road with the shiniest performing bike ever!
Thanks. Wish every performance improvement was this easy.
Finally able to move my bike over to center stage for some little updates.......
Did the wiring this evening and YES IT DOES WORK!!
Cold engine, little bit of enrichment, not full, hit the button and she fired right up.
Smooooth idle and was able to back off the enrichment within 30 seconds.
Thanks Again Steve!!!!!
Stephen
Did the wiring this evening and YES IT DOES WORK!!
Cold engine, little bit of enrichment, not full, hit the button and she fired right up.
Smooooth idle and was able to back off the enrichment within 30 seconds.
Thanks Again Steve!!!!!
Stephen
squishman said:What does the term "hot starting" mean. I saw it mentioned a couple times in this thread.
Thanks Steve for another great mod!
Squish,
It means the engine is already at, or very close to, normal operating temperatures.
Matt
ppenrose
Street Cruiser
Poor/insufficient grounding on a motorcycle? Say it ain't so! Seriously, my K100 had similar problems. I upgraded the critical ground paths on that bike and it solved a number of niggling problems. I got my C10 last year and have not had time to do too many mods yet, but this one is now at the top of my list. Probably this Friday since I have the day off. My bike has the same cold starting/idling problems as others have described here, so I'm looking forward to curing that.
Mettler1
Sport Tourer
Paul, welcome to the Forum.Paul said:Poor/insufficient grounding on a motorcycle? Say it ain't so! Seriously, my K100 had similar problems. I upgraded the critical ground paths on that bike and it solved a number of niggling problems. I got my C10 last year and have not had time to do too many mods yet, but this one is now at the top of my list. Probably this Friday since I have the day off. My bike has the same cold starting/idling problems as others have described here, so I'm looking forward to curing that.
Yes, the ground wire is a good place to start. There could be other reasons but this is cheap and easy. Enjoy the bike and the people here. Tomppenrose
Street Cruiser
Just finished the mod. Crimped and soldered the ring connector; I've learned the hard way over the years not to trust crimps. Good mechanical strength (if done right), but electrical conductivity will degrade over time, especially in a potentially wet environment like a motorcycle. On the other end I carefully stripped off some insulation the BK/Y wire, wrapped the new one onto it and soldered that connection as well. Then I taped it all back up with good 3M electrical tape. I've also learned not to cheap out on small supplies - get the good stuff. While I was at it, the negative battery terminal and the ring connectors there looked a little corroded, so I cleaned them off with a soft wire brush. When I fired it up (cold, 60F ambient), it caught right away and idled like it was hot. Nice! > Thanks for finding and posting this Steve! The rough cold start was about the only thing I didn't like about my Connie.
Thanks for finding and posting this Steve! The rough cold start was about the only thing I didn't like about my Connie.Well I finally got around to doing this mod, but I only have one regret, WHY DID I NOT DO THIS SOONER !!! I noticed the difference in the bike as soon as I cranked and rode it. My bike was already the fastest stock bore, naturally aspirated Connie on the planet, but now its even faster. Can't wait to get to the national and show off my muscles >. Thank you Mr. Steve for another great idea.
. Thank you Mr. Steve for another great idea.I decided to check out my bike re this mod. measured the voltage dropfrom the battery to the igniter connector and it was .2 volts. I did as Steve recommended, cut the wire and soldered a new one in. soldered both ends. Now the drop is 3.5 millivolts, quite a difference. I checked both readings with two different DVMs and they were the same. So it should run better. going on a trip next week to the SW area shindig in Prescott, so will see how it runs then. I have had the same problem starting in the winter as some one else talked about here. wouldn't keep running until it started two or three times, so maybe this will help with that, but my winter starting was a lot better when I replaced the battery last year. that old battery was 8 years old!!!! Strange, one day it just wouldn't work anymore!!
I see that, according to my Clymer manual, there is at least one connector and one junction in the wire from the igniter to the battery. the drop is probably in those connections, if one could find them, Easy mod. thanks Steve.
I see that, according to my Clymer manual, there is at least one connector and one junction in the wire from the igniter to the battery. the drop is probably in those connections, if one could find them, Easy mod. thanks Steve.
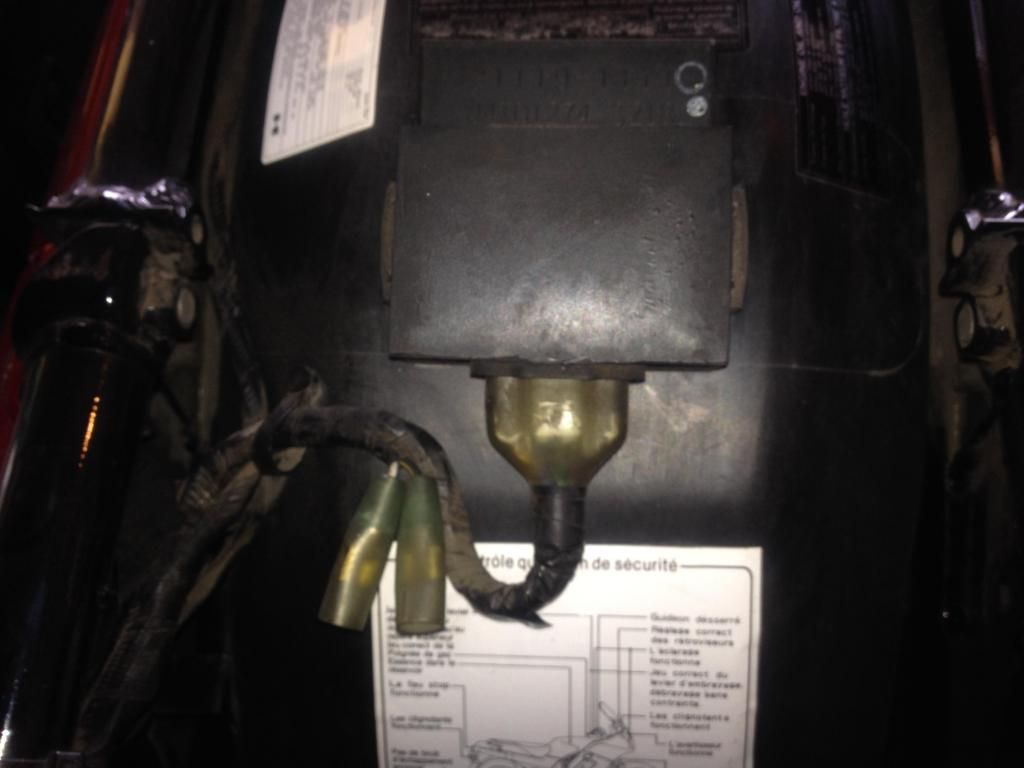
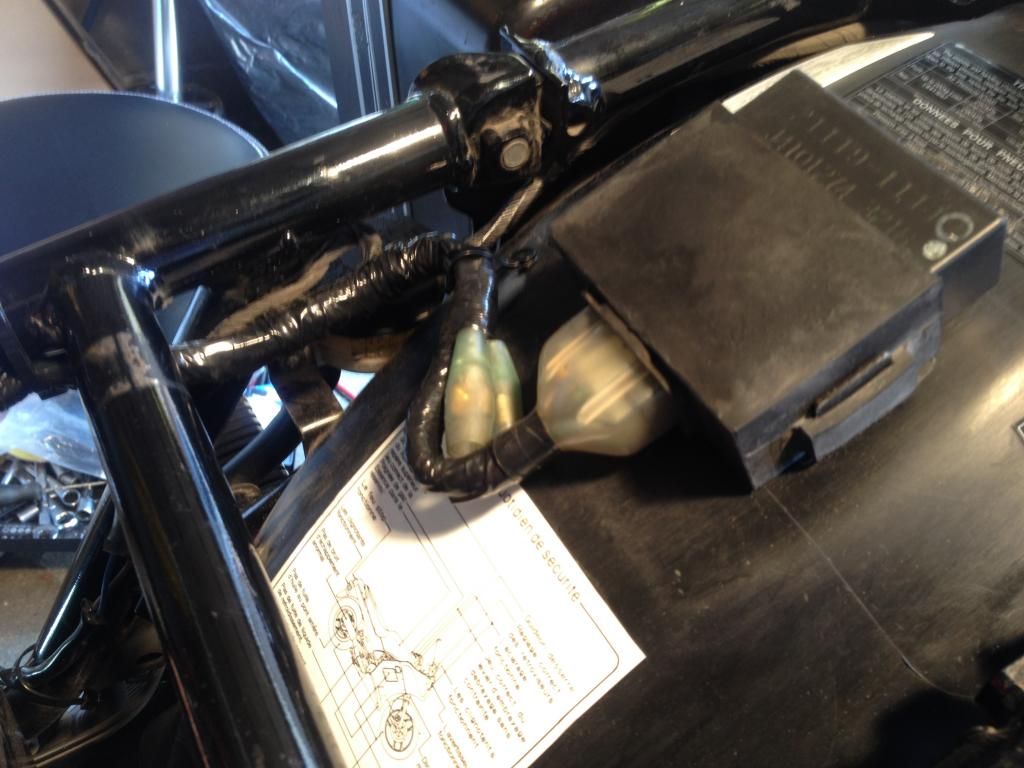
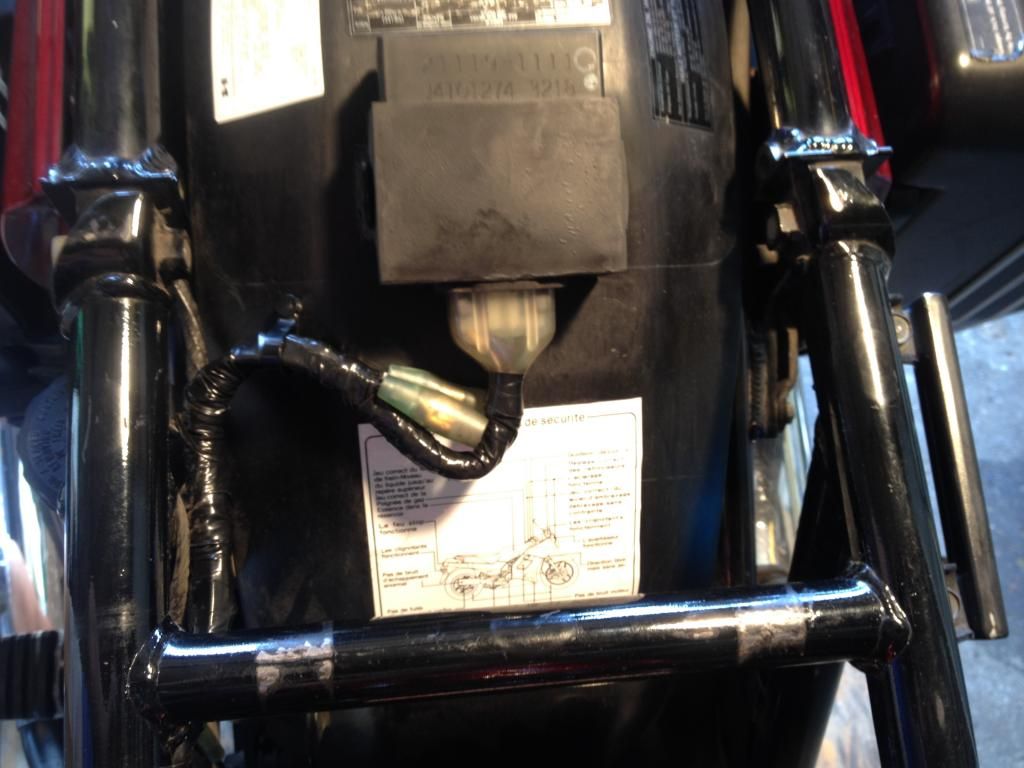
I finally decided to do this mod and have a question. While checking the Jbox connectors with multi-tester I noticed that it has 2 ground wires, not just BLK-Y but also solid BLK, which is right above the first one. So, the questions for electics gurus - why is there 2 ground wires, and should I ignore solid black one?
This mod is for the ground wire from the Ignitor Box, not the JBox. The Ignitor is the black box that is mounted on the fender, under the seat.Carlson said:I finally decided to do this mod and have a question. While checking the Jbox connectors with multi-tester I noticed that it has 2 ground wires, not just BLK-Y but also solid BLK, which is right above the first one. So, the questions for electics gurus - why is there 2 ground wires, and should I ignore solid black one?
Outback Jon said:This mod is for the ground wire from the Ignitor Box, not the JBox. The Ignitor is the black box that is mounted on the fender, under the seat.Carlson said:I finally decided to do this mod and have a question. While checking the Jbox connectors with multi-tester I noticed that it has 2 ground wires, not just BLK-Y but also solid BLK, which is right above the first one. So, the questions for electics gurus - why is there 2 ground wires, and should I ignore solid black one?
I thought Ignitor and JBox is 2 names for the same thing... I guess I was wrong
Anyway, I was talking about that black box under the seat.Carlson said:Outback Jon said:This mod is for the ground wire from the Ignitor Box, not the JBox. The Ignitor is the black box that is mounted on the fender, under the seat.Carlson said:I finally decided to do this mod and have a question. While checking the Jbox connectors with multi-tester I noticed that it has 2 ground wires, not just BLK-Y but also solid BLK, which is right above the first one. So, the questions for electics gurus - why is there 2 ground wires, and should I ignore solid black one?
I thought Ignitor and JBox is 2 names for the same thing. Anyway, I was talking about that black box under the seat.
Your J-Box holds your fuses and relays. It is located behind the left side panel. The ignitor box is the 'brain' of your
ignition system.
Mcfly said:Your J-Box holds your fuses and relays. It is located behind the left side panel. The ignitor box is the 'brain' of your
ignition system.
Thanks for clarifying that. :great:
The question, however still stands, should anything be done with the second ground wire (solid black one).
Mettler1
Sport Tourer
Just the black with yellow stripe. Splice in a wire and attach it to a good ground. Not the yellow wire with the black stripe or any other wire.Carlson said:Mcfly said:Your J-Box holds your fuses and relays. It is located behind the left side panel. The ignitor box is the 'brain' of your
ignition system.
Thanks for clarifying that. :great:
The question, however still stands, should anything be done with the second ground wire (solid black one).
higworld
Bicycle
My story.
I jumped the ground directly to the battery the other week, retaining the existing ground as well (per the updated instructions). Is there a difference? Maybe. Not sure. It might start easier. Then again, it's getting warmer. It runs great, but honestly I'm having a tough time comparing in my head.
Bottom line is yes, I think it made the bike a little more responsive/smoother and easier to start. Costs nothing but two clips and a bit of wire. (One day I'll solder them correctly, I suppose). But does it add 100 HP and gobs of torque? No. Better running bike, perhaps. But if you're looking at this as a hot rod solution, I think you might be disappointed.
Won't hurt anything and smooths things out a bit, so why not. Every little bit helps, right?
:great:
I had seen this mod when it was first "posted"; followed every ones remarks and made a "mental note" to try it [bad idea there]. Yesterday I finally took the time to look at the mod [on line and physically look at my '86]. As reported, 20 minutes of time, spare materials on hand and it was done. Shop temp was about 65*; bike hadn't been started in over a week [or more]; a little choke, a couple of pokes on the starter button and she fired right up. Choke off almost immediately and bike settled in to idle after about a minute @ 1100rpm. [Usually I'd have to set the throttlemeister to keep it going for at least two minutes before releasing the choke.]
I just tapped into the black/yellow with a "T" type splice; soldered a bullet to one end for the splice; and ran a 14awg to the battery with a soldered ring terminal. I followed the wire loom from the igniter to the battery and all was good.
I haven't ridden it yet to test with the "seat dyno", but I will soon. Thanx to all for their input and to SISF for the video, well done.
FasteRocket
Bicycle
Looking forward to this mod . Gonna do it this Sunday . Will be soldering . Do not like those crimpy thingys one bit . They corrode like buggers .
Also using 3M Automobile Electrical tape for resealing .
Just brilliant by the sounds of things .
Thanks Steve :great: :great: :great:
Also using 3M Automobile Electrical tape for resealing .
Just brilliant by the sounds of things .
Thanks Steve :great: :great: :great:
FastRocket said:Looking forward to this mod . Gonna do it this Sunday . Will be soldering . Do not like those crimpy thingys one bit . They corrode like buggers .
Also using 3M Automobile Electrical tape for resealing .
Just brilliant by the sounds of things .
Thanks Steve :great: :great: :great:
IF I ever use crimp connectors (and I do sometimes), I always put some heat shrink tube over the connector.
This works well, but I agree there's no substitute for solder. Crimps are big and bulky in comparison too.
stevedap
Mini Bike
Mcfly said:FastRocket said:Looking forward to this mod . Gonna do it this Sunday . Will be soldering . Do not like those crimpy thingys one bit . They corrode like buggers .
Also using 3M Automobile Electrical tape for resealing .
Just brilliant by the sounds of things .
Thanks Steve :great: :great: :great:
IF I ever use crimp connectors (and I do sometimes), I always put some heat shrink tube over the connector.
This works well, but I agree there's no substitute for solder. Crimps are big and bulky in comparison too.
I've read that a properly executed crimp joint will be mechanically and electrically more reliable than a soldered joint - especially in a high vibration environment. I've tried both methods and personally I prefer crimping to soldering. The key is using a decent ratchet type crimping tool and the right type of crimp connectors.
FasteRocket
Bicycle
Mcfly said:FastRocket said:Looking forward to this mod . Gonna do it this Sunday . Will be soldering . Do not like those crimpy thingys one bit . They corrode like buggers .
Also using 3M Automobile Electrical tape for resealing .
Just brilliant by the sounds of things .
Thanks Steve :great: :great: :great:
Yup ,,,big heat shrink user myself
IF I ever use crimp connectors (and I do sometimes), I always put some heat shrink tube over the connector.
This works well, but I agree there's no substitute for solder. Crimps are big and bulky in comparison too.
FasteRocket
Bicycle
stevedap said:Mcfly said:FastRocket said:Looking forward to this mod . Gonna do it this Sunday . Will be soldering . Do not like those crimpy thingys one bit . They corrode like buggers .
Also using 3M Automobile Electrical tape for resealing .
Just brilliant by the sounds of things .
Thanks Steve :great: :great: :great:
IF I ever use crimp connectors (and I do sometimes), I always put some heat shrink tube over the connector.
This works well, but I agree there's no substitute for solder. Crimps are big and bulky in comparison too.
I've read that a properly executed crimp joint will be mechanically and electrically more reliable than a soldered joint - especially in a high vibration environment. I've tried both methods and personally I prefer crimping to soldering. The key is using a decent ratchet type crimping tool and the right type of crimp connectors.
Very interesting . I did not know that ,,, Thanks :great: :great: :great:
Posted this to my "gremlin" thread as well, but figured SISF needed more public recognition for his mod to the ignitor:
Today I am a happy biker, at least for now. Call me PISNS (Pete in sunny Nova Scotia), though SISF deserves the credit for my smile.
Spent days testing, fiddle-faddling, mucking about and generally standing on my head trying to trace a loose or shorting wire to no real end. The zip tie holding the harness to the small frame cross under the seat was cut and a small piece of sound deadener placed between frame and harness. A few accessories like heated grips and 12V socket were connected better with solder, better wrap, etc., battery connections cleaned. Whether these did anything only time will tell. Hopefully it won't be in the middle of nowhere with no cell service.
Before putting baby back together, I decided to try SISF's ground modification to the ignitor.
Wow. For the 10-minutes it took (plus the half hour of worrying I'd screw it up) this is the best single thing I've ever done. The result is truly a WOW.
What are the differences from before?
*absolutely instant start
*instant throttle response
*no low RPM chug
*hit the key and the system powers up with snap
*runs more smoothly
*for some reason everything seems to work better - shifts are easier and slicker, which should not be.
I can't believe the difference such a small change produced. My C10 usually takes a few starter yips to get going. My old 650 Maxim started with barely any starter turn; now that's how Connie does it. For my last-minute decision I used a larger wire with a circular connecter at one end. The black wire yellow stripe under the ignitor was cut and this new lead soldered on. It was long enough to connect directly to the battery, which seemed like a good idea.
You have to do this change. It's a 10-cent investment worth a few hundred dollars of result. Simply amazing!
Still hoping the short was either cured, averted or fixed itself... Thanks SISF!
Steve in Sunny Florida,
I posted several weeks ago about my 99 having issues around 3-4 grand in the rpm department. After numerous attempts at carbs, coils with wires, spark plugs, new K&N air filter to no avail your wire trick solved all my problems!!!! I don't know how you figured this mod out but I am truly grateful for your discovery. I have been fighting this poor running problem for about three years and I was about to pull what little hair I have left out of my head trying to figure out what the problem was. The ole girl runs great now and even though I did replace a lot of parts they are over fourteen years old and probably needed to be replaced. Thanks again for being the brains who figured it all out!! You rock!!!!!!!
I posted several weeks ago about my 99 having issues around 3-4 grand in the rpm department. After numerous attempts at carbs, coils with wires, spark plugs, new K&N air filter to no avail your wire trick solved all my problems!!!! I don't know how you figured this mod out but I am truly grateful for your discovery. I have been fighting this poor running problem for about three years and I was about to pull what little hair I have left out of my head trying to figure out what the problem was. The ole girl runs great now and even though I did replace a lot of parts they are over fourteen years old and probably needed to be replaced. Thanks again for being the brains who figured it all out!! You rock!!!!!!!
RodWpg said:I crimped and soldered
Congrats! You win the Optimum Compensation Distinction Award, or 'OCD', for short....
FasteRocket
Bicycle
I perhaps went to the extreme in the Electrical performance improvement mod but I like thinks to be stock and look stock . I also like things to be hidden so take a look and see what I did .
Yes it will take more than 20 mins . I could have done it in 20 but I am retired so no rush .
:motonoises: :motonoises: :motonoises:
Can you see any difference or extra wires ,crimps or welds ? other than new 3M fire proof tape ...
No wires were cut or spliced during the picture taking of these pics ...
Before
After
Yes it will take more than 20 mins . I could have done it in 20 but I am retired so no rush .
:motonoises: :motonoises: :motonoises:
Can you see any difference or extra wires ,crimps or welds ? other than new 3M fire proof tape ...
No wires were cut or spliced during the picture taking of these pics ...
Before

After


yeah, that's how mine looks too. :beerchug: Steve
FasteRocket
Bicycle
Steve in Sunny Fla said:yeah, that's how mine looks too. :beerchug: Steve
:beerchug: Mike
FasteRocket
Bicycle
Mcfly said:Very nice FastRocket, but now you have no proof you did it! :nananana:
I'm not much better though, I've got about 2 miles of black wire cover running
throughout my bike... I like tidy too.
:rotflmao: :great: :beerchug:
FasteRocket
Bicycle
So I was able to go out for a bit :motonoises: on Saturday with the con and wow . The motor is quieter :great:. It runs smoother :great:. It accelerates smoothly :great:. The bike also seems to have less vibration through the pegs and grips :great:.
Well isn't that just weird or what . Very simple mod and look what it does for this bike .
Thank you again Steve
Well isn't that just weird or what . Very simple mod and look what it does for this bike .
Thank you again Steve
O.K. call me a little more than sceptical on this one, but keeping an open mind I tried it on my '05. Did not get to ride it right away due to weather. I knew the starting was quicker and idle seemed smoother when I first started the old girl. Today I got the first chance to ride and I am a beleiver. With almost 25,000 miles on the clock, she has never run better. Way smoother at idle, pulls harder and just seems to have much improved throttle response. Will let you know after a few tanks if the mpg's change. Thank you Steve, right on target again.
leegeek
Tricycle
I was changing brake and clutch fluid this weekend and did the free power mod while I had my tools out. I ended up tapping (solder and tape) into the ground wire and running a short 12 gauge stranded wire straight to the battery, using a crimped eye terminal on the battery.
I also saw a noticeable difference in cold starting my '87 with 45K on the clock. Less enricher... and can idle with no enricher a few seconds after starting.
Another believer! Thanks Steve! :beerchug:
Lee
I also saw a noticeable difference in cold starting my '87 with 45K on the clock. Less enricher... and can idle with no enricher a few seconds after starting.
Another believer! Thanks Steve! :beerchug:
Lee
suncityjack
Tricycle
Pbfoot said:Update. On the ride home this morning I had the opportunity to get on it a little. All I can say is,Wow! Throttle response is like right now. The mid range to top end pull is much stronger. Daddy likes!
Ya.......what he said. Performed it yesterday and morning ride to coffee was great with much better response.
conniesaki
Tricycle
Thanks Steve. My '86 loved this mod. She starts right up. Lights are brighter. And I have to say there is less vibration. Not sure why that is but I like it. It's like she's 20 years younger!
I just got my 3rd Connie about a month ago. I've owned them off and on over the years. This one is a 1998, dark green metallic. It has only 17k miles and is in pristine condition. It has been stored inside for years. Rebuilt the carbs, installed new air box boots, new petcock. The bike started up fairly easy after I put it back together. Then I read this thread and followed SISF's suggestion on the FREE POWER and i\now the bike starts up almost instantly even when it's in the 50's. I know that this mod really helped.
Thanks Steve
Thanks Steve
Pbfoot said:Update. On the ride home this morning I had the opportunity to get on it a little. All I can say is,Wow! Throttle response is like right now. The mid range to top end pull is much stronger. Daddy likes!
How do you like the sonic 1.0 springs? I’m 225 and ordered the 1.1. According to the website i could have gone up to the 1.2; specially since i want to tour with extra weight.
Thanks
Paul.
pbfoot
Crotch Rocket
I was advised to get the .9kg based on my 200lbs. I decided to give the 1kg a try as like a firmer ride. Was a little stiff at first but the cartridge fork emulators helped alot. Perfect matchfir the C14 shock. 1.1kg will be fine. 1.2 to stiffWantabeach said:Pbfoot said:Update. On the ride home this morning I had the opportunity to get on it a little. All I can say is,Wow! Throttle response is like right now. The mid range to top end pull is much stronger. Daddy likes!
How do you like the sonic 1.0 springs? I’m 225 and ordered the 1.1. According to the website i could have gone up to the 1.2; specially since i want to tour with extra weight.
Thanks
Paul.
Would suspect this works so well as you are bypassing a spade terminal connector that is just off the negative battery terminal wires. Cleaning this terminal and/or preferably soldering it would produce similar result would proffer. Just a thought. Hats off to Steve for sharing!
Amazing. This old carbureted bike starts faster than my injected bike! Not sure about more power but simply amazing what 10 minutes and a couple of electrical connectors can do!
I also jumped the ground side of the accessory terminals by the rear brake reservoir and grounded it at the reservoir.
If you don't do this you need to sell your bike!
I also jumped the ground side of the accessory terminals by the rear brake reservoir and grounded it at the reservoir.
If you don't do this you need to sell your bike!
Hi Steve, thanks for this great mod. I'm late to the party here, but thought I'd add to the story. If you look at a modern vehicle wiring harness, you will see frame ground points that collect the various circuit return lines to a common, battery ground derived point. The C10 does not have this configuration as it is apparently the result of theoretical circuit analysis, where the effects of conductor losses are 'forgotten'. In the real world this approach to wiring results in Ground Loops, where separate little voltage drops (i.e. parasitic circuits) occur - the result being an overall voltage drop as these useless parasitic losses drain power from the battery. I worked in the telecommunciations field, where the practice is to establish a single Ground Bus (a big chunk of copper bar) where the various circuits collect to one common ground point in common with the Office battery ground.
Thanks for the reference nosmo, I'm thinking the 2-minute mod would be a good project for winter. Do you have experience with SISF's exhaust cam sprocket?If you think SISF's "free power" mod is good, you should try his 2-minute mod for the carbs, and (too late now) his "7th gear" mod. you really can't imagine what a difference those make. I just wish to heck I'd gotten a set of his torque cams when he was still making them.
Yes, I also have that mod. And the intake cam position reset. These help make a bit more low-end torque, which is particularly effective when combined with the "7th gear" mod. I can put my bike in 4th gear and tour the backroads all day long and not have to shift (actually kind of boring). the"2 minute mod" just flat-out FIXES the carbs. While you're in there, do the overflow tubes if possible.
Too bad I seem to have joined the "no time to ride" club.
Too bad I seem to have joined the "no time to ride" club.