
-
WOULD YOU LIKE TO BE ABLE TO POST? REGISTER FOR COG MEMBERSHIP
All registration must be done through the club's main webpage: To register / join COG, click here
For instructions to convert to full membership, click here
-
Can't post after logging to the forum for the first time... Try Again - If you can't post in the forum, sign out of both the membership site and the forum and log in again. Make sure your COG membership is active and your browser allow cookies. If you still can't post, contact the COG IT guy at IT@Concours.org.
You are using an out of date browser. It may not display this or other websites correctly.
You should upgrade or use an alternative browser.
You should upgrade or use an alternative browser.
front auxiliary light bulb question
- Thread starter maverick9611
- Start date
BULBS
City Lights - 2825 (5w) or 2886 (6w)
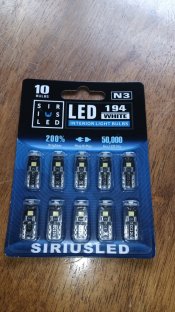
City Lights (LED, inverted cone, white) - 194 or 168
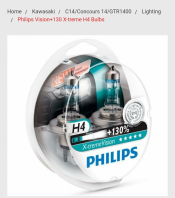
Headlight Bulb 12V-60/55W - 92069-1002 (standard H4)
(Small) Headlight Bulb 12V/5W - 92069-1016
Tail License Plate Bulb - 92069-1055, 5007, R5W (5 watt)
Front/ Rear Turn Signal Bulbs - 92069-1125
Turn Signal Bulbs - 7507A bulbs (BAU15s base)
Hope that helps in ur search...
That info and more like it is in the c14 general discussion. Its a permanently highlighted section with the top 3 posts....
City Lights - 2825 (5w) or 2886 (6w)
City Lights (LED, inverted cone, white) - 194 or 168
Headlight Bulb 12V-60/55W - 92069-1002 (standard H4)
(Small) Headlight Bulb 12V/5W - 92069-1016
Tail License Plate Bulb - 92069-1055, 5007, R5W (5 watt)
Front/ Rear Turn Signal Bulbs - 92069-1125
Turn Signal Bulbs - 7507A bulbs (BAU15s base)
Hope that helps in ur search...
That info and more like it is in the c14 general discussion. Its a permanently highlighted section with the top 3 posts....
thank u sir
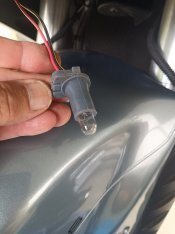
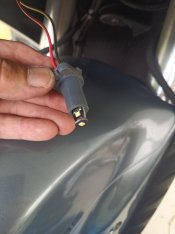
I converted the two small bulbs to LED's when I bought the Pathfinder LED headlight lamps. They are nice & bright and should last about forever.
I also installed a similar small LED lamp for the parking lamp in the headlight in my Triumph Trophy. I got that from Superbright LEDs. - same size as in the Concours, I believe, and cost a lot less than the bulbs from Pathfinder.
Miniature Wedge Base LED bulbs They are polarized so they work only when inserted one way.
Last edited:
thanx
stupid question. how do a access the bulbs?
They're socketed. Go fishing with your hand down in the lower fairing area.stupid question. how do a access the bulbs?
I have my '12 apart at the moment and can get a pic of the area later today.
10/4>outstanding
stupid question. how do a access the bulbs?
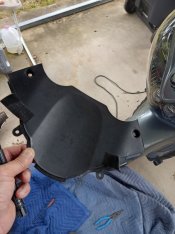
Remove the flat plastic piece under the front nose of fairing, it has 4 push rivets holding it in place. You can then easily reach under to replace them.
sweet
Just did the aux lights last night. If you have long arms you can kneel next to the bike and reach between the forks from the back side and grab both bulbs. No need to remove the panel but it was a stretch.
Removing that panel is so much easier....especially for thise of us eith t-rex arms...
I'm long all over - inseam and arms.
Has its advantages and disadvantages. A cramped riding position needs adjustments to the bike in order to maximize potential mileage between rest stops. And ham-sized fists are always fun come time to reach into that tiny little nook or cranny to retrieve the part you dropped in there.
Has its advantages and disadvantages. A cramped riding position needs adjustments to the bike in order to maximize potential mileage between rest stops. And ham-sized fists are always fun come time to reach into that tiny little nook or cranny to retrieve the part you dropped in there.
EU-mandated. Cheaper to have one headlight assembly for use everywhere than multiple parts for EU and NA/elsewhere.I'm new to the C14. Can someone advise if those lights actually serve a purpose? I'm assuming we're talking about the little lights below the headlights.
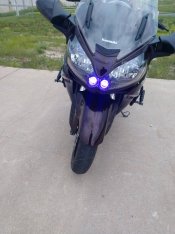
I don't think they really serve a purpose. I put colored bulbs in mine to be "different".I'm new to the C14. Can someone advise if those lights actually serve a purpose? I'm assuming we're talking about the little lights below the headlights.
Attachments
I'm new to the C14. Can someone advise if those lights actually serve a purpose? I'm assuming we're talking about the little lights below the headlights.
I'm pretty sure they come on when the key is on while the main lights only come on when running. Sort of parking lights.
yup, that's right. wow, this thread is takin offI'm pretty sure they come on when the key is on while the main lights only come on when running. Sort of parking lights.
Theres a replacement laser targeting/ranging module, coming soon for those who want to add a missle launching systems on the hard cases....
Use it to take out the cagers who wont get out of the dam left lane....er did i just say that out loud...
Use it to take out the cagers who wont get out of the dam left lane....er did i just say that out loud...
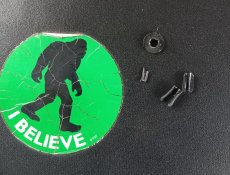
job is finished. reminder: put a blanket/cover on fender! I scratched mine pulling those dumbass plastic rivets. the design of these rivets is flawed. Nissan makes a 1 piece design that superior. (guess kawy didn't get the message) have extra rivets on hand, you will destroy some/curse them.
Attachments

Not meaning to be offensive but.....I (and many others) have found no problem with those rivets. You just have to know how to use them.I scratched mine pulling those dumbass plastic rivets. the design of these rivets is flawed.
Looking at this photo I'm thinking there was some operator error involved?
That aside, nice work. Are those HyperWhites under the intake areas or some other brand of LEDs?
yup, they are indeed hypers.
please give me your secret on the nasty rivets. i'm a brute with em
please give me your secret on the nasty rivets. i'm a brute with em
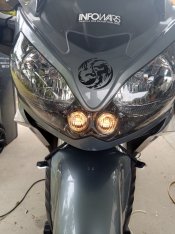
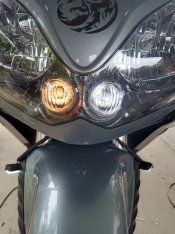
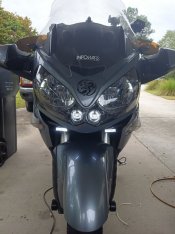
these do match better than stock lights. not perfect but better. I hope this helps if your on the fence
Those aux lights match the marker lamps just fine. Pretty nearly identical temperature.
Not being a SA but you do push the pin in?Those aux lights match the marker lamps just fine. Pretty nearly identical temperature.
Yes I do, (I realize you were not asking meNot being a SA but you do push the pin in?
) but for the mavster': the central pin has 3 positions.1st position) is sticking out approx 1/8" (ready to be inserted);
2nd position) after insertion (In honor of BDF..EZ BOYZ!) is pushed in flush with the shoulder of the rivet;
..and 3 position )(important) pushed in approz 1/8" to aid removal.
Now those rivets in the back sides under the seat with the Philips heads....I hate those for sure!!!
I wish they were like the ones up front.
Last edited:
marty you only gave half off the riddle. i understand how they work when being applied. the problem is removal.
in a perfect world i would have access to backside of rivet. i would then push the locking pin backwards which would release flare pressure on the rivet allowing easy removal of rivet from the other side(applying pressure on both sides of rivet head )unfortunately its impossible to do this in some of the locations this design is flawed in my opinion. they get brittle and will self destroy on removal. i think something of this design should be used
in a perfect world i would have access to backside of rivet. i would then push the locking pin backwards which would release flare pressure on the rivet allowing easy removal of rivet from the other side(applying pressure on both sides of rivet head )unfortunately its impossible to do this in some of the locations this design is flawed in my opinion. they get brittle and will self destroy on removal. i think something of this design should be used
Attachments
i did see you said leave out 1/8 of a inch to aid removal. i have seen any rivet on any bike with the rivet lock pin being left out for easy removal. they all look flush to me.
ok, I will try that. thanx
Yes, see step 3 or position 3 in my post. Pushing the pin in takes the pressure off of the expansion tabs inside, but if you have absolutely no fingernail tips then you may need to use something sharp (preferably plastic or wood) to get under the lip of the rivet but then (with the pin pushed in) it should offer almost no resistance to removal. The pin doesn't need to be pushed all the way through just 1/8 inch or so, you should feel it hit a stop if you use a toothpick or a small Allen wrench to depress it. If you use a punch and hammer well then....To remove, you push the center in about 1/8" that will let you pull the rivet out.
I think it's actually an ingenious design. I much prefer it to those ones with all the fins on them.
Good luck with them in the future.
EDIT: Maybe a video is better than words?...pardon my toothpick maneuvering ineptitude, I was working through the screen on my phone...I do much better without the phone in the way. Sorry, I wasn't going to lay on my back and video the rivets under the city lights, I'm just not that nice a person...beside it's Sunday and I only had one cup o' jo.
Video Link
Last edited: