
-
WOULD YOU LIKE TO BE ABLE TO POST? REGISTER FOR COG MEMBERSHIP
All registration must be done through the club's main webpage: To register / join COG, click here
For instructions to convert to full membership, click here
-
Can't post after logging to the forum for the first time... Try Again - If you can't post in the forum, sign out of both the membership site and the forum and log in again. Make sure your COG membership is active and your browser allow cookies. If you still can't post, contact the COG IT guy at IT@Concours.org.
You are using an out of date browser. It may not display this or other websites correctly.
You should upgrade or use an alternative browser.
You should upgrade or use an alternative browser.
Installing 2007 model year ZX14 Exhaust Camshaft in my just purchased 2014 Concours 14
- Thread starter Jeff.C
- Start date


zx14 has a higher redline. Keeping weight off the timing chain will help it live longer.
looking forward to seeing the results... I'm sure you did some baseline dyno pulls for comparison's sake...
BTW I was going to do this a LONG time ago, then got busy doing a bunch of other stuff. I timed the exhaust cam, I expect I have the specs around here somewhere, but I think it has about .5mm more lift and 15* more duration at .050" lift.
Steve

So you're using kapetanidis' mapping? Did he put it on mapshare? I remember when he first posted this online, didn't know he made it public.
BTW, I hope you looked at the oil holes in the cam, for some reason I'm thinking when I was working into this, there was something I was needing to do / study regarding the zx oil holes being different than the zg holes on the right side of the cam. Can't look at it now, i gave the cams to Chris Jones.
ETA - I found the cam timing. ALL timing done at .050" lift
ZG intake w/vvt: LC 120*
OP 10 ATDC
CL 50 ABDC
lift .320
220* @ .050"
ZG EX OP 29 BBDC (has a note that this was on a zx intake sprocket for a 100* LC, no recollection)
CL 1 BTDC
LC 105
.300 lift
208 @ .050"
ZX EX OP 36 BBDC
CL 10 ATDC
LC 103
lift .330
226 @ .050
Steve
Last edited:
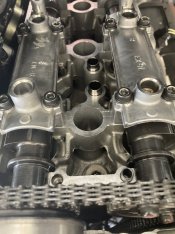
I just checked the ones I have; they weigh the same and look the same. Both are billet. The only difference is the c14 has an oil groove on the journal between the #4 lobes. The zx has .030 more lift and a visually more aggressive lobe profile. So that's really weird, possibly changed it for cost savings, maybe?
I noticed the Greece reference. Not the first time I've heard of it.
I noticed the Greece reference. Not the first time I've heard of it.
Attachments
![20220326_174946[4246].jpg](/data/attachments/31/31919-25ff890b0022bc4390e3950d960e03e2.jpg)
![20220326_174431[4245].jpg](/data/attachments/31/31918-c968c8945ca33845fa801932e8f44216.jpg)
Am I seeing a increase from 133.6/stock to 162 with just the BW Header/Exhaust cam/(Oops and a Mapped ECU)?
What did the plot look like?
ie; Does the cam hurt low end torque and/or does it increase the Hiccups in the plot?
What did the plot look like?
ie; Does the cam hurt low end torque and/or does it increase the Hiccups in the plot?
Last edited:
Any idea which year the billet exhaust cam came out of or part number on it by chance??
Last edited:
no, he's guessing. the bike he has showed 133, and is likely a bit sick. The 162 came from a bike in Greece, and I don't think it was using one of our correction factors.Am I seeing 133.6 to 162 with just the BW Header/Exhaust cam?
What did the plot look like? ie; Low end torque or Hiccups in the plot?
Steve
I see that the part number changed from 09 to 10. See posts 21 and 22 for accurate infoAny idea which year the billet exhaust cam came out of or part number on it by chance??
Last edited:
Going to stop responding using my cell phone while in the shop, we do not have any misunderstandings,So you're using kapetanidis' mapping? Did he put it on mapshare? I remember when he first posted this online, didn't know he made it public.
BTW, I hope you looked at the oil holes in the cam, for some reason I'm thinking when I was working into this, there was something I was needing to do / study regarding the zx oil holes being different than the zg holes on the right side of the cam. Can't look at it now, i gave the cams to Chris Jones.
ETA - I found the cam timing. ALL timing done at .050" lift
ZG intake w/vvt: LC 120*
OP 10 ATDC
CL 50 ABDC
lift .320
220* @ .050"
ZG EX OP 29 BBDC (has a note that this was on a zx intake sprocket for a 100* LC, no recollection)
CL 1 BTDC
LC 105
.300 lift
208 @ .050"
ZX EX OP 36 BBDC
CL 10 ATDC
LC 103
lift .330
226 @ .050
Steve
No, not using Kapetaindis tune (Map) only posted that for the camshaft lift and duration cause I just happened to be looking at what he wrote regarding his outcome!
Yes, I knew about the oil holes for the ZG are cross-drilled and grooved with a total of four holes in each journal right side (Sprocket) second journal, and center journal, in fact, all the journals are full grooved I totally understand the reason for cross drilling we used to do it on the race builds if we needed it. Kawasaki also has all the cam saddles grooved in the head and probably their reason could be to lengthen the amount of time the cam journals see oil so it seems a little overkill to flood that area with volume and bleed off the oil pressure.
In Chapter two of my build, I shall cross drill the ZX Cam
The ZX and ZG share the same oil Pump part number # 16154-0047 but the top-end oiling is vastly different from the ZX using internal feed and the ZG using external piping to feed through cam caps.
The Camshaft Part Number I'm using # 49118-0071
The Camshaft Sproket # 12046-0057 might be a good idea to use an adjustable so that I can dial it in a little tighter it's just thought now there really won't be much performance improvement with low compression.
Cast iron or in the material of the ZG camshaft is Chilled cast iron they are extremely hard wearing and have excellent longevity with low-cost productivity the drawback being heavy.I just checked the ones I have; they weigh the same and look the same. Both are billet. The only difference is the c14 has an oil groove on the journal between the #4 lobes. The zx has .030 more lift and a visually more aggressive lobe profile. So that's really weird, possibly changed it for cost savings, maybe?
I noticed the Greece reference. Not the first time I've heard of it.
Steel is used more in extreme usage and handles more load
Really surprised finding cast iron camshafts is a Big Jap four Cylinder that's why I mentioned it. Thanks for the heads up on the Early ZG using Steel
Cast iron (chilled or not) and steel effectively weigh the same. The only difference in this case is if the cast one was gun drilled to the same ID as the steel one. Probably not since cast iron is more brittle than steel, and the thin section would be more prone to cracking.
The external piping you speak of is specifically for the variable valve timing actuator on the end of the intake cam.
The external piping you speak of is specifically for the variable valve timing actuator on the end of the intake cam.
Looked at your pictures and noticed the ZX and ZG sprockets looked identical so went and looked up the part numbers and early production ZG build 2007 through 2010 used steel Camshafts and shared the same part number with early 2006 through late 2007 ZX # 12046-0057 sprockets Intake & Exhaust for the ZX are marked with both timing marks and are not interchangeable with 2011 the year they switched to Cast camshafts since the center hole is larger on the cast cam sprocket 12046-0085 to accommodate the different camshaftI just checked the ones I have; they weigh the same and look the same. Both are billet. The only difference is the c14 has an oil groove on the journal between the #4 lobes. The zx has .030 more lift and a visually more aggressive lobe profile. So that's really weird, possibly changed it for cost savings, maybe?
I noticed the Greece reference. Not the first time I've heard of it.
So it gets typical Japanese weird the early ZX 14 Camshafts # 49118-0071 is a little bit more radical than 2008 # 49118-0097 ZX 14 due to the Emissions they went with the converter in the Header, So tomorrow requires me to look through the pile of camshafts to find the early ones!
Really glad you chimed in Laker cause the neurons jumped harder in my brain and made me do some research and it turns out there were four different sets of camshafts for the ZX14 and all getting milder as the years and emissions became more prevalent, Kawasaki marketing might have listed high peak horsepower but that's not the whole story, So then there was the ZX14R different monster
I have the wrong year cam to see the benefit I want back to the drawing board
No Kidding cast iron and steel are the same in pure density Anything made out of cast iron rather than steel is heavier because it needs to be much thicker. Cast iron has lower strength so to be durable needs to be thicker.Cast iron (chilled or not) and steel effectively weigh the same. The only difference in this case is if the cast one was gun drilled to the same ID as the steel one. Probably not since cast iron is more brittle than steel, and the thin section would be more prone to cracking.
The external piping you speak of is specifically for the variable valve timing actuator on the end of the intake cam.
Pictures are posted using my scale cast 2.6 pounds, Steel 1.3 Pounds camshaft is thicker and that appears why the change in sprockets that are not interchangeable
I'd love to see this work as well.
ZX14 forks, exhaust cam and a good rear shock would make for a nice upgrade to a great bike.
ZX14 forks, exhaust cam and a good rear shock would make for a nice upgrade to a great bike.
Let us get the beatdown feeling out of the way, In no way shape, or form do I feel that way. What I'm doing has only been done by one guy that posted it on the Woolich racing forum but only in his Happy Dyno numbers!
So I threw it out here to collaborate to see can this really safely be done and get this big motor to exhale mechanically by using a longer duration and higher lift Exhaust cam. As we all see and it been documented the engine is congested on purpose, Slip-on wakes it up, and the area P makes it scream.
I want to see if I can achieve similar levels of torq and HP ( Did not say Match ) without making a touring bike draw unwanted attention! BW Header with the stock muffler "Cored" Slightly modified and then on to the Akrapovic my personal taste for many reasons!
Have already built and ran a ZG motor up to 325 horsepower the only thing left that was ZG was the crankcase so that we could still use the shaft drive (No VVT) And to give you an Idea of the Camshafts used .419" / .388 254 / 248 custom built billet this whole build is a whole other story of failure!
So what so far do I see that am making my research and inspect further.
Severely botherd by the almost extra pound of the cast cam, So my intake will be heavier than my exhaust and not by ounces. (Find an early ZG camshaft)
The cam and gear I have is a later production until I can degree and prove in my head that the cam timing on the ZX is not retarded ( more Top End) Compared to the ZG sprocket, Thinking the greek that did this was using an early Concours with steel cams and swapped the cam gear, The gears are not interchangeable from cast to steel if it is its an easy fix to just use a slotted gear!
Not doing this to build a fast bike Laker I already have those, Doing this cause I can't leave shit alone and cause I Can")
So I threw it out here to collaborate to see can this really safely be done and get this big motor to exhale mechanically by using a longer duration and higher lift Exhaust cam. As we all see and it been documented the engine is congested on purpose, Slip-on wakes it up, and the area P makes it scream.
I want to see if I can achieve similar levels of torq and HP ( Did not say Match ) without making a touring bike draw unwanted attention! BW Header with the stock muffler "Cored" Slightly modified and then on to the Akrapovic my personal taste for many reasons!
Have already built and ran a ZG motor up to 325 horsepower the only thing left that was ZG was the crankcase so that we could still use the shaft drive (No VVT) And to give you an Idea of the Camshafts used .419" / .388 254 / 248 custom built billet this whole build is a whole other story of failure!
So what so far do I see that am making my research and inspect further.
Severely botherd by the almost extra pound of the cast cam, So my intake will be heavier than my exhaust and not by ounces. (Find an early ZG camshaft)
The cam and gear I have is a later production until I can degree and prove in my head that the cam timing on the ZX is not retarded ( more Top End) Compared to the ZG sprocket, Thinking the greek that did this was using an early Concours with steel cams and swapped the cam gear, The gears are not interchangeable from cast to steel if it is its an easy fix to just use a slotted gear!
Not doing this to build a fast bike Laker I already have those, Doing this cause I can't leave shit alone and cause I Can
Agreed 100 Percent John and that's kind of my thoughts as well, My Feelings are the Concours 14 is the last of the real Japanese comfortable typical big engine brutes. Something they did very well for many years!I'd love to see this work as well.
ZX14 forks, exhaust cam and a good rear shock would make for a nice upgrade to a great bike.
Being easily confused; I used the old reliable Ebay search and looked at ZG Cams.
2008 and 2009 appear to be Billet.
2010 and up appear to be cast.
That sed;
Here's a 2008 ZG intake;

Here's a 2008 ZG exhaust;

Here's a 2007 ZX intake and exhaust;

Or for a few $$ more, here's the whole 2008 ZG kit and kaboodle.

2008 and 2009 appear to be Billet.
2010 and up appear to be cast.
That sed;
Here's a 2008 ZG intake;
2008 Kawasaki 1400 Concours ZG1400 Engine Intake Camshaft 2504A | eBay
Find many great new & used options and get the best deals for 2008 Kawasaki 1400 Concours ZG1400 Engine Intake Camshaft 2504A at the best online prices at eBay! Free shipping for many products!
www.ebay.com
Here's a 2008 ZG exhaust;
2008 Kawasaki 1400 Concours ZG1400 Engine Exhaust Camshaft 2504A | eBay
Find many great new & used options and get the best deals for 2008 Kawasaki 1400 Concours ZG1400 Engine Exhaust Camshaft 2504A at the best online prices at eBay! Free shipping for many products!
www.ebay.com
Here's a 2007 ZX intake and exhaust;
2007 KAWASAKI NINJA ZX14 ZX1400A CAMSHAFT CAMS CAM SHAFTS 06-11 | eBay
Removed From: 2007 Kawasaki Ninja ZX14 ZX1400A with miles. This camshaft set is in good condition and shows normal signs of wear. ITEM MUST BE FULLY INSPECTED AND YOU MUST TAKE FULL RESPONSIBILITY/Liability before installation.
www.ebay.com
Or for a few $$ more, here's the whole 2008 ZG kit and kaboodle.
2008 Kawasaki Concours 14 Zg1400 ABS OEM Cylinder Head Top & Camshaft Assembly for sale online | eBay
Find many great new & used options and get the best deals for 2008 Kawasaki Concours 14 Zg1400 ABS OEM Cylinder Head Top & Camshaft Assembly at the best online prices at eBay! Free shipping for many products!
www.ebay.com
Last edited:
Good find there,Ted. I just looked too and BOTH cams appear to be cast. I also just looked at the pictures of the 2013 that I worked on and they were both cast. My memory is going along with my eyes.2010 and on appear to be cast.
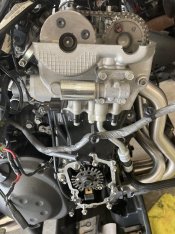
2008 ZG14 Billet steel cam and billet ZX14 installed for mock up and lash measurements. Ordered a new cam chain and adjustable cam gear was told by Kawasaki the chain is back-ordered by ten days. In Drag racing the ZX 14 wears the chain out really quickly due to the heavy springs. Even though the bike only has 8900 miles that one and a half paper weight at the end of the intake bothers me enough to replace it since I’m already in here!
Attachments


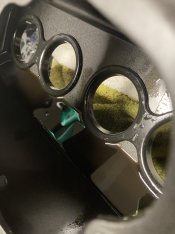
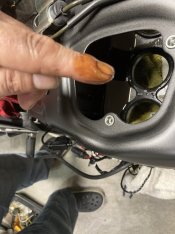
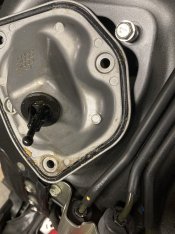
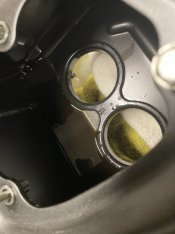
Had suspected during disassembly that the valve cover had an enormous leak at the rear of the engine so much that the complete left side around the area of the slave cylinder was just caked with oil and dirt under the Rubber heat and sound matt- (Going in the Garbage it's useless to me) and just wind-driven towards the rear of the bike but wasn't worried since I was replacing all o-rings and gasket anyway! Also knew something was wrong during my baseline pulls since it was down on power 133 range of HP missing a few upper horsepowers and acting like it was super lean in the fuel department so I figured the Injectors are partially clogged from sitting unridden for a few years being 2014 with 8400 miles someone was not a rider I guess. This is what happens when you really are not educated enough to perform your own maintenance and overfill your engine by filling it on the side stand! That's right boys and girls there are about 2 quarts in a total of kinda clean oil in the airbox and under the rubber cover LMAOF. Got the Throttle bodies out and will remove the Injectors to send out and clean and flow balance with the other four from my previous project when I swapped the 40 MM for 48MM throttle bodies that way RC fuel injection can match the flow rates between all eight and give me four that are within .01 of each other. The ZX 14 camshaft is at the Machine shop getting the oil feeds drilled and a groove machined into the journal and should be back next week. Next week is the degree the cam button everything up with a Manual cam chain adjuster and get it started up and do some rolling smokie burn-outs One of my fellow drag racers gave me a practically brand new set of throttle bodies off a ZX 14 makes me wonder if they're worth using?
One of my fellow drag racers gave me a practically brand new set of throttle bodies off a ZX 14 makes me wonder if they're worth using?Attachments
Question; Was the current oil level very high and caused this recently?
Was it oil that accumulated over time and should have drained or been sucked back into the crank case?
ie; Did a drain back system fail?
Reason for Q: Wondering if others might have the same issue. (even with slight overfills)
If you use the ZX throttle bodies, don't they use larger injectors too?
Watch your Drag race Buddy.
,,,,,,,,, Those Drag Race guys are sneaky Devil's.
Ride safe, Ted
PS:
Another explanation for low peak HP.
The bike isn't RED. <evil grin>
Last edited:
Other than the groove, what other oil passages need to be added? Glad to see you getting this done.
I'm sure there's a formula for throttle body size as related to horsepower supported. But I personally would run as small as possible for rideability, and still get close to max horsepower. But drag racers usually think differently

I'm sure there's a formula for throttle body size as related to horsepower supported. But I personally would run as small as possible for rideability, and still get close to max horsepower. But drag racers usually think differently
I rebuilt the carb on somebody's little honda generator. Oil was everywhere. He said when he filled the oil he tipped it back on a degree 45 angle and filled her up! Then it wouldn't start and sat for 3 years, he was going to by a new one. So I offered to clean the carb and found the oil. It now runs like new.
One question i have and have always pondered.. What is the point of degreeing a camshaft if they're not adjustable? On most vehicles you can advance or retard them 1 tooth on the chain or belt but that would throw it way off. The gears are pinned or keyed to the cams so you can move them that way. Again, just pondering..
Hi Ted, I had just picked the bike up that night we spoke on the phone the past owner changed the driveline fluids ( Yep gear oil was super low as expected when you refill it on the side stand) and engine oil, I didn't even have 40 miles on it when we rolled it on the shop dyno and noticed it was slightly below the top line. you have two lines on the site glass first line is low, second is upper, the imaginary line in the middle with the machine standing perpendicular is the correct line.Question; Was the current oil level very high and caused this recently?
Was it oil that accumulated over time and should have drained or been sucked back into the crank case?
ie; Did a drain back system fail?
Reason for Q: Wondering if others might have the same issue. (even with slight overfills)
If you use the ZX throttle bodies, don't they use larger injectors too?
Watch your Drag race Buddy.
,,,,,,,,, Those Drag Race guys are sneaky Devil's.
Ride safe, Ted
PS:
Another explanation for low peak HP.
The bike isn't RED. <evil grin>
So knowing that I said screw it gonna be alright at 10,500
Being a Drag Racer and hanging out with Drag racers we run our Walmart (best price in the South) Shell Rotella T6 a quart low to avoid crank drag or foaming cause once you make foam it's like going in with no condom you got no protection and you will reap the rewards! ( She got you for 21 years, Sorry that song gold digger was playing in my head
So the Concours and like most bikes have a catch bottle on the clutch cylinder side that catches the airbox contaminants such as oil mist that spits out the breather hose from the valve cover usually it's very very little that you find in there cause if you follow the correct procedure middle of the glass you might never have to drain the little plastic bottle its usually on the left side, a small 6-8mm od tube that runs down to a small catch bottle near the bottom of the fairing check it out Ted see if you collected anything over the years? And no the tubes do not lead back to the oil pan to drain back they lead to the floor or your back wheel. The Japanese and Italians want you to fill it to the middle of the glass and My Harley V-Rod has a Dip-stick with three lines Low, Good, Too much Num Nuts
On the top of the motor coming out of the valve cover is a vent, that allows the crankcase fumes to go into the airbox and get recirculated through the motor. Then there is the breather baffled breather box on the top of the transmission that's the one that really does all the pushing of oil when you overfill cause the clutch and trans just churn it out like a hamilton beach blender without the lid.
so if you are running a slightly high oil level, oil can get past the baffle. No more than a teaspoon is normal.
In my case, it was a few quarts cause that's how much it was overfilled!
Pretty sure you hit the Nail Ted it was down a few from overfilled and the oil being sucked it a mist down the throttle bodies killing a clean charge and the leanness I saw in my AFR line!
Yes, the Drag- racers, and especially those that spend winters down in Mexico doing that high-speed roll racing are a sneaky bunch cause not sure if those are the throttle bodies from when his ZX was stock and they would be 44 MM or if those are the ones he had bored to 47MM and never used them, Guess I better measure them up, Really the 47MM would be useless you would need head work, bigger valves, and long duration cams to see any gain.
I could see the 44MM extending the power and maybe building a few up top and the Injectors are the same
Here is some Trivia the rubber boots' internal diameter leading to the intake port on the Concours 14 measures 43.7 mm Part Number
16065-0040 the boots actually slightly shroud the intake port (Smaller diameter ) Perfect for 44 MM throttle bodies.
The Zx Rubber boots part number 16065-0020 measure slightly larger if I remember I was once told they are closer to 46mm cause Kawai anticipated those sneaky drag guys would bore out the throttle body and knife-edge the throttle blades for every last RPM horsepower, Funny thing though the Concours uses short Velocity stacks and the ZX uses staggard two short two long to pick up mid-range Kawasaki engineering is very confusing. You guys please bear with me Kawasakis although not new to the Brand as I worked at a Dealership wrenching when I was a young man in the 90s that sold Suzuki and Kawasaki.
My super street Drag Bike is a No wheelie bar stock wheelbase little 750 cause it still has the sticker on the tail but being one of those Sneaky Drag Racer guys it was taken apart one night and sent to my Freinds at KWS in Charleston SC for bigger pistons 3MM + 3MM stroker crankshaft they told me its 870CC but to me, it will always be a 750 cause that sticker on the tail section tells me and it still has the round yellow reflectors mounted to the front fender and don't worry about those big header pipes cause they slow me down below 10,000 RPM Think there's nitrous on this bike cause it's really fast and they never display the times when I race this on Thursday nights at some Grudge or Fudge event here in SC ! so I can't tell you how fast LOL
I'm team Blue (Suzuki) all the way so I have been learning about it Kawasaki recently and come to find out they build a great motor but a really shitty frame!
Also, Run a V-Rod Destroyer that keeps me very busy, and on a busy schedule like right now sitting in the pits writing this to you Ted, well to some it still looks like a Destroyer until I come out of the hole and the last thing you see was my ass getting smaller!
Big pistons and the stroker crank found their way into that motor one night when I was drinking Red Wine guess I could not deal with the factory 160 horsepower and mid 9 seconds 1/4 mile times can't remember the size it is now but it's only two cylinders and makes over two hundred horsepower on MR12 Fuel yep that's only two pistons going up and down and looks like one of those Destroyers and runs high eights!
This was fun getting to know everyone and looking forward to meeting up at some event....
16065-0026
Attachments
Last edited:
The reason is every tolerance is never perfect on mass-produced engines and a few MM here ends up a lot more over there, So we Degree using slotted cam gears.One question i have and have always pondered.. What is the point of degreeing a camshaft if they're not adjustable? On most vehicles you can advance or retard them 1 tooth on the chain or belt but that would throw it way off. The gears are pinned or keyed to the cams so you can move them that way. Again, just pondering..

I could see that, Wrenching for a bunch of years I can tell you some stories, Last year a customer dropped off his older carb Yamaha cruiser but they should be really clean he told the service adviser cause he stored the bike in his Shed filled with seafoam before leaving overseas two years earlier.I rebuilt the carb on somebody's little honda generator. Oil was everywhere. He said when he filled the oil he tipped it back on a degree 45 angle and filled her up! Then it wouldn't start and sat for 3 years, he was going to by a new one. So I offered to clean the carb and found the oil. It now runs like new.
Sea Foam is alcohol and it's hygroscopic, especially in the humid hell of the south! Yep fuel tank and sender along with carbs were corroded beyond any help I was laughing when I pulled the sending unit cause the bar rotted through
From what we could see there was a total of four holes cross-drilled and grooved at the first journal gear side and the second journal four cross-drilled thinking the story there is bleed off due to the VVT cause the journals on the head are grooved as well and not really seeing why it requires or needs extra lubrication what are your thoughts? We also pulled the galley plugs to measure the inner diameter with the cast having a smaller diameter due to it being a weaker material, So fingers crossed nothing missed and this all works if not and she blows then I offer the parts to the gods of speed and start all over and maybe due away with the VVT and go ZX head and Cams.Other than the groove, what other oil passages need to be added? Glad to see you getting this done.
I'm sure there's a formula for throttle body size as related to horsepower supported. But I personally would run as small as possible for rideability, and still get close to max horsepower. But drag racers usually think differently
Really doubt the 44 mm would add any significant horsepower without being able to raise the RPM range, It was Kawais way of keeping the lower speed crisp and helping to increase the volumetric efficiency of the intake. You know if they weren't such a pain to R/R I would do a baseline with the 40mm and then swap out to 44MM Tuned from the factory I feel that 40mm with the intake cam and restrictive exhaust is about right, The ZG engine is not high RPM Power but that 1/4 throttle cruise for an almost seven hundred pound bike keeping you flying down the interstate
Last edited:
Ahh, the catch bottle. I've only had slight traces of oil in mine.
Following your replies.. Understand most of the explanations, but Confused about your Connie work.
At the start of this discussion, I thought you were adding ZX-14 exhaust to the Street Connie, and building up a Connie or ZX-14 for racing.
ie; You sed; Few weeks ago I picked up a really nice clean low mile Concours 14. Doing a valve adjustment and thought let’s do the exhaust cam! CANT hurt any thing except a little low end and maybe gain some midrange and upper. SO LETS DO THIS
In other notes/discussions, You and I have discussed3 (now 2) Connies and a ZX-14 (with Connie bags).
Please explain which bike is being modified currently, and for what?
ie; Originally you also had a Connie for Mexico runs that broke the frame. (engine sold, project ended)
You have a Connie for the road that is supposedly mostly stock. (Thought you were doing ex cam on it)
You have another Connie or a ZX that your going to Race (Drag or Roll on/Mexico racing)
(I was under the impression that drag racing a Beefed up Connie was out due to frame weakness)??
Ride safe, Ted
Following your replies.. Understand most of the explanations, but Confused about your Connie work.
At the start of this discussion, I thought you were adding ZX-14 exhaust to the Street Connie, and building up a Connie or ZX-14 for racing.
ie; You sed; Few weeks ago I picked up a really nice clean low mile Concours 14. Doing a valve adjustment and thought let’s do the exhaust cam! CANT hurt any thing except a little low end and maybe gain some midrange and upper. SO LETS DO THIS
In other notes/discussions, You and I have discussed
Please explain which bike is being modified currently, and for what?
ie; Originally you also had a Connie for Mexico runs that broke the frame. (engine sold, project ended)
You have a Connie for the road that is supposedly mostly stock. (Thought you were doing ex cam on it)
You have another Connie or a ZX that your going to Race (Drag or Roll on/Mexico racing)
(I was under the impression that drag racing a Beefed up Connie was out due to frame weakness)??
Ride safe, Ted
Lot going on I should start a y tube channel Lol… roll racer is dead, motor sold off! But I kept the full
ZX 14 akrapovic Race exhaust and will sell it off there will never be a project like that ever again.
The ZG is too heavy and is not meant to be anything but a quick touring bike.
Kept the rear subframe and plastic to use on a wrecked 2010 ZX14 along with the brand new stock ZX14 exhaust header that a friend gave me, and the two mufflers you sent me. The project will be a zx14 with the rear subframe section of a concourse with the hard bags.
The 2014 was recently purchased and I’m putting the cam and throttle bodies from a ZX14 I installed a black widow header and Akrapovic muffler just to wake it up a little bit on the upper RPMs
You made a reference to drag racing guys being sneaky, and your right we are that’s why I was making references to my drag bikes appearing stock ( sleepers )
And that’s kind of where this 2014 Concours is heading into a sleeper but not for drag racing just a Concours that’s makes a little more upper rpm horsepower.
G'night.
I learned something here. 2 of the external pipes supply oil to the vvt actuator for advance and retard duties. The other 2 have nothing to do with vvt actuation. Those other 2 pipes supply and return pressurized oil up and over from the intake side to the exhaust cam, down into the center bore of the ex cam, then back up and over to the intake cam, apparently to supply the left-hand half of the in cam with oil. Had to study it a bit and think about why. But I believe the answer is because the right-hand half of the intake cam is essentially a solid shaft with only a small, blind, oil passage feeding the vvt. So, they had to bypass the solid core portion of the intake cam.From what we could see there was a total of four holes cross-drilled and grooved at the first journal gear side and the second journal four cross-drilled thinking the story there is bleed off due to the VVT cause the journals on the head are grooved as well and not really seeing why it requires or needs extra lubrication what are your thoughts?
Last edited:
Started this project cause on a tuning site I belong to there was one tuner that did the swap and he posted the power gains and they were impressive but he never talked about machining the cam only said direct bolt-in but just dropping it in lacking what I feel is some important oil grooving and holes to make it last
Had Dropped both the stock ZG & ZX camshafts off to our Machinist back in the middle of April to cross oil drill and full groove the ZX camshaft.
Called me today to let me know they can not work with the camshaft since the Journals are hard chromed on the ZX cam and there is no way without destroying the product! (Though here is the Early ZX 2006 to 2007 Camshafts were hard-chromed) 2008 they changed part numbers but not the cam profiles lift duration only did away with hard chromed or this is already been modified ZX 14 Camshaft done years ago by a company like B&B cause the ZX motors experienced camshaft journals that galled from heat and high loaded RPM.
With that being said and by the way, pretty bummed out cause really wanted to do this project but not all is completely lost there is one good option here!
1- Work with the stock ZG camshaft and have the lobes hard welded and machined to ZX 14 Profile and continue with ZX 14 cam profile
2- Use the ZG14 Camshaft and Retard timing 2 to 4 degrees theoretically it should help power at higher rpm by holding the valve open longer extending the duration for the exhaust to evacuate and helping with a higher top end.
3- Already own three extremely fast bikes convince me that I do not need a 690-pound fast bike, Just add a better suspension leave the ZX 14 throttle bodies on it, and ride it for what it is
I was rooting for you…. Suggest #3….Started this project cause on a tuning site I belong to there was one tuner that did the swap and he posted the power gains and they were impressive but he never talked about machining the cam only said direct bolt-in but just dropping it in lacking what I feel is some important oil grooving and holes to make it last
Had Dropped both the stock ZG & ZX camshafts off to our Machinist back in the middle of April to cross oil drill and full groove the ZX camshaft.
Called me today to let me know they can not work with the camshaft since the Journals are hard chromed on the ZX cam and there is no way without destroying the product! (Though here is the Early ZX 2006 to 2007 Camshafts were hard-chromed) 2008 they changed part numbers but not the cam profiles lift duration only did away with hard chromed or this is already been modified ZX 14 Camshaft done years ago by a company like B&B cause the ZX motors experienced camshaft journals that galled from heat and high loaded RPM.
With that being said and by the way, pretty bummed out cause really wanted to do this project but not all is completely lost there is one good option here!
1- Work with the stock ZG camshaft and have the lobes hard welded and machined to ZX 14 Profile and continue with ZX 14 cam profile
2- Use the ZG14 Camshaft and Retard timing 2 to 4 degrees theoretically it should help power at higher rpm by holding the valve open longer extending the duration for the exhaust to evacuate and helping with a higher top end.
3- Already own three extremely fast bikes convince me that I do not need a 690-pound fast bike, Just add a better suspension leave the ZX 14 throttle bodies on it, and ride it for what it is
A freer flowing exhaust (uncertain what you have) then leave the ZX throttle bodies on and spend the money tuning vs machining and tuning. I would believe there is certainly a good amount to gain by freeing up the intake a bit alongside the exhaust. If I recall you were looking for top end anyhow.
Wayne, Carol & Blue
Thanks, Wayne! Black widow header with Akrapovič mufflerI was rooting for you…. Suggest #3….
A freer flowing exhaust (uncertain what you have) then leave the ZX throttle bodies on and spend the money tuning vs machining and tuning. I would believe there is certainly a good amount to gain by freeing up the intake a bit alongside the exhaust. If I recall you were looking for top end anyhow.
Wayne, Carol & Blue
As you have the bike apart already, I wouldn't give up yet on the drilling/grooving.
There has to be away to get it (oil in the right area) done...
There are some people here that may have idea's.
or; Mebbe' you could modify the caps to pick up/move the oil to the area you want?
Ride safe, Ted
There has to be away to get it (oil in the right area) done...
There are some people here that may have idea's.
or; Mebbe' you could modify the caps to pick up/move the oil to the area you want?
Ride safe, Ted
I don't see any pictures of cams in this thread with hard chromed journals. Is it a different cam? There's no reason a factory cam would be chromed, it's not something that would be done on a massed produced item. I know when cam lobes are hard welded and reground with a new profile; after welding, the camshaft is straightened. But it can't be straightened good enough so they grind the journals underside about .005/.010" then chrome them up twice that amount and regrind the chrome back down to stock size. Then regrind the lobes. That whole process costs $1500 for a single camshaft.
The oiling problem kawasaki has with the zx14 motors is with the #3 rod journal. Not the cam. I have a 14r crank that needs #3 rod journal dusted or at least polished. It's for sale. With shipping and repair to CA and back would still be under half cost of new.
The oiling problem kawasaki has with the zx14 motors is with the #3 rod journal. Not the cam. I have a 14r crank that needs #3 rod journal dusted or at least polished. It's for sale. With shipping and repair to CA and back would still be under half cost of new.
I don't see any pictures of cams in this thread with hard chromed journals. Is it a different cam? There's no reason a factory cam would be chromed, it's not something that would be done on a massed produced item. I know when cam lobes are hard welded and reground with a new profile; after welding, the camshaft is straightened. But it can't be straightened good enough so they grind the journals underside about .005/.010" then chrome them up twice that amount and regrind the chrome back down to stock size. Then regrind the lobes. That whole process costs $1500 for a single camshaft.
The oiling problem kawasaki has with the zx14 motors is with the #3 rod journal. Not the cam. I have a 14r crank that needs #3 rod journal dusted or at least polished. It's for sale. With shipping and repair to CA and back would still be under half cost of new.
Thanks for your valuable Input Laker9142!
The camshafts in the pictures were the first Steel ZX & ZG Intake purchased off eBay to replace the cast camshafts that my bike was equipped with.
What was left out of my story?
I took the Exhaust cam and clamped it into V-blocks and mounted it to my press so that I could cross drill the oil holes to match the ZG Exhaust cam at this point figured going to use it without adding the oil groove since the cam towers are grooved but the thought of it not being the correct thing still slightly in my head. Got through the top layer of the journal and was now drilling blind inside the cam to come out the other side and Crap happens it must have slightly shifted during drilling and snapped my Mars-tool 3/32 carbide bit just as it was starting to breakthrough, With the cam plug out of the end and viewing the damaged bit, the cam is trash not worth the expense of my time to try not when early ZX cams are sold on eBay for less than 50 dollars with free shipping.
The racing season kicked off and my time is extremely limited so purchased a second ZX cam off eBay and had it shipped directly to the Machine shop and my wife dropped off the cast ZG camshaft for them to use as a template since the shop is only a few towns away. The scope of the project was to cross drill and to have the 1mm groove cut in the journal. There busy so it sat there until they were ready and they broke the news cant be done.
"he product! (Though here is the Early ZX 2006 to 2007 Camshafts were hard-chromed) 2008 they changed part numbers but not the cam profiles lift duration only"
What I intended to write was the word thought as in my assumption of the early cams being chromed journals was incorrect Laker9142 and you correct no OEM that I know of used mass-produced chrome journals writing the early cams more than likely the 06-07 part# 49118-0071 to 08-11 part#49118-0097 was nothing more than a supplier change that's typical with mass-produced products looking for cheaper suppliers similar to the ZG going from steel to cast.
Getting back to the Difference in the Camshaft speaking with the machine and cutting the groove in the Steel ZX cam is not a good idea as there is less material (Thickness) compared to the Steel ZG camshaft of course it makes sense the ZX cams are lighter if only in grams.
Here is my firm conclusion this is not a ZX14 drop-in and expect longevity firmly believe Kawasaki engineers used the groove to pass larger quantities of oil for the application something to do with the VVT oiling. Further proof the ZG is a much lower performance engine since grooved cams and grooved cam-towers do not support the same high loads as non-grooved. The engine is not designed to live in the High RPM range the way the ZX is meant.
So where does this setback leave me... What I should have done whenever I get bored and the thought of taking on the project of making one of my new toys faster not cause I need it but cause WTF why not, knowing well in advance the pitfalls never stops me from wasting time and money. I own a 2019 Panigale V4 that makes over 229 horsepower to the rear wheel and weighs 385 pounds fueled up it's also almost impossible to ride and requires a concentration level of a pro road racer cause it accelerates so fast you run out of time and space, Any 750cc motorcycle is more fun to ride, So it sits covered with 2300 miles on it!
Alright enough of me manning up and bearing my Soul what's my next step!
Sent an Early steel ZG camshaft off to Webcams to profile the ZX cam with slightly more lift but everything else the same, what do I expect once it's all done. To install it tune it jump up and down that I now have a Concours 14 with the most peak horsepower than anyone else only to be disappointed once again to not losing but greatly shifting my much-needed torq to a useless place for such an overweight machine with gear ratios, not engineered for the modifications I did!
The Concours 14 is an awesome machine as a quick touring motorcycle despite Kawasakis America markiting for what it is and what it is a classified in their line-up as a supersport touring bike cause it has some Ninja DNA, In the industry kind of insults what a real supersport is but that's Marketing right!
Lesson 1 Sheared my first Concours projects frame in half building an outrageous motor and feeding it large amounts of Nitrous showed me Bike is out of its vocation and should have moved on
Lesson 2 Purchase a very low milage 2014 but when Dynoed it showed fueling issues plugged injectors hence lower output in the low 130s and should have been as per the 100s of the test I read 131 to mid 140s depending whose dyno you use where you use and ahhh do not want to get into this.
Putting the early Factory steel cams in so I can ride it the way it was meant to be ridden, It has a very accurate valve lash setting all extremely close to each other with no minimum variances Exhaust 0.23mm intake 0.15mm lot of money in shims and labor to get it that close once everything is hot and expanded it should be close to the limits and stay there.
When Webcams sends me back the modified cam I will take the time to break it apart install it and test it but don't wait cause I get bored quick so there is a chance I might just offer the cam to the god of speed and throw it up on my shelf and moved on to a new time and money-wasting project like finally finishing my Trask Turbocharged 2004 V-Rod that has approached the purchase price of my Ducati!
Figured I at least owed everyone this update so far since some have been following the updates and apologize for any past non-checking grammar and confusion
Be safe out there
Jeff
Well, it's good that you were able to cut it with carbide. I'm sure its nitrided alloy steel, probably 65 r/c so it seemed hard as chrome. But carbide cuts right thru it. You just can't use solid carbide in a drill press! Carbide requires a rigid setup. Also drilling 4 holes to the center would have been much better than going all the way thru. I agree that it's not worth the effort, I went thru many scenarios 5 or 7 years ago and gave up. I finally decided that swapping in in a 14R motor would be the way to go. I researched enough to believe its 99% probable that it could be done. But ultimately decided that it wasn't worth the effort and expense for several reasons, the most important reason being that 1% chance would bite me. At the time a desirable 14R was $4k. And there was no going back once you start machining the area around the output bearing to allow for the front bevel drive. Also, about that time my front bevel drive self-destructed, so that's a weak spot. Also, the ecu swap would be difficult considering kipass and all.
But I want to thank you for answering a question I've had for 10 years or more! I've never been able to figure out why I had such a bad rear wheel wobble. People behind me said the top of my rear tire was moving left and right a total of 2 inches. It felt worse than that. It would happen in the middle of a corner, always in Mexico, and as soon as I would get back on the gas. So, I fixed it by remaking most of the tetra-lever system, most importantly replacing the 2 individual struts with a H-frame unit that transferred a good portion of the load to the upper frame tabs where they attach. I did fix the problem but never realized that it was the frame that was flexing! I always figured it had to be those S shaped aluminum struts flexing, but they show no signs of it. So, I appreciate your comments on that.
But I want to thank you for answering a question I've had for 10 years or more! I've never been able to figure out why I had such a bad rear wheel wobble. People behind me said the top of my rear tire was moving left and right a total of 2 inches. It felt worse than that. It would happen in the middle of a corner, always in Mexico, and as soon as I would get back on the gas. So, I fixed it by remaking most of the tetra-lever system, most importantly replacing the 2 individual struts with a H-frame unit that transferred a good portion of the load to the upper frame tabs where they attach. I did fix the problem but never realized that it was the frame that was flexing! I always figured it had to be those S shaped aluminum struts flexing, but they show no signs of it. So, I appreciate your comments on that.
Your welcome and Thank You for (Below)
"Also drilling 4 holes to the center would have been much better than going all the way thru." That is some good advice although I have the tools I lack some of the wisdom of Someone like you or Ted and others doing it and perfecting your Machine shop skills for years. Now that I think about it that was pretty stupid drilling to china LOL, Machine shop work is having the patience to be precise the patience part I lack and need to work on! everything else will come!
Often think about what makes guys like us want to build faster bikes when others say but you have a fast bike or just buy a fast bike, Were MotorHeads, Hot Rodders the last of humans to think like us cause the next decade will be all about riding the torq of electric.
I looked at that area when I had the first 2012 ZG motor torn down and thought this could be a future issue if a lot of horsepowers is thrown at it, My build skipped that area and went right for the mounting points of the Tetra-Lever system, and sent me crabbing sideways during a wide-open run down in Mexico
Agreed it's not worth the effort cause of those weak areas, especially the frame, ZX 14 guys have had similar frame problems although the lower part of the frame is different, When my ZG frame sheared I had sent it off to Trac-Dynamics cause I had way too much invested in a motor and my project was at a loss so they offered to take a look. They x-rayed and did some metallurgy then some software simulations and sent me the report.
The findings were that the frame is built to a price point (Understandable it is massed produced and not European) and the Tetra-Lever plays a big role in not transferring the jacking that's prone with driveshaft bikes but instead absorbing the energy and I think it said transferring it to the frame. Was enough for me and I moved to this project with much lesser dreams, Sold the complete motor to a crazy dude with a smart car.
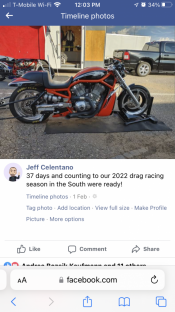
There is a guy on FB who stipped down a Concours 14 added ZX14 carbon bodywork and rear subframe, lowered it, front end strapped it, Shinko hook up rear tire, and running in 9.90s, pretty impressive. Considering a Stock ZG14 with an average rider mid elevens I know some are going to read this and say but Cycle world went 10.88 with their brand new stock test bike Ummm Yep alright!
Spoke with the guy on messenger, and he made the claim Ryan Schiniz flashed the ECU with only doing full de-restriction and he is running a power Commander for fueling, Meaning all throttle plates are wide open with your right hand. Brocks ZX14R full titanium alien head Exhaust, ZX14 Throttle bodies no cams but he has played with exhaust cam timing using adjustable sprocket and no mods at all to the VVT through the ECU
The guy can ride he has his lunch perfected and his 60 foot the most important part of a run is in the 1.60s that's a true pilot perfecting his craft and a dropped almost 100 pounds and he is a jocky size guy with a Heart of a Hot Rodder! But unfortunate the last I heard from second-hand sources is the frame sheared
"Also drilling 4 holes to the center would have been much better than going all the way thru." That is some good advice although I have the tools I lack some of the wisdom of Someone like you or Ted and others doing it and perfecting your Machine shop skills for years. Now that I think about it that was pretty stupid drilling to china LOL, Machine shop work is having the patience to be precise the patience part I lack and need to work on! everything else will come!
Often think about what makes guys like us want to build faster bikes when others say but you have a fast bike or just buy a fast bike, Were MotorHeads, Hot Rodders the last of humans to think like us cause the next decade will be all about riding the torq of electric.
I looked at that area when I had the first 2012 ZG motor torn down and thought this could be a future issue if a lot of horsepowers is thrown at it, My build skipped that area and went right for the mounting points of the Tetra-Lever system, and sent me crabbing sideways during a wide-open run down in Mexico
Agreed it's not worth the effort cause of those weak areas, especially the frame, ZX 14 guys have had similar frame problems although the lower part of the frame is different, When my ZG frame sheared I had sent it off to Trac-Dynamics cause I had way too much invested in a motor and my project was at a loss so they offered to take a look. They x-rayed and did some metallurgy then some software simulations and sent me the report.
The findings were that the frame is built to a price point (Understandable it is massed produced and not European) and the Tetra-Lever plays a big role in not transferring the jacking that's prone with driveshaft bikes but instead absorbing the energy and I think it said transferring it to the frame. Was enough for me and I moved to this project with much lesser dreams, Sold the complete motor to a crazy dude with a smart car.
There is a guy on FB who stipped down a Concours 14 added ZX14 carbon bodywork and rear subframe, lowered it, front end strapped it, Shinko hook up rear tire, and running in 9.90s, pretty impressive. Considering a Stock ZG14 with an average rider mid elevens I know some are going to read this and say but Cycle world went 10.88 with their brand new stock test bike Ummm Yep alright!
Spoke with the guy on messenger, and he made the claim Ryan Schiniz flashed the ECU with only doing full de-restriction and he is running a power Commander for fueling, Meaning all throttle plates are wide open with your right hand. Brocks ZX14R full titanium alien head Exhaust, ZX14 Throttle bodies no cams but he has played with exhaust cam timing using adjustable sprocket and no mods at all to the VVT through the ECU
The guy can ride he has his lunch perfected and his 60 foot the most important part of a run is in the 1.60s that's a true pilot perfecting his craft and a dropped almost 100 pounds and he is a jocky size guy with a Heart of a Hot Rodder! But unfortunate the last I heard from second-hand sources is the frame sheared
My mom says when I was 2yo sitting in the highchair, that I would make motor sounds while running a cookie across the tray. that would have been 1959 so I wasn't flooded with internet screens showing motors. Just born that way. I learned some about motorcycle engines in the minisprint days around 1990. Thats a gsxr 1100 bored to 1200, methonal, 14.5 compression, very tall and short cams. The throttle bodies I cut off the float bowls of 44 mikuni flat slides. and mounted all to a plate then spliced in all the Hilborn stuff. Ran the nozzles directly into the port, aimed at the valves. Ran the hilborn pump off the rh side of the in cam. Bill Hahn mag.Often think about what makes guys like us want to build faster bikes when others say but you have a fast bike or just buy a fast bike, Were MotorHeads, Hot Rodders the last of humans to think like us cause the next decade will be all about riding the torq of electric.
Attachments
![20220517_115626[4467].jpg](/data/attachments/32/32606-faaf3513f87c2034ec79465acc2e4a74.jpg)
That picture shows when Mini Sprints were Downright Mean and nasty fast cars, Early GS & GSX Motors were and still are some of the best engines and held more Records in drag racing than any other Motorcycle engine. So used the Carb bodies to move air for the Hilborn that's pretty coolMy mom says when I was 2yo sitting in the highchair, that I would make motor sounds while running a cookie across the tray. that would have been 1959 so I wasn't flooded with internet screens showing motors. Just born that way. I learned some about motorcycle engines in the minisprint days around 1990. Thats a gsxr 1100 bored to 1200, methonal, 14.5 compression, very tall and short cams. The throttle bodies I cut off the float bowls of 44 mikuni flat slides. and mounted all to a plate then spliced in all the Hilborn stuff. Ran the nozzles directly into the port, aimed at the valves. Ran the hilborn pump off the rh side of the in cam. Bill Hahn mag.
Hahaha Mom would say similar things about me My Family is from Italy and me being first Gen American. All the men in our family rode and raced cars and bikes and my Moms brother my Uncle owned a Motorcycle Dealership in NYC that sold Moto Guzzis, Ducati, Laverda, and Triumph so I grew up in this working between the bike shop and my grandfathers Gas Station knowing nothing else I made a good life from things that run on Gasoline.
When I was that age, I worked on Lawn Mower motors. And bolted them on my bicycle.
Does that count?
Ride safe, Ted
PS: Ok/ok,,, It was actually my brother's bicycle, but he didn't know I took it.
Does that count?
Ride safe, Ted
PS: Ok/ok,,, It was actually my brother's bicycle, but he didn't know I took it.
Last edited:
Do you remember how you over some the vertical shaft thing? We couldn't do a bike and didn't have a clutch so we chisled a hole in the bottom of a wagon and but a pulley on the axle. Attached wheels to axle. Had to push motor with your feet to engage. Geared to high to get going so we tried it downhill. Myself and the motor both flew out of the wagon at the bottom of the hill. Good times!When I was that age, I worked on Lawn Mower motors. And bolted them on my bicycle.
Does that count?
Ride safe, Ted
PS: Ok/ok,,, It was actually my brother's bicycle, but he didn't know I took it.
We used a horizontal shaft motor, welded another rim to the back rim (for the belt to run in), strapped the motor to the frame, and used a centrifugal clutch.
We used GS1150s bored to 1200 (rule limit). that's the ones we ran the magnetos on to avoid a battery. Starter was handheld. Switched to GSX for light weight, plain bearing crank and oil cooling. I couldn't tell much difference. All cranks, rods, and pistons came from Falicon.Early GS & GSX Motors were and still are some of the best
Nice!Myself and the motor both flew out of the wagon at the bottom of the hill. Good times!
They didn't have lawns or mowers back then!When I was that age, I worked onLawn Mower motors..tumble weeds and sage brush.


Nice my first built purpose-built drag bike was based on the GS1100E motor we also used falicon cranks and their other parts but over the years there were some issues with their products thinking about where they sourced their metal from gotta say the old guy Glen would stand by the product and replace it but not your ventilated block, There are gone now since 2018 closed up shop in Fla they were acquired by race-winning brands same guys that own JE Pistons, Wiseco Performance Products, K1 Technologies, Diamond Pistons, Trend Performance, Dart Machinery, Rekluse Motor Sports, and ProX Racing Parts. It seems they killed off Falicon.We used GS1150s bored to 1200 (rule limit). that's the ones we ran the magnetos on to avoid a battery. Starter was handheld. Switched to GSX for light weight, plain bearing crank and oil cooling. I couldn't tell much difference. All cranks, rods, and pistons came from Falicon.
Nice!
They didn't have lawns or mowers back then!
Been using Marine Cranks and their quality and process seem better and been running for 3 seasons a 3.085 stroker billet Ion Plas nitrated and has held up
I bought an 85 GS1150ES rolling chassis years ago that didn't have a thousand miles on it. The guy bought the bike to get the engine for a mini sprint car. I managed to find an engine in Canada and put it all together. Nice bike with lots of grunt. Years later I bought a GS1150E that I was gonna rehab but didn't. Advertised the engine on dragbike.com. It sold pretty quickly as I recall.That picture shows when Mini Sprints were Downright Mean and nasty fast cars, Early GS & GSX Motors were and still are some of the best engines and held more Records in drag racing than any other Motorcycle engine. So used the Carb bodies to move air for the Hilborn that's pretty cool
Hahaha Mom would say similar things about me My Family is from Italy and me being first Gen American. All the men in our family rode and raced cars and bikes and my Moms brother my Uncle owned a Motorcycle Dealership in NYC that sold Moto Guzzis, Ducati, Laverda, and Triumph so I grew up in this working between the bike shop and my grandfathers Gas Station knowing nothing else I made a good life from things that run on Gasoline.
So to Continue the saga here are the Cam spec of the ZG14 motor using factory-installed stock Exhuast cam and one using the ZX14 Exhaust cam. What's going to be nice is idle will be as smooth as stock being the separation angle will be 112.0 Degrees. Most performance cams run with less exhaust backpressure LSA's of 109 degrees are more the norm. Lobe separation angles in turbochargers are around 112-114 degrees reason being is turbochargers are highly dependent on the exhaust backpressure present, But it appears Kawasaki uses backpressure to build low end and midrange torq, Just look at the pipe size on the ZG header along with the Cam. My thoughts are swapping cams is not going to give up torq but add more right in the heart of the Mid-Range, That five grand Dip might disappear?
Camshaft Calculations - Lobe Center / Duration using ZG14 Intake cam and ZG14 Exhaust cam
Your Concours 14 has an Overlap of 39.00 degrees and has an Intake Duration of 272.00 degrees. The Exhaust Duration is 254.00 degrees. Your Lobe Separation Angle is 112.00 degrees. The Inlet Cam has an Installed Centerline of 119.00 degrees ATDC. The exhaust cam has an Installed Centerline of 105.00 degrees BTDC.
Camshaft Calculations - Lobe Center / Duration using ZG14 Intake cam and ZX14 Exhaust cam
Your Concours 14 has an Overlap of 51.00 degrees and has an Intake Duration of 272.00 degrees. The Exhaust Duration is 278.00 degrees. Your Lobe Separation Angle is 112.00 degrees. The Inlet Cam has an Installed Centerline of 119.00 degrees ATDC. The exhaust cam has an Installed Centerline of 105.00 degrees BTDC.
Last edited:
Can’t wait to see the results!My thoughts are swapping cams is not going to give up torq but add more right in the heart of the Mid-Range, That five grand Dip might disappear?
Wayne
You and me both it’s been a rough project with some set- backs and almost threw the towel in!Can’t wait to see the results!
Wayne
Extremely educational conversations with people that know very well how the top end oiling on the ZG works and how important the cross drilling and oil groove in the ZG Exhaust cam play a important role in supporting the VVT and top end oiling.
I'll admit that I don't understand most of what you sed.
But, I do understand that your making progress..
Yahoooooooooooooo
Ride safe, Ted
But, I do understand that your making progress..
Yahoooooooooooooo
Ride safe, Ted
I want to add to what Jeff said. What made me want to expand on his numbers is the fact that he shows that the 2 different exhaust cams are at the same centerline. This shows that cam lobe centerline numbers are not really that important. They're a good reference number and easy to arrive at, so if you want to remove and replace a cam back to the same position, then this is good way to do it. But valve opening and closings are at different degrees on the two different cams. even with the same centerline.
If you want to know what your valves are doing, then you need to press on a bit further. First I should say that small displacement in-line 4, 4 valve dohc motors like the number 52. The single most important valve timing event is closing the intake valve at 52 degrees ABDC. The second most important valve timing event is to open the exhaust valve at 52 degrees BBDC. These are very true statements concerning high performance street motors, dirt motors and used to be true for road race motors. It moves the power band lower in the rpm range for more power coming off corners. This will explode some people's minds that only know "overlap and "duration ". Those are true in the drag racing world where the rpm is maxed out continuously, and then your overlap can scavenge some intake charge for you.
One bad thing about timing the cams the way I said is that the motor will hit a wall and not accelerate past a certain point. BUT WITH THE ADVENT OF VVT, you can now have your cake and eat it too! At that certain point of hitting a wall, you retard the intake cam and keep accelerating!
Thanks to Jeff for keeping us updated and thinking. This is good stuff.
She runs! ZX14 throttle Bodies, Zx14 exhaust cam, Black Widow header Zx14 oil pump plate gear and relief valve / high oil pressure and volume. Manual cam chain adjuster,Sounds good no oil or coolant leaks.
The exhaust sound from the stock muffler is loud and raspy combination of high lift and longer duration. Trying to post a video but it seems this site will not let me
The exhaust sound from the stock muffler is loud and raspy
combination of high lift and longer duration. Trying to post a video but it seems this site will not let meGet that thing tuned and let’s see what you got! Awesome to hear the experimenting and testing is continuing - very exciting!She runs! ZX14 throttle Bodies, Zx14 exhaust cam, Black Widow header Zx14 oil pump plate gear and relief valve / high oil pressure and volume. Manual cam chain adjuster,Sounds good no oil or coolant leaks.
The exhaust sound from the stock muffler is loud and raspy
Wayne, Carol & Blue
It "IS ALIVE"!She runs! ZX14 throttle Bodies, Zx14 exhaust cam, Black Widow header Zx14 oil pump plate gear and relief valve / high oil pressure and volume. Manual cam chain adjuster,Sounds good no oil or coolant leaks.
The exhaust sound from the stock muffler is loud and raspy
(I wanna hear it..)
Ride safe, Ted
COG member brings down YouTube:Thanks for the Advice I tried everything to no avail so I created a y tube account, this way I can post future updates
An error occurred. Please try again later. (Playback ID: m-mrxOZAS8kryIV5)
I’ll check it later - see how this is, however, every time I have listened to exhaust on a video it’s nothing like in the flesh.
The link is not broken. It works for me.This is strange the link here is broke but working perfectly on y tube and Facebook
I can see/hear it.Posting a y tube link
(Sounds good. Almost a lumpy idle)
Now that I've seen it, I wanna see it goooooo...
Ride safe, Ted
Working on Ted’s link - she be running.I can see/hear it.
(Sounds good. Almost a lumpy idle)
Now that I've seen it, I wanna see it goooooo...
Ride safe, Ted
+1 let’s see that thing go with some optimized tuning and get some performance feedback!
Good job sticking with it Jeff.
Wayne, Carol & Blue
Wow that sounds nice! Other than the heaviness of the stock exhaust back half, the machine gives the impression that it’s going to tear up some tires. Really throaty.
Let’s see a couple vids of take-offs and decelerations. And of course we’re all anxious to know if this is boosting performance over what a simple ECU tune and exhaust swap will provide. And maybe there’s a question of how much weight savings were netted from all the manhours put into the ZX parts integration.
Personally, I’m curious to know about the durability of the machine after it’s been on the road for a while.
Thx for sharing all your hard work and experimentation! Truly a COG lifer! :^ ) AB
Hello Jeff. I have been following your build for several months. Just want to commend you for your time and diligence invested thus far. The YouTube video is very interesting. The motor sounds real strong ! Based on your feedback and final dyno pulls, I will make a decision weather to install a exhaust cam in my Connie. I have a 2009 with a flash, AreaP full system and PC. It will dyno at 165 hp. My guess is your setup should produce 175 hp on pump gas. This is very strong for a all motor Connie. You and Laker did discuss the frame strength of the Connie. I was unaware that the frame had a limit. Any way this can be strengthened ? Laker mentioned a H frame bracket I believe. Any specs for this ? I have several additional questions for you Sir:
1) Throttle Body upgrade: Unable to find any real data on before and after gains. In my set-up I believe I would loose TQ in the power band due to less velocity. In your set-up, it should work well. Real curious on this one....
2) Installing the cam would be a drop-in, correct ? Is there a need to degree ?
3) What was the cost of drilling and groove work from WEB ?
4) What year exhaust cam do I purchase for the build ?
Thank you,
Sean
Hello Sean, Glad you liked it, and thank you! My Responses will be 1 through 4 to match your questions in that orderHello Jeff. I have been following your build for several months. Just want to commend you for your time and diligence invested thus far. The YouTube video is very interesting. The motor sounds real strong ! Based on your feedback and final dyno pulls, I will make a decision weather to install a exhaust cam in my Connie. I have a 2009 with a flash, AreaP full system and PC. It will dyno at 165 hp. My guess is your setup should produce 175 hp on pump gas. This is very strong for a all motor Connie. You and Laker did discuss the frame strength of the Connie. I was unaware that the frame had a limit. Any way this can be strengthened ? Laker mentioned a H frame bracket I believe. Any specs for this ? I have several additional questions for you Sir:
1) Throttle Body upgrade: Unable to find any real data on before and after gains. In my set-up I believe I would loose TQ in the power band due to less velocity. In your set-up, it should work well. Real curious on this one....
2) Installing the cam would be a drop-in, correct ? Is there a need to degree ?
3) What was the cost of drilling and groove work from WEB ?
4) What year exhaust cam do I purchase for the build ?
Thank you,
Sean
1) Never found solid proof dyno or 1/4 mile results showing horsepower increase. The Intake manifold on the Concours is 44mm matching the intake port size, so the theory of Kawasaki installing smaller throttle bodies to increase port velocity in my opinion to increase low end is incorrect, It was done to limit the top-end power the Japanese are famous for parts shelving high-end motors to fit a usage scope.
2) I did not advance or retard the cam I felt the aspects Kawasaki built into the cam were good for low-end mid-range-top-end, ( I posted the final numbers and compared them to the stock ZG numbers, it was a win-win) My process was more of blueprinting using a slotted cam gear to get my centerlines as perfect as possible with the slack removed from the cam chain.
Also, Performed a valve adjustment and set every exhaust valve between 0.2290 to 0.2300 mm Intakes were all set to 0.1500 after setting the Intakes I looked up and said Umm Thanks!
3) I would think it should be around $50.00 plus shipping
4) I used 2006 through 2007 ZX14 eBay 49.99 and also replaced my Intake with early 2008 through 2010 ZG steel cam eBay 55.00, The early ZG valve train was lighter than the later cast cams and I feel there is less twisting up in the higher RPM.
With just fixing the AFR and not turning off any ECU restrictions at 9200 Rpm 154.87 peak HP and carried peak torq 95.33 at 6200 Rpm using a Black widow header with the stock muffler. Hole-sawing the first steel baffle helped it rev quicker and using the Ram Air Effect Fans we tune the race bikes with Bumped peak HP to 161.20 and torq 98.44
My Thoughts so far.........
The black widow header will hold back gains along with the stock muffler but I have to credit Kawasaki for using a muffler with such volume to move air, There is a bottleneck at the outlet and going through the gears up to the rev limiter secondaries shutting it down sounds Erie like an old Detroit 8v92 diesel.
Using a gifted tuner and raising the rev limit to take advantage of their VVT tuner skills using an Area P or Akrapovic Header for ZX14R using Dual mufflers, a High side of 175 to mid 180s with 110 to 114 foot-pounds of torq.
The frame issue I had was from the First Concours 14 I built for Grudge racing down in Mexico, It honestly was 13.5 compression, Ported ZX14 Cylinder head, 48mm throttle bodies Custom ground Camshafts Marine crank over two hundred rear-wheel horsepower, and then using a 3 stage 250 wet spray, I think the frame is built alright up to a limit its the shaft set up transferring the jacking motion that split the mounting points,
I readily admit that I'm not a tuner / not a Cam guy; Trying to understand the ZX Ex Cam install more.
On Sean's question/your answer #2, and based on your previous note. (see below)
*If you set the Lobe centerlines at the same point (105*) wouldn't the duration of the ZX Ex cam (Ex Valve starts opening sooner) cause more overlap than a ZG Ex Cam at low RPM's?
**If so, wouldn't actual compression be lower? (ie; Less actual compression may develop less low end torque)
***Also; If you used a ZG Cam Gear, is the Lobe CL located the same as if you used a stock ZX Cam gear?
ie; If you used the timing marks on the different Cam gears, are both cam's ground to have the same CL?
Ride safe, Ted
Camshaft Calculations - Lobe Center / Duration using ZG14 Intake cam and ZG14 Exhaust cam
Your Concours 14 has an Overlap of 39.00 degrees and has an Intake Duration of 272.00 degrees. The Exhaust Duration is 254.00 degrees. Your Lobe Separation Angle is 112.00 degrees. The Inlet Cam has an Installed Centerline of 119.00 degrees ATDC. The exhaust cam has an Installed Centerline of 105.00 degrees BTDC.
Camshaft Calculations - Lobe Center / Duration using ZG14 Intake cam and ZX14 Exhaust cam
Your Concours 14 has an Overlap of 51.00 degrees and has an Intake Duration of 272.00 degrees. The Exhaust Duration is 278.00 degrees. Your Lobe Separation Angle is 112.00 degrees. The Inlet Cam has an Installed Centerline of 119.00 degrees ATDC. The exhaust cam has an Installed Centerline of 105.00 degrees BTDC.
Some great questions Ted! Let me try and break it down the best way i can for you to understand.I readily admit that I'm not a tuner / not a Cam guy; Trying to understand the ZX Ex Cam install more.
On Sean's question/your answer #2, and based on your previous note. (see below)
*If you set the Lobe centerlines at the same point (105*) wouldn't the duration of the ZX Ex cam (Ex Valve starts opening sooner) cause more overlap than a ZG Ex Cam at low RPM's?
**If so, wouldn't actual compression be lower? (ie; Less actual compression may develop less low end torque)
***Also; If you used a ZG Cam Gear, is the Lobe CL located the same as if you used a stock ZX Cam gear?
ie; If you used the timing marks on the different Cam gears, are both cam's ground to have the same CL?
Ride safe, Ted
Camshaft Calculations - Lobe Center / Duration using ZG14 Intake cam and ZG14 Exhaust cam
Your Concours 14 has an Overlap of 39.00 degrees and has an Intake Duration of 272.00 degrees. The Exhaust Duration is 254.00 degrees. Your Lobe Separation Angle is 112.00 degrees. The Inlet Cam has an Installed Centerline of 119.00 degrees ATDC. The exhaust cam has an Installed Centerline of 105.00 degrees BTDC.
Camshaft Calculations - Lobe Center / Duration using ZG14 Intake cam and ZX14 Exhaust cam
Your Concours 14 has an Overlap of 51.00 degrees and has an Intake Duration of 272.00 degrees. The Exhaust Duration is 278.00 degrees. Your Lobe Separation Angle is 112.00 degrees. The Inlet Cam has an Installed Centerline of 119.00 degrees ATDC. The exhaust cam has an Installed Centerline of 105.00 degrees BTDC.
There are also two ways to express compression: static compression ratio which is the ratio of maximum cylinder volume to minimum cylinder volume, and therefore is not/cannot be affected by timing. This is the measurement that is almost always referred to when reading about an engine's compression ratio.
dynamic compression ratio. Dynamic implying that it is not fixed and can change - which it does. It is affected by both valve timing and RPM.
At “lower RPM, compression can't effectively begin until the intake valve closes to seal the cylinder, so later the valve closes, the less cylinder pressure will result.
This also changes as RPM increases and the airflow velocity through the engine increases. Let me throw basic physics into this, Air has mass, thus it also possesses the properties of anything that has mass and is in motion, namely inertia. As RPM increases, the faster moving column of air in the intake tract will tend to keep “ramming” into the cylinder through the still open intake valve due to the air column's inertia, resulting in more compression/cylinder pressure than at lower RPM.
So yes, valve timing can have an effect on dynamic compression Kawasaki knew this and gave the ZG engine lower static compression knowing the VVT would control some of the Dynamic! Raising the compression at lower RPM.
Cam timing altering the center line degree in this case just the exhaust! My opinion and why I feel so strongly about the procedure is maybe on the first hundred stamped cam / crank gears your tolerance is what the true specs call for, but stamp out two hundred thousand and things change a lot!
Just a couple of degrees of misalignment affect the engine's peak efficiency. If there were perfect parts with no manufacturing incorrect tolerances, you would only need to line up the marks on the timing chain sprockets and the cam would be degreed, but group the different components camshaft, crankshaft, timing chain, and sprockets) all with their own standards and tolerances that when installed, build up against you.
few degrees of misalignment can affect the engine's operation dramatically. If there were no manufacturing tolerances, you would only need to line up the marks on the timing chain sprockets and the cam would be degreed, but with a group of components (the camshaft, crankshaft, timing chain, and sprockets) all with their own standards and tolerances that when installed, can stack up against you. I’m one of those engine guys that if I do not at least check I think about it and end up tearing it down thinking I left horsepower on the table.
There is always confusion over the terms centerline and lobe separation. Years ago lobe separation was referred to as centerline. And that is so wrong Centerline refers to the relationship of the maximum lift point on the cam lobe to the crankshaft. Lobe separation refers to the relationship of the lobes to each other, if you want I can explain the whole process, but I did not advance or retard the timing after looking at the numbers I felt the ZX exhaust cam was a perfect match to the ZG engine and all I did was just slightly correct the intolerance!
Hope I explained everything well, I tried and it’s long and drawn out if anyone wants more information, Our truck is loaded up and we’re ready to pull out towards bowling green Kentucky for the AMRA all Harley summer shoot out!
I will get back to you soon as I can
Last edited:
Thanks Jeff. When I sed Actual compression, I used the wrong word.
I was referring to Dynamic Compression Ratio.
ie; What the actual compression would be when the compression ratio is affected by valves opening/closing/ etc.
My guess is with more overlap from the ZX Ex cam, the actual compression (pressure) will be lower at low RPM's than a bike with a ZG Cam?
I also don't recall:
{With variable valve timing} Does the timing change on the exhaust, the intake, or both valves?
And does that valve timing advance or retard as RPM's rise?
Watched some YouTube videos.
My thought is only 1 move's.
(I think) it; Advances the intake at low RPM's.
,,,,,,,,,,,,,,,,,,,,,Retards the intake {as the RPM's rise}.
Having a heck of a time visualizing that..
Ride safe, Ted
Last edited:
Camshaft Overlap has no effect on dynamic compression it’s intake valve closing that effects it more then anything! That’s why I mentioned the VVT controlling the intake cam timing. To build horsepower the VVT retards as rpm climb, advanced is at lower rpm for throttle response and torqueThanks Jeff. When I sed Actual compression, I used the wrong word.
I was referring to Dynamic Compression Ratio.
ie; What the actual compression would be when the compression ratio is affected by valves opening/closing/ etc.
My guess is with more overlap from the ZX Ex cam, the actual compression (pressure) will be lower at low RPM's than a bike with a ZG Cam?
So that we're on the same page, I'm referring to basic VVT with low throttle openings (for riding/cruising), not WOT accell's.
Bear with me.
I have to work this out (step by step) in my feeble little mind.
I want to emphasize that all the sentences should start with "I think"..
In my little mind;
When the ramps of the Exhaust and Intake Cam Lobes "overlap" the cam lobes hold the valves partially open.
NOTE: In an engine cycle; the exhaust valve closes just before the intake valve opens.
So, the "Cam lobe overlap" is between the closing side of the Exhaust Cam Lobe, and the opening side of the Intake Cam lobe.
With cam overlap, "both" valves are slightly open during the overlap period.
& (With the valves partially open) compression can't build properly.
The greater the Intake advance/overlap, the more time the valves are open at the same time.
With no Intake valve advance / no overlap; the exhaust would be closed before the intake starts to open. (Like my Model T Engine)
With more intake valve advance / more overlap; the Exhaust valve is open when the intake starts to open.
With less intake valve advance / Less overlap; the Exhaust Valve is almost closed when the intake starts to open.
Am I on the right track?
Geez, my head hurts!
Ride safe, Ted
Last edited:
Enjoy this discussion Troops ! Cams are the science of performance. In my previous motorcycles, I installed a intake cam in the exhaust side and produced impressive gains. They were Suzuki model GSXR 1000 and Gen 1 Busa. The best setting was 106/104 if I can recall. One of the local drag racers at the time, was beating all the stronger Busa's with just the two intake cams ver stage one's. I can see this working well on the Concourse. Jeff, I would really like to see what you could pull with better exhaust, raised rev limit(flash) and a few other tricks. I feel you could pull 175(+) on a daily driver. Very impressive with no head work. Wanted to offer another hot rod trick making the rounds on the ZX-14 forums. Run a ZX10R flywheel & stator with custom spacer on the Connie. You are taking a pound of rotating mass off the assembly. I have seen a 3hp gain doing this. SAE Outlaw racing also makes a titanium clutch basket kit that also reduces weight. I believe this will fit the Connie. A few questions:
1) Any issues running the upgraded pressure valve in the Connie ? Would this create too much pressure for the proper function of the VVT ? I was previously advised not to run the pressure valve as it would cause other issues. Does the stock valve blow off at 90 psi ?...Curious.
2) Any way to strengthen the mounting points you mentioned on the frame ? Laker previously mentioned some sort of H bracket to reduce the shock to the driveline. How would I make one of these ? Photo ?...Laker, chime in.
3) Your final dyno pull was 161.20, correct ?
4) What oil are you running ?
5) Did you remove the back torque limiter ?
Thank you,
Sean
See no feeble mind your on the right track!So that we're on the same page, I'm referring to basic VVT with low throttle openings (for riding/cruising), not WOT accell's.
Bear with me.
I have to work this out (step by step) in my feeble little mind.
I want to emphasize that all the sentences should start with "I think"..
In my little mind;
When the ramps of the Exhaust and Intake Cam Lobes "overlap" the cam lobes hold the valves partially open.
NOTE: In an engine cycle; the exhaust valve closes just before the intake valve opens.
So, the "Cam lobe overlap" is between the closing side of the Exhaust Cam Lobe, and the opening side of the Intake Cam lobe.
With cam overlap, "both" valves are slightly open during the overlap period.
& (With the valves partially open) compression can't build properly.
The greater the Intake advance/overlap, the more time the valves are open at the same time.
With no Intake valve advance / no overlap; the exhaust would be closed before the intake starts to open. (Like my Model T Engine)
With more intake valve advance / more overlap; the Exhaust valve is open when the intake starts to open.
With less intake valve advance / Less overlap; the Exhaust Valve is almost closed when the intake starts to open.
Am I on the right track?
Geez, my head hurts!
Ride safe, Ted
We run similar circles, Sean The Busa mod as well as the GSX-R intake cam mod we were doing a few years ago with great results.Enjoy this discussion Troops ! Cams are the science of performance. In my previous motorcycles, I installed a intake cam in the exhaust side and produced impressive gains. They were Suzuki model GSXR 1000 and Gen 1 Busa. The best setting was 106/104 if I can recall. One of the local drag racers at the time, was beating all the stronger Busa's with just the two intake cams ver stage one's. I can see this working well on the Concourse. Jeff, I would really like to see what you could pull with better exhaust, raised rev limit(flash) and a few other tricks. I feel you could pull 175(+) on a daily driver. Very impressive with no head work. Wanted to offer another hot rod trick making the rounds on the ZX-14 forums. Run a ZX10R flywheel & stator with custom spacer on the Connie. You are taking a pound of rotating mass off the assembly. I have seen a 3hp gain
1) Any issues running the upgraded pressure valve in the Connie ? Would this create too much pressure for the proper function of the VVT ? I was previously advised not to run the pressure valve as it would cause other issues. Does the stock valve blow off at 90 psi ?...Curious.
2) Any way to strengthen the mounting points you mentioned on the frame ? Laker previously mentioned some sort of H bracket to reduce the shock to the driveline. How would I make one of these ? Photo ?...Laker, chime in.
3) Your final dyno pull was 161.20, correct ?
4) What oil are you running ?
5) Did you remove the back torque limiter ?
Thank you,
Sean
We did the ZX10R stator on the Grudge roller, The engine spooled up so quick but I need the heavy flywheel in this street bike to gett its big ass rolling
1) no issues at all running the upgraded pressure valve and do not foresee any, all it does Sean is to allow oil pressure to keep climbing up to 110psi (40psi higher than stock) if needed in the most extreme to ensure plenty of oil flow to key components such as rod bearings and cam buckets so it's not a conversion to a 110 psi oil system full time, Kawasaki should have fixed on the ZG engine when they released the 2012 ZX14R that received the updated oil pump to help the Rods and mains that were blowing up on the Early ZX motors, I did it more for the shitty top end oiling that Kawasaki floods the exhaust cam journals and transfers with pipes to the Intake journals since my plan is to rev it higher and longer. The other thing to point out is those 12 o-rings for the VVT for camshaft oiling should be changed at every valve adjustment cause the ones I pulled on my 7000-mile bike were hard and the valve cover keeps the pipes locked down but does not prevent leakage so just an FYI spend the 70 bucks!
The upgrade is three parts = The High Volume Oil Pump Gear is a direct bolt-in replacement for the OEM oil pump gear. This gear causes the pump to turn at faster speeds which increases oil volume something the ZG lacks and thus pressure at a lower RPM. 32psi with stock gear. 52psi with high volume gear. 6000RPM, 72psi stock high volume gear. Billet Oil Pump Cover replaces the stock cast aluminum unit that flexes and loses its seal with high pressure.
The VVT system is a Mitsubishi automotive system that Kawasaki purchased the rights to just like the KiPASS and the ECU, Their rally cars run over 120 psi with no issues
2) Yes there is a way to strengthen the frame mounting points and I believe the honorary knowledgeable Laker is the man!! on that so hopefully he exits the seat and cup holder conversations and chimes in on the fun page, PLEASE NOTE PEOPLE OF COG I WAS JUST JOKING ABOUT SEATS AND CUP-HOLDERS REALLY WAS
3) My final run was 161.20 blowing 150 MPH air into the ram air, No other tuning was done except raising the Rev Limiter and adjusting the AFR, Adding notes below on the dyno I,m using!
4) Shell Rotella T6 15w40 purchased at Walmart by the gallon
Let me tell you why! for 37 years I have been in the Diesel world mostly as a mechanic and the last seven as a service Manager before moving on to my boujee job of diagnostic software.So in my expert opinion Millions of trucks in America support a supply chain, Those engines although are low revving have massive gear trains and connecting rod bearings the size of motorcycle gears, extremely close tolerance hi-pressure rail fuel system that shear oil viscosity and reduces it to Iced tea, Shell Rotella like other name brand Diesel oils are trusted to a level of National Security to keep the supply chain moving! Besides the amount of zinc in the oil is big and these big motorcycle cam buckets just love it, with all the oil testing we have done the guys in the Road race shop also use it and only slap Motul stickers on the side of the bike when it's paying out that race, That's right boys and girls the AMA winning 1000cc Aprilia Champ runs truck oil its also Jaso certified for wet clutch although they run dry clutch. But it's no secret Sean those Gold Wing riders have been using it since the 80s logging 300 thousand miles!
5) back-torque limiter, is long gone its got the Brocks kit, for now, it's staying in this bike since it will be my Touring bike or maybe even my frequent everyday bike since I rarely use four wheels and ride to the office every day on a bike, This Concours is growing on me the ride is so smooth and this Whale goes around turns better than my 433-pound street fighter, still scratching my head, But it will be useful if and when I drag race it
We have three Dynos with the newest being a SuperFlow SF250A, and Factory Pro EC997 both of those being state-of-the-art technology, Unlike my road racing brothers I'm the low guy on the pole being the dirty Harley drag racer stuck with using a very old Dyno Jet, Actually, the way it happened that day of the Stock baseline run the other two were in use so to stay true to myself I have continued to use it. Compared to the other Dynos this one tends to be very Happy with its numbers by four percent even after updates and I only use SAE correction factors.
Also do not consider myself a gifted tuner although I get by! and hopefully, a deal goes through for a really good tune and that will let me continue my Concours tuning
Last edited:
No cup holder, flower sniffin or 2-hour lunch's here. I'll post up some pictures for your viewing pleasure. I actually forgot what I had already figured out 10 years ago when I went thru this. While I do agree that the frame probably comes into play after the gyrations start. The main culprit is the axle! That poor skinny but LONG rear axle is asked to tie both sides of the tetra-lever system together all by itself. If you remove the wheel/axle you will notice that the 2 sides are completely independent. Because of the flexy axle, the drive shaft side starts to move up and down before the right side and eventually you have an axle that looks like a whip. Unlike a normal swingarm which is cast as one piece, or if a welded unit, it will have a giant gusset just in front of the tire. The more power the beefier the swingarm. So, my H-frame addresses this by tying the 2 sides together and consequently does transfer some of the load to the upper strut tabs, thereby reducing the stress on the swingarm mounts. I wish I would have added more gusseting but since its already electroless nickel plated i didn't want to mess that up with more welding. But it works just fine the way it is. No more high-speed wobbles. For those that are unaware, I had an issue of the rear tire moving 2 inches total, left and right at the top of the tire, while riding in Mexico around some high-speed sweepers. And it continued to get worse even at lower speeds like in Missouri. I'm told by the nice folks on the other forum that machinists are a dime a dozen and basically anybody can do this. So, it really should be common knowledge. 
I forgot to mention anything about cams.
I forgot to mention anything about cams.
Attachments
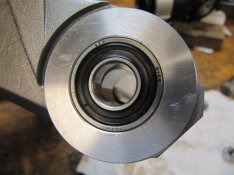
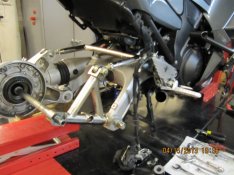
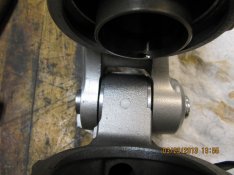
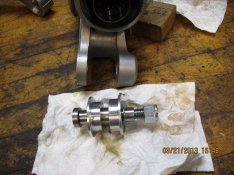
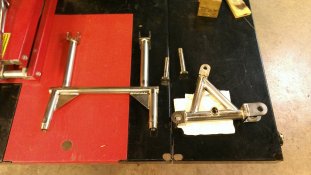
Last edited:
Intelligent Engineering with Beautiful Craftmanship hats off to you Laker, Do you market this fix?No cup holder, flower sniffin or 2-hour lunch's here. I'll post up some pictures for your viewing pleasure. I actually forgot what I had already figured out 10 years ago when I went thru this. While I do agree that the frame probably comes into play after the gyrations start. The main culprit is the axle! That poor skinny but LONG rear axle is asked to tie both sides of the tetra-lever system together all by itself. If you remove the wheel/axle you will notice that the 2 sides are completely independent. Because of the flexy axle, the drive shaft side starts to move up and down before the right side and eventually you have an axle that looks like a whip. Unlike a normal swingarm which is cast as one piece, or if a welded unit, it will have a giant gusset just in front of the tire. The more power the beefier the swingarm. So, my H-frame addresses this by tying the 2 sides together and consequently does transfer some of the load to the upper strut tabs, thereby reducing the stress on the swingarm mounts. I wish I would have added more gusseting but since its already electroless nickel plated i didn't want to mess that up with more welding. But it works just fine the way it is. No more high-speed wobbles. For those that are unaware, I had an issue of the rear tire moving 2 inches total, left and right at the top of the tire, while riding in Mexico around some high-speed sweepers. And it continued to get worse even at lower speeds like in Missouri. I'm told by the nice folks on the other forum that machinists are a dime a dozen and basically anybody can do this. So, it really should be common knowledge.
I forgot to mention anything about cams.
I might make some of the H frames. Sadly, that was a cut and fit kind of project, and I didn't make any drawings. So, I'd have to take mine apart to copy and make sure the new one fit. So that might happen this winter if somebody wanted one. The other thing is, in Jeffs case, where he's massively twisting the rear wheel (because of the driveshaft), it may also overpower the upper strut tabs where the H frame attaches. So that may need some gusseting. I'd have to look at it. The H frame is 90% of the fix, the rest of that stuff is nice and rock solid, but probably unnecessary, especially for straight line work.
Thanks Dave I probably could use your set up on this bike in the future so I will reach out come winterI might make some of the H frames. Sadly, that was a cut and fit kind of project, and I didn't make any drawings. So, I'd have to take mine apart to copy and make sure the new one fit. So that might happen this winter if somebody wanted one. The other thing is, in Jeffs case, where he's massively twisting the rear wheel (because of the driveshaft), it may also overpower the upper strut tabs where the H frame attaches. So that may need some gusseting. I'd have to look at it. The H frame is 90% of the fix, the rest of that stuff is nice and rock solid, but probably unnecessary, especially for straight line work.
Thank you Jeff. Your response is five star. Just want to elaborate on a few points. Regarding the oil lubrication upgrades to the ZX/ZG motors. I already have the oil pump plate and K/P engineering oil filter installed. I attempted to install the oil gear (Robinson,) and it did not fit. Called Robinsons and determined it would not fit the Connie. For whatever reason, the Connie oiling system is different from the ZX-14. I suspect VVT.We run similar circles, Sean The Busa mod as well as the GSX-R intake cam mod we were doing a few years ago with great results.
We did the ZX10R stator on the Grudge roller, The engine spooled up so quick but I need the heavy flywheel in this street bike to gett its big ass rolling
1) no issues at all running the upgraded pressure valve and do not foresee any, all it does Sean is to allow oil pressure to keep climbing up to 110psi (40psi higher than stock) if needed in the most extreme to ensure plenty of oil flow to key components such as rod bearings and cam buckets so it's not a conversion to a 110 psi oil system full time, Kawasaki should have fixed on the ZG engine when they released the 2012 ZX14R that received the updated oil pump to help the Rods and mains that were blowing up on the Early ZX motors, I did it more for the shitty top end oiling that Kawasaki floods the exhaust cam journals and transfers with pipes to the Intake journals since my plan is to rev it higher and longer. The other thing to point out is those 12 o-rings for the VVT for camshaft oiling should be changed at every valve adjustment cause the ones I pulled on my 7000-mile bike were hard and the valve cover keeps the pipes locked down but does not prevent leakage so just an FYI spend the 70 bucks!
The upgrade is three parts = The High Volume Oil Pump Gear is a direct bolt-in replacement for the OEM oil pump gear. This gear causes the pump to turn at faster speeds which increases oil volume something the ZG lacks and thus pressure at a lower RPM. 32psi with stock gear. 52psi with high volume gear. 6000RPM, 72psi stock high volume gear. Billet Oil Pump Cover replaces the stock cast aluminum unit that flexes and loses its seal with high pressure.
The VVT system is a Mitsubishi automotive system that Kawasaki purchased the rights to just like the KiPASS and the ECU, Their rally cars run over 120 psi with no issues
2) Yes there is a way to strengthen the frame mounting points and I believe the honorary knowledgeable Laker is the man!! on that so hopefully he exits the seat and cup holder conversations and chimes in on the fun page, PLEASE NOTE PEOPLE OF COG I WAS JUST JOKING ABOUT SEATS AND CUP-HOLDERS REALLY WAS
3) My final run was 161.20 blowing 150 MPH air into the ram air, No other tuning was done except raising the Rev Limiter and adjusting the AFR, Adding notes below on the dyno I,m using!
4) Shell Rotella T6 15w40 purchased at Walmart by the gallon
So in my expert opinion Millions of trucks in America support a supply chain, Those engines although are low revving have massive gear trains and connecting rod bearings the size of motorcycle gears, extremely close tolerance hi-pressure rail fuel system that shear oil viscosity and reduces it to Iced tea, Shell Rotella like other name brand Diesel oils are trusted to a level of National Security to keep the supply chain moving! Besides the amount of zinc in the oil is big and these big motorcycle cam buckets just love it, with all the oil testing we have done the guys in the Road race shop also use it and only slap Motul stickers on the side of the bike when it's paying out that race, That's right boys and girls the AMA winning 1000cc Aprilia Champ runs truck oil its also Jaso certified for wet clutch although they run dry clutch. But it's no secret Sean those Gold Wing riders have been using it since the 80s logging 300 thousand miles!
5) back-torque limiter, is long gone its got the Brocks kit, for now, it's staying in this bike since it will be my Touring bike or maybe even my frequent everyday bike since I rarely use four wheels and ride to the office every day on a bike, This Concours is growing on me the ride is so smooth and this Whale goes around turns better than my 433-pound street fighter, still scratching my head, But it will be useful if and when I drag race it
We have three Dynos with the newest being a SuperFlow SF250A, and Factory Pro EC997 both of those being state-of-the-art technology, Unlike my road racing brothers I'm the low guy on the pole being the dirty Harley drag racer stuck with using a very old Dyno Jet, Actually, the way it happened that day of the Stock baseline run the other two were in use so to stay true to myself I have continued to use it. Compared to the other Dynos this one tends to be very Happy with its numbers by four percent even after updates and I only use SAE correction factors.
Also do not consider myself a gifted tuner although I get by! and hopefully, a deal goes through for a really good tune and that will let me continue my Concours tuning
I will do more research regarding the pressure valve in the Connie. I was informed by several performance shops that excessive pressure may cause damage to other components, I like your analysis thou. I run T6 synthetic in the bikes. Thank you for the o-ring replacement thought. As far as kawasaki fixing the oiling system in the 2012 ZX-14R, it didn't happen. The 14R's are loosing #3 rod bearing all over the Country in all sorts of conditions. The forums are full of horror stories. The oil mods are a absolute must in my opinion. The Connie motors do not seem to eat rod bearings Jeff. I feel you have more hidden (hp) in your Connie, just needs a aggressive flash/tune and a performance muffler. I want to see the camshaft shine brother ! Based on your camshaft research for the Connie, I will start gathering the parts I need to do the install. I'm excited about the project. To be continued....
Thank you,
Sean
Hello Laker. Thank you very much regarding your response to the frame issue on the Connie. I really appreciate the engineering in your H bracket. It looks very sturdy indeed ! I would be very interested in this product. Let me know a ballpark cost and we can start the planning/fabrication process. Having 90 % of the fix is good enough for me Laker. I'm a street rider, no drag racing. I do enjoy rev-limiter runs thou...lol.I might make some of the H frames. Sadly, that was a cut and fit kind of project, and I didn't make any drawings. So, I'd have to take mine apart to copy and make sure the new one fit. So that might happen this winter if somebody wanted one. The other thing is, in Jeffs case, where he's massively twisting the rear wheel (because of the driveshaft), it may also overpower the upper strut tabs where the H frame attaches. So that may need some gusseting. I'd have to look at it. The H frame is 90% of the fix, the rest of that stuff is nice and rock solid, but probably unnecessary, especially for straight line work.
Thank you,
Sean
Beautiful !No cup holder, flower sniffin or 2-hour lunch's here. I'll post up some pictures for your viewing pleasure. I actually forgot what I had already figured out 10 years ago when I went thru this. While I do agree that the frame probably comes into play after the gyrations start. The main culprit is the axle! That poor skinny but LONG rear axle is asked to tie both sides of the tetra-lever system together all by itself. If you remove the wheel/axle you will notice that the 2 sides are completely independent. Because of the flexy axle, the drive shaft side starts to move up and down before the right side and eventually you have an axle that looks like a whip. Unlike a normal swingarm which is cast as one piece, or if a welded unit, it will have a giant gusset just in front of the tire. The more power the beefier the swingarm. So, my H-frame addresses this by tying the 2 sides together and consequently does transfer some of the load to the upper strut tabs, thereby reducing the stress on the swingarm mounts. I wish I would have added more gusseting but since its already electroless nickel plated i didn't want to mess that up with more welding. But it works just fine the way it is. No more high-speed wobbles. For those that are unaware, I had an issue of the rear tire moving 2 inches total, left and right at the top of the tire, while riding in Mexico around some high-speed sweepers. And it continued to get worse even at lower speeds like in Missouri. I'm told by the nice folks on the other forum that machinists are a dime a dozen and basically anybody can do this. So, it really should be common knowledge.
I forgot to mention anything about cams.
Hi Sean and thanks for your kind words! A more aggressive tune will be coming along with a videos of 1/4 mile passes. Really sorry they told you the ZG/ZX do not share the same lower end oil components. And really not sure how they determined it so I listed both parts list that show part numbers. Just an FYI the main parts of the oil gyro pump do not get replaced, just the plate and gear and that needs to be pressed off and on. Again not sure why a manufacturer told you the pumps # 16154-0047 is different between the two and how they determined high volume and 20psi over stock pressure can effect the VVT negatively. Also Sean one last thought on that is the Connie’s are not losing Rod bearing maybe because the vocation of the bike and different rider I’m sure 99.9 percent don’t shift there concours at 9800rpm. If I can help you in anyway just PM me. Good luck with the build!! Ohh and there is a guy on FB and you tube that got his concours in the Low 9s running ZX14 body work, Brock’s parts and flashed by Ivan’sThank you Jeff. Your response is five star. Just want to elaborate on a few points. Regarding the oil lubrication upgrades to the ZX/ZG motors. I already have the oil pump plate and K/P engineering oil filter installed. I attempted to install the oil gear (Robinson,) and it did not fit. Called Robinsons and determined it would not fit the Connie. For whatever reason, the Connie oiling system is different from the ZX-14. I suspect VVT.
I will do more research regarding the pressure valve in the Connie. I was informed by several performance shops that excessive pressure may cause damage to other components, I like your analysis thou. I run T6 synthetic in the bikes. Thank you for the o-ring replacement thought. As far as kawasaki fixing the oiling system in the 2012 ZX-14R, it didn't happen. The 14R's are loosing #3 rod bearing all over the Country in all sorts of conditions. The forums are full of horror stories. The oil mods are a absolute must in my opinion. The Connie motors do not seem to eat rod bearings Jeff. I feel you have more hidden (hp) in your Connie, just needs a aggressive flash/tune and a performance muffler. I want to see the camshaft shine brother ! Based on your camshaft research for the Connie, I will start gathering the parts I need to do the install. I'm excited about the project. To be continued....
Thank you,
Sean
Link to Oil Pump mod parts
Attachments
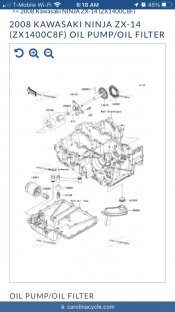

Last edited:
I'll let you know but its gonna be November. Your temporary status may be up by then.Let me know a ballpark cost and we can start the planning/fabrication
Thank you Laker. Don't worry, I will extend my membership status. November it is. Any ballpark cost to fabricate the components ?
Hello Jeff. Thank you for your response. Wanted to paint you the narrative regarding my experience attempting to upgrade the oil pump gear in my 2009 Connie. As I previously mentioned, I installed the oil pump plate and K/P engineering oil filter. I wanted to upgrade the oil pimp gear as I have done to my 14R. I checked the part numbers and they matched. I ordered the gear from Robinsons and reached out to my tech for install. Upon taking the stock gear off, my tech attempted to fit the Robinson gear and it would not fit. We reached out to Robinsons who cross referenced the part number and in fact the Connie is different from a ZX-14 same year model. I sent the gear back. I was disappointed to say the least. For whatever reason, the Connie VVT system uses a different gear. I believe it may already be a high volume gear. Unless this is a complete brain fart, the gear does not work in the Connie Jeff. I did see the drag bike Connie, I believe he blew that bike up. Love to see a strong dyno pull from your build. Regarding the high-pressure valve upgrade in the Connie, let me reach out to my hi-pro shops and get some feedback. Maybe this would be ideal for my final oil mod upgrade. Honestly Jeff, I believe your bike should be in the 170 hp dyno range, no ram air. You have all the goodies that Connie hot rodders talk about. Drop me your e-mail so I can PM you...Take care.
Hello Laker. I was just looking at the photos of the H bracket and assorted bushings. Looking at photo #1, the H bracket : Would you strengthen the top of the H like you strengthened the middle ? Another words, place a triangle reinforcement on the top part of the H. I would believe that would have a significant amount of stress within the bracket...JMONo cup holder, flower sniffin or 2-hour lunch's here. I'll post up some pictures for your viewing pleasure. I actually forgot what I had already figured out 10 years ago when I went thru this. While I do agree that the frame probably comes into play after the gyrations start. The main culprit is the axle! That poor skinny but LONG rear axle is asked to tie both sides of the tetra-lever system together all by itself. If you remove the wheel/axle you will notice that the 2 sides are completely independent. Because of the flexy axle, the drive shaft side starts to move up and down before the right side and eventually you have an axle that looks like a whip. Unlike a normal swingarm which is cast as one piece, or if a welded unit, it will have a giant gusset just in front of the tire. The more power the beefier the swingarm. So, my H-frame addresses this by tying the 2 sides together and consequently does transfer some of the load to the upper strut tabs, thereby reducing the stress on the swingarm mounts. I wish I would have added more gusseting but since its already electroless nickel plated i didn't want to mess that up with more welding. But it works just fine the way it is. No more high-speed wobbles. For those that are unaware, I had an issue of the rear tire moving 2 inches total, left and right at the top of the tire, while riding in Mexico around some high-speed sweepers. And it continued to get worse even at lower speeds like in Missouri. I'm told by the nice folks on the other forum that machinists are a dime a dozen and basically anybody can do this. So, it really should be common knowledge.
I forgot to mention anything about cams.
Sean
That was mentioned in post 81.Would you strengthen the top of the H like you strengthened the middle?
*********************************************
Also, I was just thinking (remembering) about another benefit to the H frame. Those 2 individual, stock, aluminum struts are shaped like an S and are weak enough that they act like a spring, an undamped spring. So, they absorb the energy from the wheel movement and immediately release it. That energy never makes it to the damper where it can be controlled. On my 3-way adjustable Penske I had to soften the high-speed setting from just past halfway to almost full soft.
I "think" the reasoning would be that since what must be a significant amount of energy is undamped in stock form, the shock is valved stiffer to really slow down what energy it does receive. Thereby giving the illusion of a medium valving. I'm still working on that explanation, but I do know for a fact when I first installed the H frame it felt like I was riding a hard tail. So much so that I thought I must have really screwed something up like a bind, or clearance issues or something! But no, the answer was softening the high-speed valving.
Thank you Laker. Working the science of suspension. Question: What would be a ballpark cost for this excellent upgrade ?
Somewhere between $300-$400 depending on how well it goes and the actual cost of powder coat. I threw in 25 for that. I have had other inquiries and I'll probably have to build some kind of down and dirty jig which hasn't been factored in. But I would eat that if I can get enough interest.
The cost surprised me too but there's more to it than meets the eye. For instance, the rod ends and rod end adaptors plus tubing costs is $80, powder coat 25? possibly buy stamped out gussets $10 each for 40 total. 5 pieces of tubing to prep and 12 welds. Adds up quick.
And 2 clevis ends to make from scratch of 4130n solid. Tubing is 4130n 1"od x .065 wall. Might go to .083 wall on that cross piece.
Im going to try to move all this H frame stuff over to the vendor area. Stepped on Jeffs thread pretty bad.
Last edited:
Thank you Laker. That's great value considering the upgrade and fabrication. I'm ready when you decide to build. Is it necessary to powder coat ? I have a powder coater in Florida that does ceramic coating. I would do ceramic instead. As previously mentioned, I would strengthen the upper portion of the H bracket using the same engineering in the middle portion. The triangle support seen in photo #1. Question: Is the main bushing upgrade in this kit capable of eliminating most of the flex (Left to Right,) in the rear suspension ? Curious...
Hello Jeff. What oil pump gear are you using in the Connie ? I tried the Robinson's and it did not fit...ThanxHi Sean and thanks for your kind words! A more aggressive tune will be coming along with a videos of 1/4 mile passes. Really sorry they told you the ZG/ZX do not share the same lower end oil components. And really not sure how they determined it so I listed both parts list that show part numbers. Just an FYI the main parts of the oil gyro pump do not get replaced, just the plate and gear and that needs to be pressed off and on. Again not sure why a manufacturer told you the pumps # 16154-0047 is different between the two and how they determined high volume and 20psi over stock pressure can effect the VVT negatively. Also Sean one last thought on that is the Connie’s are not losing Rod bearing maybe because the vocation of the bike and different rider I’m sure 99.9 percent don’t shift there concours at 9800rpm. If I can help you in anyway just PM me. Good luck with the build!! Ohh and there is a guy on FB and you tube that got his concours in the Low 9s running ZX14 body work, Brock’s parts and flashed by Ivan’s
Link to Oil Pump mod parts
Not a big issue David! Really glad you are going to market your work, you are a talented craftsman. That's what it's really all about!!Somewhere between $300-$400 depending on how well it goes and the actual cost of powder coat. I threw in 25 for that. I have had other inquiries and I'll probably have to build some kind of down and dirty jig which hasn't been factored in. But I would eat that if I can get enough interest.
The cost surprised me too but there's more to it than meets the eye. For instance, the rod ends and rod end adaptors plus tubing costs is $80, powder coat 25? possibly buy stamped out gussets $10 each for 40 total. 5 pieces of tubing to prep and 12 welds. Adds up quick.
And 2 clevis ends to make from scratch of 4130n solid. Tubing is 4130n 1"od x .065 wall. Might go to .083 wall on that cross piece.
Im going to try to move all this H frame stuff over to the vendor area. Stepped on Jeffs thread pretty bad.
Hello Jeff. What oil pump gear are you using in the Connie ? I tried the Robinson's and it did not fit...Thanx