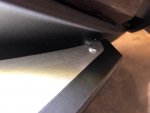
I have a Top Block tip over protection kit sitting on my workbench. I'm concerned about drilling large holes in expensive motorcycle parts and want to be sure I fully understand the process for marking where to drill. The pictures on the instructions for the kit are so dark they really aren't much good to me. Thank goodness Murph's kits provides a link to Fred Harmon's pictures. In the instructions for the kit, Top Block instructs to measure 26mm from the edge of the (shoe) masking tape along the edge of the lower fairing cover and to draw a straight line to be intersected by the horizontal arm in the kit. In Fred's pictures, it appears his mark is about two and a half inches. I have searched for an instructional video on this install and have not found one. Also I thought I had Fred Harmon's email but can't find it now. Can anyone who has installed this kit give me any guidance on where to find a video or any helpful hints?

-
WOULD YOU LIKE TO BE ABLE TO POST? REGISTER FOR COG MEMBERSHIP
All registration must be done through the club's main webpage: To register / join COG, click here
For instructions to convert to full membership, click here
-
Can't post after logging to the forum for the first time... Try Again - If you can't post in the forum, sign out of both the membership site and the forum and log in again. Make sure your COG membership is active and your browser allow cookies. If you still can't post, contact the COG IT guy at IT@Concours.org.
You are using an out of date browser. It may not display this or other websites correctly.
You should upgrade or use an alternative browser.
You should upgrade or use an alternative browser.
Top Block Tipover protection install
- Thread starter joer53
- Start date
I eyeballed it and drilled.
Yes, I did. And it's dead nuts.
Don't be afraid.
Steve
Yes, I did. And it's dead nuts.
Don't be afraid.
Steve
well, thats what makes you Steve in Sunny Fla :great:
I'm in the same place as you JoeR. except i've been sitting on it probably a bit longer. Think i picked it up from Murph last spring. I was super close one time to just doing it and chickened out. not even thought about till now reading your post.
Maybe I'll just man up and go eye ball it tomorrow!!
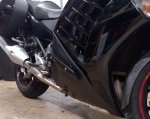
I remember drilling several increasingly larger holes in the fairing with standard drill bits before actually using the hole saw. With the internal components installed and in the proper location I drilled a very small hole in the fairing to make sure it aligned with the hole in the mount. I used a flashlight to shine from the outside in and from the inside out to make sure I was centered over the hole in the mount. Then I moved up to a slightly larger drill bit and repeated the process. Don't use too large a drill bit or the hole saw will not center in the hole. I also inserted a a thin metal pick through the hole in the fairing and into the mount to ensure the pick aligned with the hole in the mount. Once I was sure I was completely aligned I drilled the hole with the hole saw. Before drilling the hole with the hole saw, I disconnected the fairing at the bottom so I could pull it out somewhat so that there was a gap between the fairing and the mount so that when the hole saw broke through it didn't hit anything. Consider inserting a fairly thin wood block on the inside of the fairing to provide support before drilling with the hole saw.
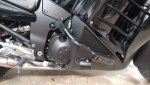
Well, I got started on the install this morning. The oem shaft came out just fine. The shaft that came with the kit goes in from the right side about 10 inches and stops. My caliper tells me it’s .01 larger. I really don’t want to tap on it with a hammer. The shaft is the only part not in the box with the rest of the kit, the numbers match though, so it must be right? The oem shaft goes back in just fine.
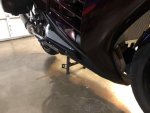
Well Murph got the replacement shaft to me today, fit is perfect. I was able to get the tip over protectors installed tonight. The 25mm holes lined up great, as others said, follow the instructions and you'll be fine. I did drill a small pilot hole and stick a toothpick through to be sure the hole lined up with the supports under the fairing. Thanks to all for your help! :beerchug:
Attachments
Well done sir! Sounds like you had the wrong sized stud, glad you did not get 'medieval' on it. I think these are the nicest looking and quite effective TOP devices and may we never need to use them!! I am amazed after 3 years with them how many bugs they collect, maybe it is their low and outside positioning but mine get glazed in insect viscera each year. They are not the easiest things to clean either.
I have had the Top Blocks on since 2011, back when you had to use a Google translator and communicate with Tatiana in France and send a wire transfer and deal with customs. Murph is much easier.
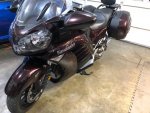
I only needed my Top Blocks once when a car rear ended me on the left saddle back and pushed me sideways during an out of state trip. The C-14 was laid down on the right side. It did a good job protecting the foot peg, mirror and front fork. The right saddle bag did touch down and was scuffed. Her Subaru was actually more damaged than my ride, probably because my saddlebag was pinned and didn’t budge. Insurance covered everything. Being out of state I was glad I could ride home and feel that the Top Blocks saved me from way more damage.
The skates are easily removed for cleaning.
They are pricey, but look awesome. The PO had installed them, and removed them for the sale, but made me a great deal on them!
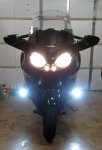
I went one more level and used them to install "conspicuity" lights. 10W LED floodlights that make me VERY visible from the front. Of course, no guarantee than an oblivion won't pull in front of me, but I think they help.
I went one more level and used them to install "conspicuity" lights. 10W LED floodlights that make me VERY visible from the front. Of course, no guarantee than an oblivion won't pull in front of me, but I think they help.