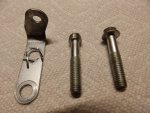
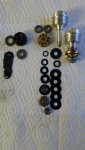
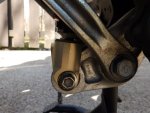
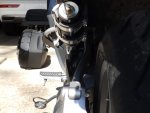
Based on positive reviews in the forum, I've decided to to do a suspension upgrade from Traxxion (AK-20 cartridge update for the forks and Penske 8983 shock). The first thing to do was remove the forks and send them to Traxxion. The left fork leg came out easily. The right fork leg not so much. It was a tight fit getting a 10mm socket on the top bolt and it was very tight (2011 with 30K miles). I ended up rounding off the bolt head (see pic). So I pulled the entire steering stem to gain better access to the bolt. I was going to do this anyhow to clean, re-grease and adjust the bearings. Now what... I purchased a set of Grip-Tite sockets. No luck. I am purchasing a set of Irwin Bolt Extractors. We shall see. I may end up having a local welder weld a nut on top of the rounded off bolt head to see if that will do the trick. I could also cut a groove in the head of the bolt to see if a hand-held impact driver could get this to move. I have been continuously soaking the back half of the bolt with Liquid Wrench. Any other ideas?

-
WOULD YOU LIKE TO BE ABLE TO POST? REGISTER FOR COG MEMBERSHIP
All registration must be done through the club's main webpage: To register / join COG, click here
For instructions to convert to full membership, click here
-
Can't post after logging to the forum for the first time... Try Again - If you can't post in the forum, sign out of both the membership site and the forum and log in again. Make sure your COG membership is active and your browser allow cookies. If you still can't post, contact the COG IT guy at IT@Concours.org.
You are using an out of date browser. It may not display this or other websites correctly.
You should upgrade or use an alternative browser.
You should upgrade or use an alternative browser.
Traxxion Suspension Upgrade
- Thread starter shoupeja
- Start date
Once you get all put back together make sure you have,said suspension set for your weight. It makes all the difference.
Does that small bracket move a tiny bit left or right if you tap it with a small hammer.
I would put the lower bolt back in and torque to spec (with some anti-seize on the threads)
to relieve some of the stress on the upper bolt.
Have you tried putting some heat on the areas around the bolt? to help free it up?..
I would put the lower bolt back in and torque to spec (with some anti-seize on the threads)
to relieve some of the stress on the upper bolt.
Have you tried putting some heat on the areas around the bolt? to help free it up?..
BTDT, my bolts did the same thing. I nicknamed them "gummy-bolts" because they are made with the consistency of gummy-bear candy.
I ended up using a punch on the side of the bolts to loosen them up. Not fun. I feel for ya.
Steve
I ended up using a punch on the side of the bolts to loosen them up. Not fun. I feel for ya.
Steve
Thanks all...kind of good to know that I was not the first to be in this position. br, thanks for the comment on initial set-up. Agreed, set-up is key to getting the most out of the new components. I am looking forward to that aspect! Daytona_Mike, Yes, the bracket moves. Since the bolt head is stripped in the loosening direction, I tried to tighten it a bit to see if it would move, and yes it did. The bracket did rotate out a bit when tightened. I tapped it back in prior to taking the pic. Putting the other bolt in and torquing it to spec is a good idea. As far as heat, I would hate to take a torch to it. I do have a heat gun that will generate some serious heat and probably do less damage to the metal. That will be a last resort. SISF, Agreed, these bolts are very soft. ZXtasy has a good idea about replacing these with Allen heads. Unfortunately, I have already ordered (4) replacements from Partzilla. I will use anti-seize when installing them. I am going to try some Dremel work today with a metal cutting blade in order to create some additional surface area on the bolt head flats for a smaller 9mm socket to see if that will work. I have a set of Irwin Bolt extractors being delivered tomorrow. I will also give those a shot first. I'll report back when I get this out. Thanks again!
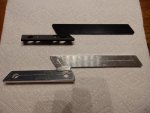
Success! A Dremel tool, used expeditiously, can be your friend! If you look closely at these bolts they have a flange around the base, I assume to distribute the load when tightened. I decided while I was cleaning up the flats of the bolt to cut down through this flange. The attached pic shows an original bolt alongside the massaged version. I think cutting through this flange also helped reduce the clamping force. I did cut into the cable mounting bracket that resides under the bolt...oh well. It served as a nice buffer so I didn't touch the steering stem with the Dremel metal cutting wheel. I used the Grip-Tite 10mm socket again and it was able to successfully grab hold of the bolt enough to get it loose. Old Cogger: 1; Crappy Gummy Bear fork clamping bolt: 0. Now time to pack up the forks and ship them off to Traxxion. I need to get these back so I can test the new Mountain Runner Premium flash in the spring! Thanks! Jeff
Attachments
Ya, those bolts are kinda soft and they might have been over-tightened at the factory. I had the same problem a few weeks ago with one of the bolt heads. I wound up removing the headlight assy. and then I bought a 3/8 inch x 3/8 inch drive 6 point impact socket. I was able to pound it onto what was left of the 10mm bolt head using a 3/8 inch extension and was able to loosen the bolt that way.
I ordered some 10.9 , 8 mm x 40 mm flange bolts from Bolt Depot. They have the standard 13 mm head. I'll use copper anti-seize on the threads before tightening / torquing them down.
I'm taking the less expensive route - I'm in the process of installing RaceTech compression & rebound Gold Valves along with a set of recommended shorter top out springs. Will see in a few months what difference it makes.
Attachments
As much as I hated to pack up my forks and ship them off, I didn't think I could take on the installation of the upgraded components myself. It looks like you are doing this yourself. Impressive! From what I've read, RaceTech makes some excellent suspension components. I took ZXtasy's advice and looked into replacing the four fork clamp bolts with something with an Allen head that will hopefully hold up better if I ever have to remove these again. I did a simple Google search for 8x40 Allen head bolt and what popped up was a hit from Partzilla, Honda 96700-08040-00, $1 each. Since I was ordering a new cable bracket that I destroyed (11054A, $5.87) I also decided to order these Honda bolts for $4. They appear to be almost identical to the stockers. We'll see. Good luck with your project!
To get the front end off the bike, I had to move it out of the unheated garage and into the driveway where it is sitting with a waterproof cover on it! Typically no fun working outside in February in Pittsburgh, although it has been a relatively warm winter here with very little snow. Probably much colder in Michigan! I am retiring at the end of the month and am on vacation until then, so I also have some free time! Good luck with the valve adjust! Jeff
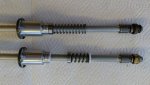
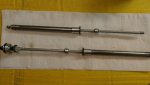
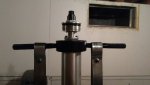
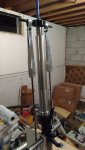
Got the RaceTech Gold Valves installed and the forks re-assembled. I made a home-brew spring compressor using threaded rod.
I'm heading into town today to buy some steel so I can fabricate a copy of RaceTech's universal spring compressor - please don't tell them about that.
EDIT: Back from town. The steel cost me $16 ( not including a threaded rod I'll get at the local hardware store - the steel supplier only sold it in 6' or 12' lengths ).
EDIT : BTW, the top cap is threaded on the cartridge rod only 8 turns so the rebound adjuster has 11 clicks possible.
Attachments
It's not that difficult, but you will need to fabricate a spring compressor and buy a few specialty tools.
Traxxion "spring compressor "https://traxxion.com/product/fork-spring-compressor-kit/ Misnamed - Really a spring spacer holding tool.
Racetech 24mm cartridge clamping tool ( the one with 3 holes ). https://www.amazon.com/Race-Tech-Shaft-Holding-Tool/dp/B000GTTC40 Used to clamp the cartridge while removing & installing the compression and rebound valves.
Motion Pro Damper Rod Fork Tool - really a cartridge holding tool https://www.motionpro.com/product/08-0117 ( half the cost of the RaceTech version of this tool ) : Used to remove and install the rebound valves.
Traxxion cartridge rod holder / bleeder tool : https://traxxion.com/product/fork-bleed-tool-universal/
So, you would be looking at about $200 for the tools & fabricating the spring compressor. And about another $260 for the RaceTech Gold Valves - buy them from a vendor online and not directly from RaceTech to save a few bucks. I used the stock springs ( rated @ 1.2 Kg/mm ). If you need lighter springs for your weight ( use the online RaceTech spring rate calculator), you can get Sonic springs for another $105 - good quality and Sonic has the best prices on springs. The C-14 Concours isn't listed at their website but their 39S series springs will work perfectly. They are 38 mm in diameter ( same as the OEM Concours springs ) and are 250 mm long.
I also got rid of the OEM plastic spring spacers and got some 1 1/4 inch ID .065" wall thickness steel tubing and then used two S.S. 1.5" OD washers between the spacer and top of the spring. I had to ream out the hole in the washers to 0.5 inches so they would slide down the 12mm cartridge rod.
Not a bad idea to also get the RaceTech "Motorcycle Suspension Bible". It has a step-by-step procedure ( with plenty of pics) on how to do the job. Includes some good tips. I bought the book a few years ago when I installed a RaceTech compression Gold Valve and a Gold Valve Emulator ( to update the damper rod fork ) in my old ST1100.
As far as doing this kind of stuff, it also helps when one doesn't know one's limitations.
But seriously, without the right tools, this job could go south real quick. For instance, you don't want to use a pipe wrench to hold the cartridge when removing & installing the compression and rebound valves.
Actually, it would be easy to make a holding fixture starting with a block of aluminum and then using a hole saw & band saw to fabricate the holding fixture. I took the easy way out and shelled out $55 instead and bought one. Maybe I might need to put the other two hole sizes to good use some day.
Sometime I wish I had a lathe & bridgeport and knew how to use them.
An update on my suspension upgrade... I received my upgraded forks (AK-20 cartridge) and new Penske shock back from Traxxion. The forks came back in perfect condition. One of the black plastic rebound adjuster knobs at the top of the fork came back cracked. I ordered a pair of the metal replacements from Traxxion. I cleaned, re-greased the bearings and installed the steering stem. I then installed the upgraded forks and the replacement rebound adjuster knobs. No problems. Moved to the back of the bike. I removed the stock shock and cleaned the three mounting bolts: the top and bottom bolt on the shock and the bolt on the upper tie-rod, When installing the Penske shock I quickly determined that the lower mounting bracket on the shock is directional. It only mounts one way. When I mounted the shock with the remote reservoir hose coming out on the left, like the stock setup, the lower mount hit the tie-rod and I couldn't insert the bolt. So I turned it 180 degrees and the lower mount worked fine. However, the remote reservoir hose now comes out of the shock on the right. It loops around in front of the shock and places the remote reservoir close to where the stock one was mounted, but the hose is not quite long enough. For folks that have installed this shock, do you have the hose coming out on the right of the shock, and if so, where and how did you mount the remote reservoir? Thanks for any information. Jeff
I guess I should have researched this a bit more prior to pulling the trigger. I sent an E-mail to Dan at Traxxion yesterday afternoon. I will be re-installing the original shock today, at least for now. I will take some pics today showing the orientation of the new shock. The bottom bracket will only go one way and when in this position the remote reservoir hose comes out on the right side (looking from the rear) which doesn't seem correct. Hopefully someone can provide some information on this aspect. High in the 60s here today. I guess I will be going for a ride with the old shock installed! I thought the shock was going to be the easy part!
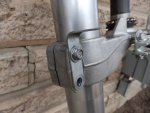
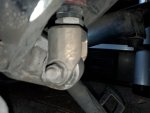
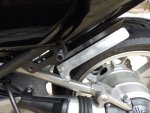
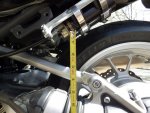
Hmmm... Took some pictures... The first one is looking in from the right side of the bike. In this orientation the hose is exiting from the right of the shock body, which does not seem correct. The second picture is with the shock removed from the bike. In this orientation, the hose is exiting from the left of the shock body, which seems correct. In this orientation the bottom bracket hits the tie-rod before the mounting holes align. Note how the hole in the bottom bracket is offset slightly to the left (rearward) of the center line of the shock. I think this puts too much material at the top of the mount on the right (forward) which then hits the tie-rod. Maybe they put an incorrect bottom bracket on my shock, or maybe the bottom bracket needs to be rotated 180 degrees. Hopefully Traxxion can provide some information on Monday.
Attachments

jas said:... The bottom bracket will only go one way and when in this position the remote reservoir hose comes out on the right side (looking from the rear) which doesn't seem correct. Hopefully someone can provide some information on this aspect...
My remote reservoir is on the left side of the bike as you sit on it. As I recall, the shock would only fit one way, also. :motonoises:
Thanks all... It would make sense that the remote reservoir hose comes down the left side of the bike just like the stock setup. My issue is that the lower bracket doesn't fit properly in that orientation. I think I could force it to "fit" (i.e., holes align) but then the lower shock bracket would continuously hit the tie-rod on full extension (droop). While I think that would rarely happen, mainly when the bike is on the center stand, it shouldn't be designed that way. Either an incorrect bottom bracket was installed on the shock or the bracket needs to be rotated 180 degrees if that is possible. Hopefully I will hear back from Dan at Traxxion today. It appears that a 1" lock nut on the bottom can be loosened and the bottom bracket can be spun around to lengthen/shorten the shock. We had our first nice riding day yesterday so I had to put the stock shock back in to go for a ride!
Turtle, Thank you for taking the picture! That really helps! Yes, my bike has the original tie-rod links. I assume your shock came from Traxxion in that orientation? If so, that means my bottom bracket needs to be rotated 180 degrees. With my shock installed in the orientation in your pic the hose comes out on the right. So I believe all I need to do is rotate the bottom bracket and I should be good to go. I am waiting to hear from Traxxion before I touch the shock. THANKS! Jeff
I heard back from Dan at Traxxion this morning. Dan responded that all I needed to do was rotate the bottom bracket 180 degrees. So I asked him how to do that, that I saw the two large 1" nuts on the bottom of the shock, and which should I loosen. He said to just hold the top of the shock and rotate the bottom. Which I did. Eureka! I thought there was more to it than that. Nope. Anyhow, I am good to go. Thanks to all for "listening"! As I told Dan, live and learn!
I just received my Spring issue of the Concourier. It contains a great write-up from ZXtasy and his suspension upgrade. His experience, less the arachnid and Winston his shop helper, closely mimicked mine. I am still attempting to determine how to mount the remote reservoir. I did not receive a bracket from Traxxion, just the two hose clamps and rubber mounts. I'm not sure where to mount the reservoir using these. Per a previous post, I am now building a bracket out of 0.25" aluminum that mounts to the two holes originally used to mount the stock preload adjuster. We shall see...
A tip: to remove/install the fork tubes remove the pinch bolts and thread them in from the back. Put a piece of sheet metal in the gap and screw the bolts in until they contact the Sheetmetal then screw them in another 1/2 - 1 turn and the forks will practically fall out.
I unscrewed the bolts while waiting for my tubes to come back then used the same process to install the tubes. Piece of cake.
Had my forks done by Traxxion: worlds of difference. Money well spent!
Ride safe.
L
I unscrewed the bolts while waiting for my tubes to come back then used the same process to install the tubes. Piece of cake.
Had my forks done by Traxxion: worlds of difference. Money well spent!
Ride safe.
L
I contacted Dan at Traxxion about the reservoir bracket. He let me know that a bracket should have been shipped with my shock. He immediately shipped it and I should be receiving it today or tomorrow. As documented on the Forum, I believe the bracket he is shipping is for pre-2011 (pre-2010?) C14s, but will work to some extent. He let me know he has a 2012 in the shop today or tomorrow so he will see first hand how the reservoir mounts using their current bracket. I asked him to let me know what they come up with for the 2012. I will continue making a bracket out of aluminum for now. Lars, thanks for the fork tube removal/installation tip! I never thought of that!
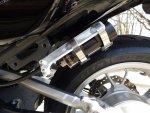
With the exception of painting it black, I completed my homemade Penske shock reservoir mount and installed it on the bike to check fitment. The mount is made out of 0.25” aluminum. Probably overkill. The first pic shows the mount in place with the Traxxion mount temporarily installed above it. The Traxxion mount locates the reservoir on the outside of the mount whereas my mount locates the reservoir on the inside of the mount. I would use the Traxxion mount but it is not long enough to mount using both passenger footrest mounting holes. I may make another mount out of thinner aluminum that mimics the Traxxion mount but is about an inch longer to allow a second mounting bolt. The other pictures show the reservoir mounted. I’m concerned there may not be enough room to allow bottoming of the suspension without the torque rod touching the bottom of the reservoir. I took it for a ride and nothing touched so we shall see. When I remove it to paint the mount I plan on bending out/up the mounting tab on the frame. This will move the reservoir out a bit and provide more clearance just in case.
Attachments
Looks good to me.
Does it interfere with the bags?
Ride safe, Ted
Does it interfere with the bags?
Ride safe, Ted

Good luck with your installation! And yes, Dan has been very helpful. I have been riding my new suspension for a month and am very happy with it. I am still experimenting with compression/rebound settings both front and rear. My custom aluminum reservoir bracket (see pic) is about complete (needs to be painted black). It mimics the Traxxion bracket but is long enough to use both passenger peg bracket mounting holes.