
-
WOULD YOU LIKE TO BE ABLE TO POST? REGISTER FOR COG MEMBERSHIP
All registration must be done through the club's main webpage: To register / join COG, click here
For instructions to convert to full membership, click here
-
Can't post after logging to the forum for the first time... Try Again - If you can't post in the forum, sign out of both the membership site and the forum and log in again. Make sure your COG membership is active and your browser allow cookies. If you still can't post, contact the COG IT guy at IT@Concours.org.
You are using an out of date browser. It may not display this or other websites correctly.
You should upgrade or use an alternative browser.
You should upgrade or use an alternative browser.
Cant Move Front Dampening Adjustment
- Thread starter HeathCreek
- Start date
Thank you, I will try backing the preload out a little.
Not either direction? Squirt a little WD and let set, or possibly back your preload adjusters all the way out and see it that changes, then go back to a good base line setting and record them. Maybe PO bottomed them out tight...mine move almost too easy.
I backed the preload all the way out, then way back in, and its still stuck. Both sides.
Not either direction? Squirt a little WD and let set, or possibly back your preload adjusters all the way out and see it that changes, then go back to a good base line setting and record them. Maybe PO bottomed them out tight...mine move almost too easy.

Its not corroded or anything. How brave should I be about trying to gently turn it with some pliers?
In the off chance that it's slightly corroded (where you can't see it), you could try 'shocking' it - gently tap the top, where the threads are, with a hammer, in the same way you'd try to break loose a carburetor drain screw that hasn't moved in several years. You can also find a small wrench or crescent wrench that fits the flats of the adjuster perfectly, and apply some light rotating pressure at the same time you're gently tapping the top, sometimes the combination will break it loose.
I'm going to go find a diagram of the adjuster as I don't recall what the guts look like from when I rebuilt my forks a few years ago, and see if I have any other ideas for ya.
I'm going to go find a diagram of the adjuster as I don't recall what the guts look like from when I rebuilt my forks a few years ago, and see if I have any other ideas for ya.
Man, I really appreciate that! Thank you! I have been stewing over this all day and I don't know what else to do. I don't want to break anything, obviously. I don't even know how to get any WD-40 down in there enough to penetrate anything either. I don't understand what would cause it to seize up. The bike has always been garaged and only has about 12,000 miles on it.In the off chance that it's slightly corroded (where you can't see it), you could try 'shocking' it - gently tap the top, where the threads are, with a hammer, in the same way you'd try to break loose a carburetor drain screw that hasn't moved in several years. You can also find a small wrench or crescent wrench that fits the flats of the adjuster perfectly, and apply some light rotating pressure at the same time you're gently tapping the top, sometimes the combination will break it loose.
I'm going to go find a diagram of the adjuster as I don't recall what the guts look like from when I rebuilt my forks a few years ago, and see if I have any other ideas for ya.

OK I did a little research and this jogged my memory from when I had my forks apart.
Here's a diagram of a cartridge fork with the rebound adjuster clearly shown (From https://www.racetech.com/articles/cartridgeforks.htm)

Essentially the adjuster is just a long rod that changes the location of a tapered needle down in the rebound valving assembly. When this adjuster rod is fully "tightened", the tapered needle is seated and allows no fluid through that orifice. As you "loosen" the adjuster, the tapered needles moves up in the seat allowing progressively more fluid through, quickening the rebound (or decreasing the rebound damping).
The relative location of the needle in the seat is determined by the location of the threaded portion of the adjuster in the fork caps, WHICH IS SET DURING FORK ASSEMBLY! If you do not properly set the rebound adjuster when reassembling your cartridge forks when changing seals/fluid or during an overhaul, the amount of damping adjustment may vary between the forks. I recall that when I reassembled my forks, I had slightly different amounts of damping adjustment, so I disassembled the fork that had less, loosened the jam nut on the fork cap, reset the the rebound adjuster, then reassembled - then I had the proper amount of adjustment available once reassembled.
Here's an excerpt from an old install guide from Traxxion Dynamics - note the "Three full turns" doesn't apply to the C14, this is from an R1 IIRC:

If your forks have been this way since you bought the bike, then my guess is that somebody was in your forks for one reason or another and didn't properly set the rebound adjuster before reassembling it all.
And, learn from my mistake and check that you have the full range of rebound damping adjustment once you have the fork reassembled but before you reinstall the forks in the bike!
Here's a diagram of a cartridge fork with the rebound adjuster clearly shown (From https://www.racetech.com/articles/cartridgeforks.htm)
Essentially the adjuster is just a long rod that changes the location of a tapered needle down in the rebound valving assembly. When this adjuster rod is fully "tightened", the tapered needle is seated and allows no fluid through that orifice. As you "loosen" the adjuster, the tapered needles moves up in the seat allowing progressively more fluid through, quickening the rebound (or decreasing the rebound damping).
The relative location of the needle in the seat is determined by the location of the threaded portion of the adjuster in the fork caps, WHICH IS SET DURING FORK ASSEMBLY! If you do not properly set the rebound adjuster when reassembling your cartridge forks when changing seals/fluid or during an overhaul, the amount of damping adjustment may vary between the forks. I recall that when I reassembled my forks, I had slightly different amounts of damping adjustment, so I disassembled the fork that had less, loosened the jam nut on the fork cap, reset the the rebound adjuster, then reassembled - then I had the proper amount of adjustment available once reassembled.
Here's an excerpt from an old install guide from Traxxion Dynamics - note the "Three full turns" doesn't apply to the C14, this is from an R1 IIRC:
If your forks have been this way since you bought the bike, then my guess is that somebody was in your forks for one reason or another and didn't properly set the rebound adjuster before reassembling it all.
And, learn from my mistake and check that you have the full range of rebound damping adjustment once you have the fork reassembled but before you reinstall the forks in the bike!
Last edited:
And yes when I say gentle, I mean very gentle. The adjusters should take very little effort to turn when it's set up properly, and you don't want to damage the needle or seat by hammering on it or applying too much force if it's already bottomed out.Man, I really appreciate that! Thank you! I have been stewing over this all day and I don't know what else to do. I don't want to break anything, obviously. I don't even know how to get any WD-40 down in there enough to penetrate anything either. I don't understand what would cause it to seize up. The bike has always been garaged and only has about 12,000 miles on it.
I had the adjustment issue when I put seals in. Will keep this info for next time. ThanksOK I did a little research and this jogged my memory from when I had my forks apart.
Here's a diagram of a cartridge fork with the rebound adjuster clearly shown (From https://www.racetech.com/articles/cartridgeforks.htm)
View attachment 38002
Essentially the adjuster is just a long rod that changes the location of a tapered needle down in the rebound valving assembly. When this adjuster rod is fully "tightened", the tapered needle is seated and allows no fluid through that orifice. As you "loosen" the adjuster, the tapered needles moves up in the seat allowing progressively more fluid through, quickening the rebound (or decreasing the rebound damping).
The relative location of the needle in the seat is determined by the location of the threaded portion of the adjuster in the fork caps, WHICH IS SET DURING FORK ASSEMBLY! If you do not properly set the rebound adjuster when reassembling your cartridge forks when changing seals/fluid or during an overhaul, the amount of damping adjustment may vary between the forks. I recall that when I reassembled my forks, I had slightly different amounts of damping adjustment, so I disassembled the fork that had less, loosened the jam nut on the fork cap, reset the the rebound adjuster, then reassembled - then I had the proper amount of adjustment available once reassembled.
Here's an excerpt from an old install guide from Traxxion Dynamics:
View attachment 38004
If your forks have been this way since you bought the bike, then my guess is that somebody was in your forks for one reason or another and didn't properly set the rebound adjuster before reassembling it all.
And, learn from my mistake and check that you have the full range of rebound damping adjustment once you have the fork reassembled but before you reinstall the forks in the bike!
Thank you, Wayne. I have done fork maintenance a bit on my cruisers. I should be able to take that cap off and investigate further, no?Don't know if this will help much.
I don't think so. You would need to remove the forks I believe.Thank you, Wayne. I have done fork maintenance a bit on my cruisers. I should be able to take that cap off and investigate further, no?I
OK I did a little research and this jogged my memory from when I had my forks apart.
Here's a diagram of a cartridge fork with the rebound adjuster clearly shown (From https://www.racetech.com/articles/cartridgeforks.htm)
View attachment 38002
Essentially the adjuster is just a long rod that changes the location of a tapered needle down in the rebound valving assembly. When this adjuster rod is fully "tightened", the tapered needle is seated and allows no fluid through that orifice. As you "loosen" the adjuster, the tapered needles moves up in the seat allowing progressively more fluid through, quickening the rebound (or decreasing the rebound damping).
The relative location of the needle in the seat is determined by the location of the threaded portion of the adjuster in the fork caps, WHICH IS SET DURING FORK ASSEMBLY! If you do not properly set the rebound adjuster when reassembling your cartridge forks when changing seals/fluid or during an overhaul, the amount of damping adjustment may vary between the forks. I recall that when I reassembled my forks, I had slightly different amounts of damping adjustment, so I disassembled the fork that had less, loosened the jam nut on the fork cap, reset the the rebound adjuster, then reassembled - then I had the proper amount of adjustment available once reassembled.
Here's an excerpt from an old install guide from Traxxion Dynamics:
View attachment 38004
If your forks have been this way since you bought the bike, then my guess is that somebody was in your forks for one reason or another and didn't properly set the rebound adjuster before reassembling it all.
And, learn from my mistake and check that you have the full range of rebound damping adjustment once you have the fork reassembled but before you reinstall the forks in the bike!
You thinking I need to dismantle my forks completely to check this out, or can I just remove the cap and pull out the rod? I have never dealt with these kind of forks before so this is uncharted territory for me.
Thanks, that is very helpful!Don't know if this will help much.
@HeathCreek - I forgot to ask, is it just one fork that is not allowing you to adjust, or both?
Unfortunately, I believe that working on any inverted forks will require you to remove them from the bike. I've done some suspension work on bikes with damper rod forks without removing the forks from the bike, where I either had a drain bolt at the bottom or didn't need to change fluid and it was much easier...
In order to correct this, and assuming you have the right tools, you'd just:
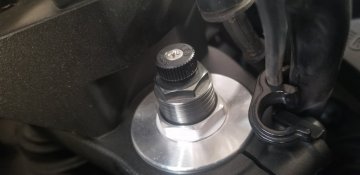
- Remove the forks from the bike
- Follow the service manual procedure to remove the fork cap and get your fork looking like the picture posted by kzz1king, making sure you have plenty of threads between the bottom of the fork cap and the lock nut that's resting on the holder in the pic
- Unscrew the fork cap several turns
- Back the rebound adjuster all the way out
- Slowly turn the rebound adjuster in to the specified number of clicks for your bike (C14 is 11 clicks) *see below
- Screw the fork cap back in until it bottoms out, making sure the rebound adjustment knob doesn't rotate
- Recheck that you still have 11 clicks of rebound damping adjustment
- Finally, tighten the lock nut back up against the bottom of the fork cap, reassemble, and check again that you have the proper range of adjustment
If you need the tools to do this, check out YouTube for some creative DIY solutions, or you can order a kit from Traxxion Dynamics, I bought the kit a few years ago and it worked great, and it should work on any inverted forks that I run into in the future.
*Kawasaki FSM states to measure this based on the distance between the bottom of the fork cap and the top of the adjuster rod after setting the locknut to specific distance from the top of the shaft:

I found that when I did mine, it was easier to just bottom it out at "full tight" setting on the adjuster and that got me right where I needed to be. YMMV.
Sorry for the info dump, but hope it was helpful. If this all seems like way too much, a good independent moto shop should be able to fix it pretty easily, and I would guess it would be fairly inexpensive if you bring them the fork(s).
Its both forks. Yesterday I went to adjust them. The left one turn slightly (about an 1/8th turn) but never clicked, and then the right one did the same thing. After that I could not budge either one of them in either direction. Weird! I was hoping that upgrading to a newer bike that I wouldn't have to worry about this stuff for awhile. Its a 2017 and had less than 10K on it.Thanks, that is very helpful!
@HeathCreek - I forgot to ask, is it just one fork that is not allowing you to adjust, or both?
Unfortunately, I believe that working on any inverted forks will require you to remove them from the bike. I've done some suspension work on bikes with damper rod forks without removing the forks from the bike, where I either had a drain bolt at the bottom or didn't need to change fluid and it was much easier...
In order to correct this, and assuming you have the right tools, you'd just:
- Remove the forks from the bike
- Follow the service manual procedure to remove the fork cap and get your fork looking like the picture posted by kzz1king, making sure you have plenty of threads between the bottom of the fork cap and the lock nut that's resting on the holder in the pic
- Unscrew the fork cap several turns
- Back the rebound adjuster all the way out
- Slowly turn the rebound adjuster in to the specified number of clicks for your bike (C14 is 11 clicks) *see below
- Screw the fork cap back in until it bottoms out, making sure the rebound adjustment knob doesn't rotate
- Recheck that you still have 11 clicks of rebound damping adjustment
- Finally, tighten the lock nut back up against the bottom of the fork cap, reassemble, and check again that you have the proper range of adjustment
If you need the tools to do this, check out YouTube for some creative DIY solutions, or you can order a kit from Traxxion Dynamics, I bought the kit a few years ago and it worked great, and it should work on any inverted forks that I run into in the future.
*Kawasaki FSM states to measure this based on the distance between the bottom of the fork cap and the top of the adjuster rod after setting the locknut to specific distance from the top of the shaft:
View attachment 38006
I found that when I did mine, it was easier to just bottom it out at "full tight" setting on the adjuster and that got me right where I needed to be. YMMV.
Sorry for the info dump, but hope it was helpful. If this all seems like way too much, a good independent moto shop should be able to fix it pretty easily, and I would guess it would be fairly inexpensive if you bring them the fork(s).
I am so appreciative of all the help I have received. I will likely just remove my forks and take them to my moto shop who rebuilt the forks on my previous Connie. I haven't dealt with these before and without somebody to walk me through it in person I am afraid I would get in over my head or screw something up. It would be worth it to me to just take my forks in and let the guys with the tools and the experience get them in shape. This is such a mystery.
Last edited:
Before taking the forks off the machine I would suggest taking the bike over to your motto friends garage. Let them have a quick whack at turning them.Its both forks. Yesterday I went to adjust them. The left one turn slightly (about an 1/8th turn) but never clicked, and then the right one did the same thing. After that I could not budge either one of them in either direction. Weird! I was hoping that upgrading to a newer bike that I wouldn't have to worry about this stuff for awhile. Its a 2017 and had less than 10K on it.
I am so appreciative of all the help I have received. I will likely just remove my forks and take them to my moto shop who rebuilt the forks on my previous Connie. I haven't dealt with these before and without somebody to walk me through it in person I am afraid I would get in over my head or screw something up. It would be worth it to me to just take my forks in and let the guys with the tools and the experience get them in shape. This is such a mystery.
I suspect they’ve been way over tightened one way or the other. I do see on one of the pics the plastic outer gear edge looks like a pliers was on it.
Wish I had more for ya.
Wayne
Before taking the forks off the machine I would suggest taking the bike over to your motto friends garage. Let them have a quick whack at turning them.
I suspect they’ve been way over tightened one way or the other. I do see on one of the pics the plastic outer gear edge looks like a pliers was on it.
Wish I had more for ya.
Wayne
Good suggestion, Wayne. Thank you.
I had the caps off the adjusters, there arent any pliers/tool marks on them. I see what you are looking at though. That might be skin from my fingers trying to turn then one way or the other.
Glad I get to pioneer an issue here!
Looks like what I got going in here. Good explanation from this feller. Jammed rebound adjuster...both sides apparently. Had to be the previous owner because I have never had these forks apart.
I agree with taking the bike to your Moto Shop and ask if they have an idea.
But before you do, we should be able to troubleshoot if their jammed all the way down or all the way up.
ie;
If their all the way down, the rebound should be "very" slow.
If their all the way up, the rebound should be "very" fast.
Get someone to help you bounce the front up and down.
Watch as they do so.
You should be able to see if the rebound is "noticeably" slow or fast.
If you can determine which way they are jammed, you will know which way you need to turn the adjuster to free them up.
ie;
If slow, their jammed down, and need to be turned counterclockwise.
If fast, their jammed up, and need to be turned clockwise.
Ride safe, Ted
PS: Fred (or one of the more knowledgeable) please correct me if I'm incorrect.
just watched the video you posted, this is sort of what I was thinking.
Are the fork really harsh and stiff? If so, then the adjuster is turned too far clockwise (closed). You should be able to turn it counter-clockwise if this is the case.
If the forks are real soft, then the adjuster may have been too far counter-clockwise and has bound the threads. If this is the case, try turning it clockwise.
Counter-clockwise turns makes the forks "faster" or "softer". It opens the rebound valve.
Clockwise turns makes the forks "slower" or "stiffer". It closes the rebound valve.
If they were locked fully clockwise, you should still be able to turn the adjuster counter-clockwise. This makes me suspect that they are turned too far counter-clockwise and binding the threads in the adjuster - but I could be wrong. The way to know for sure is to determine if the forks are too harsh or too soft.
Last edited:

The adjuster has a physical limit that it can be unscrewed (counter-clockwise). I haven't tried to see if it will bind if unscrewed too far, but it may be possible, as the threads could bind up. The OP may just have to remove the forks and take them apart and see what's going on with them.
My initially reaction was that the rebound was a bit stiff, so I wanted to adust it counter-clockwise a little. When I tried, both adustments turned slightly (may 1/8 or less) and stopped. Never clicked or anything. Then I couldnt turn either adjuster in either direction. I also backed the preload all the way out as a hail mary to see if it would make any difference, but it did not. I removed the adjuster cap but I have NOT attempted to tap the dampening adjuster or force it one way or the other. Again, it will not budge either way. This is where I am at.
I can have my son push down enough on the handle bars for me to try and observe the speed of the rebound, but even if I can determine if its all the way one way, I dont want to risk damaging something by trying to force it a certain way. You guys tell me.
I think I am confident enough to remove the forks and take the cap off, but once I am in there it is all uncharted territory for me. I have changed oil and springs in my Vulcans several times, but with Connie I have zero experience.
Thanks, that is very helpful!
@HeathCreek - I forgot to ask, is it just one fork that is not allowing you to adjust, or both?
Unfortunately, I believe that working on any inverted forks will require you to remove them from the bike. I've done some suspension work on bikes with damper rod forks without removing the forks from the bike, where I either had a drain bolt at the bottom or didn't need to change fluid and it was much easier...
In order to correct this, and assuming you have the right tools, you'd just:
- Remove the forks from the bike
- Follow the service manual procedure to remove the fork cap and get your fork looking like the picture posted by kzz1king, making sure you have plenty of threads between the bottom of the fork cap and the lock nut that's resting on the holder in the pic
- Unscrew the fork cap several turns
- Back the rebound adjuster all the way out
- Slowly turn the rebound adjuster in to the specified number of clicks for your bike (C14 is 11 clicks) *see below
- Screw the fork cap back in until it bottoms out, making sure the rebound adjustment knob doesn't rotate
- Recheck that you still have 11 clicks of rebound damping adjustment
- Finally, tighten the lock nut back up against the bottom of the fork cap, reassemble, and check again that you have the proper range of adjustment
If you need the tools to do this, check out YouTube for some creative DIY solutions, or you can order a kit from Traxxion Dynamics, I bought the kit a few years ago and it worked great, and it should work on any inverted forks that I run into in the future.
*Kawasaki FSM states to measure this based on the distance between the bottom of the fork cap and the top of the adjuster rod after setting the locknut to specific distance from the top of the shaft:
View attachment 38006
I found that when I did mine, it was easier to just bottom it out at "full tight" setting on the adjuster and that got me right where I needed to be. YMMV.
Sorry for the info dump, but hope it was helpful. If this all seems like way too much, a good independent moto shop should be able to fix it pretty easily, and I would guess it would be fairly inexpensive if you bring them the fork(s).
Well, I took my forks into the dealer and when I got them back on damper had a range of 14 clicks and the other had a range of 2 clicks. I took the one back and now I have a fork with a range of 14 clicks and one with the range of 12 clicks. SOOOO I guess I have to take them back in or is this something I can live with? I paid them $247. I can now move the dampeners, but now they have different ranges. One side of me wants to take it back and tell them to get it right or refund my money, and the other side of me thinks they don't know what they are doing so I am afraid to take it back. By the way, they returned the fork with the thumb cap broken and a scratch on the tube.
Give me some advice, boys. One option is to send the forks somewhere else or buy the special tools and figure the darn things out myself. If I had somebody who could show me how to do it once then I could maintain my forks myself for the rest of my life.
Take them back, talk to the shop foreman or ask for the owner, and make them do it right.
Also show them the scratch.
Also show them the scratch.
I should have a range of 12 clicks on both forks when done correctly, right?Take them back, talk to the shop foreman or ask for the owner, and make them do it right.
Also show them the scratch.
I don't know the exact number, but definitely more than 2.
The number of clicks doesn't mean much. As long as you can close the adjustors all the way clockwise and they feel the same doing so then you're good. Should be a good smooth feel through the clicks and then a good solid stop. At that point you can turn the adjustors ccw 2 to 4 clicks and give it a try. You will never see more than 6 clicks ccw as it will be like a pogo stick. There is only rebound adjustment on stock forks.
Thank you!The number of clicks doesn't mean much. As long as you can close the adjustors all the way clockwise and they feel the same doing so then you're good. Should be a good smooth feel through the clicks and then a good solid stop. At that point you can turn the adjustors ccw 2 to 4 clicks and give it a try. You will never see more than 6 clicks ccw as it will be like a pogo stick. There is only rebound adjustment on stock forks.