• Can't post after logging to the forum for the first time... Try Again - If you can't post in the forum, sign out of both the membership site and the forum and log in again. Make sure your COG membership is active and your browser allow cookies. If you still can't post, contact the COG IT guy at IT@Concours.org.
  • IF YOU GET 404 ERROR: This may be due to using a link in a post from prior to the web migration. Content was brought over from the old forum as is, but the links may be in error. If the link contains "cog-online.org" it is an old link and will not work.

New Hwy peg set up for C14 2010-2016 with Canyon Cages

n3nman

Member
Member
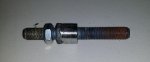
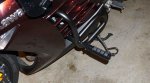
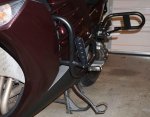
Have a 2012 C14 with Canyon Cages. Was looking at my options to attach Hwy pegs to give my legs a break. Did not love the idea of attaching something to the bars. Did not look that clean and was also concerned about those types of clamps rotating if tipped over. Came up with an idea that I think fits the bill.

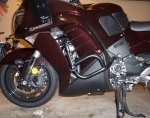
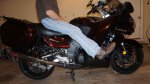
I am 5'10" tall with a 30" inseam. The location is perfect for me (slight bend at the knees). If you have longer legs and want your legs straight then you can rest the back of your boots on them as well. They take about 60 seconds per side to install. If you do not like the way they look you can just put them on for your longer trips. I am using the Rivco black vibration isolating pegs on my hardware. The other thing I like about them is they will not touch during a "normal" tip over but with more momentum I believe they will stop the bike from rotating a lot more and getting your rear view mirrors.

Was really just making a pair for myself to solve a problem but others might have interest as well. They will only fit 2010-2016 C14 with this style of Canyon Cages.

If you have some Rivco Black pegs already then the cost for the hardware (comes in black or black) is $40 plus $6.95 shipping in the CONUS.
If you want or need the pegs, the entire set (Rivco pegs and Hardware to mount them) would be $95 plus $9.95 shipping in the CONUS.

Lifetime replacement on the hardware (my lifetime not yours). if you have a problem, return the hardware to me first, and I'll replace it.

If there is a fair amount of interest it will be a couple of weeks before the first set ships. After that they will be ready to go.

PayPal is the preferred method of payment. PM me if you have questions or anything else. Thanks.
 

Attachments

  • pegs6.jpg
    pegs6.jpg
    229.5 KB · Views: 839
  • pegs3.jpg
    pegs3.jpg
    321 KB · Views: 758
  • pegs1.jpg
    pegs1.jpg
    327.9 KB · Views: 694
  • pegs5.jpg
    pegs5.jpg
    239.3 KB · Views: 675
I think the pegs do. The attach hardware does not, but there is such a small amount that you can see you can just paint it silver. There is maybe 1/3 of a inch visible between peg and Canyon Cage.
 
Remove bolt that came with Canyon Cage. Install new bolt/stud. That is it. It is as clean as it gets.
 
Looks nice, but the problem that I foresee is when you drop your bike, the peg is going to take all the impact, possibly snapping or bending the bolt and making removal of damaged peg very difficult.
 
I originally thought that might be a problem. So after I installed them i put the bike down with help on some cardboard. The end of the pegs clear the ground by 1 1/2" . Contact is made with the bottom of the bar as CC intended. But I think in a a higher momentum drop (aka crash) it might contact them. To me that is good because on those higher rate drops the mirrors usually contact (more expensive). In any case the stud part is 3/8 grade 5 bolt and even if it got slightly bent you can just put a vise grip on it and turn it out. You have a 1.25" long stud. It is solid and do not think it can get stuck unless you destroy the bars at the same time, and that's a whole other story.
 
I did something similar to you.. I made some brackets but where did you get the studs from? I would prefer mine to look like yours instead of being on a bracket..


Nicole, That's SLICK!  Recessed, I like it a lot.  I hope you don't mind if I steal that idea.  :great: :beerchug:
 
SilverConnieRider said:
Nicole - did you weld that bracket to the cages?

Yes it is welded.

Flat-spot said:
Nicole, That's SLICK!  Recessed, I like it a lot.  I hope you don't mind if I steal that idea.  :great: :beerchug:

Flat-spot, by all means, please do so. I am glad that you liked it.  By the way, I hope you dont have a difficult time remembering your COG member number .
 
Dam thats a fantastic idea......love the bracket.....did you make the bracket or find it somewhere, and/or modify it to the application?  let the secret out....!!!
 
Sailor Chic,
That looks great.  Is the bracket custom or did you purchase it. 


Can anyone confirm the info below is the correct peg for doing this?

Anti-Vibration Pegs – Black Powder Coated (pair)
Product Code: PEGSBK
 
I'm interested. I would like to see just a picture of the mounts that I would be buying though. I like to know exactly what I am getting.
 
Couple of close ups of the Bolts that make up the attach hardware. Bolts are undercut at a 30 deg angle and then welded together. Used them the other day and they work great. A note about the other attach methods in this thread. If the Hwy bars are mounted any further inboard it becomes difficult to get your feet on them without your legs being hard up against the fairings.
 

Attachments

  • Peg1.jpg
    Peg1.jpg
    165.2 KB · Views: 329
  • Peg2.jpg
    Peg2.jpg
    151.6 KB · Views: 273
Not stainless. Painted black. Even if I used stainless the welding would ruin the properties of stainless. After installation I just use a little flat black on it.
 
Sailor_chic said:
Doesnt welding also ruin the hardness properties of the bolt?

Depends on the bolt. A grade 5 bolt ( same as original on CC's) will not be much different as long as you weld and then heat the whole assembly red and cool slowly. Makes it not to brittle and bend rather then break.
 
n3nman said:
If you have some Rivco Black pegs already then the cost for the hardware (comes in black or black) is $40 plus $6.95 shipping in the CONUS.
Isn't $47 for two bolts tack welded together a bit steep?
 
Well not tack welded together. Since you asked. 4 Bolts 2 special order because of the pitch ($7.25 for all). The bolts heads are turned on a lathe and undercut the heads at a 30 deg angle. They are then TIG welded around the entire bolts. Then they are stress relieved with a torch (guy charges me $18 a set), then of course we paint them, and shipping is around $7 in a small box in the CONUS. So I would make less then $15 per set.

That might cover my effort. Had a good idea and if someone does not want to go to the trouble of doing this on there own then have at it. I thought folks might like the idea, not trying to get rich LOL.


Thanks for the explanation, I first saw this yesterday and did not really think about it until I looked at it again today and $40 seemed like a lot for a few bolts welded together.

I was not trying to down play your idea. I actually do think it is a good one, the pegs look good there.
 
I just got my canyon cages in.

was going to put them on in the next few days.

anything i need to know about this?   

like "dont do this" 

"watch out for this"

"do this first to make it easier"


any info and tips would be greatly appreciated    :great:
 
Robert said:
I just got my canyon cages in.

was going to put them on in the next few days.

anything i need to know about this?   

like "dont do this" 

"watch out for this"

"do this first to make it easier"


any info and tips would be greatly appreciated    :great:

Get some blue painters tape and tape the edges of the fairing.  On the right side is difficult getting a socket wrench in there I was slightly scraping my fairings.  Painters tape solved that and peeled right off.  You will also need a second set of hands to hold the bars while you are dealing with the hardware.
 
Nyrangersfan19 said:
Robert said:
I just got my canyon cages in.

was going to put them on in the next few days.

anything i need to know about this?   

like "dont do this" 

"watch out for this"

"do this first to make it easier"


any info and tips would be greatly appreciated    :great:

Get some blue painters tape and tape the edges of the fairing.  On the right side is difficult getting a socket wrench in there I was slightly scraping my fairings.  Painters tape solved that and peeled right off.  You will also need a second set of hands to hold the bars while you are dealing with the hardware.

Just so you know the above will work - but there is more then one way to skin a cat.  ;D

It can be done with only one set of hands as I did mine solo and didn't have a problem installing them.

I used a T handle Allen wrench which allowed me to use a pipe on it for more leverage which worked good.

I also went out a got a tap to clean out the thread lock that was left in the threaded holes. 
It's a 10x1.75 mm tap I THINK - check for yourself before you buy one.
 
thanks for the info. 

I did get them on last night by myself.  all went well and they look good. 

have to adjust my highway pegs im sure, but they felt good in the garage.    :great:

thanks for info guys! 
 
Got the welded bolts from n3nman.
Fit great, instructions were very helpful.
Everything went together very well.
Thanks!
 
I know this post is a little old now but I was thinking about picking up a canyon cage and i was wondering if you are still making these?
 
I installed pegs on my Canyon Cages using the bolts from n3nman.  It works great, as advertised, and is worth the money!  Highway pegs greatly increase the comfort of long-distance riding.  I have no issues with comfort using the stock seat when I can adjust my legs while riding.
 
Sailor_chic said:
Here is how I installed my pegs:


I’m new here and have been doing some research on highway pegs. Is there any way you could upload some pictures again for the newbies like me to see how you mounted your pegs?

Thanks!

Miguel
 
Miguel, just click on the missing pic links and you should be able to see the photos.


miguel said:
I’m new here and have been doing some research on highway pegs. Is there any way you could upload some pictures again for the newbies like me to see how you mounted your pegs?

Thanks!

Miguel
 
Thanks for the tip. I was able to to see them like that.
robertv said:
Miguel, just click on the missing pic links and you should be able to see the photos.


miguel said:
I’m new here and have been doing some research on highway pegs. Is there any way you could upload some pictures again for the newbies like me to see how you mounted your pegs?

Thanks!

Miguel
 
Someone asked me about these and I still have a few sets left if anyone still has Canyon Cages and looking to mount the RIVCO foot pegs.
 
Top