
-
WOULD YOU LIKE TO BE ABLE TO POST? REGISTER FOR COG MEMBERSHIP
All registration must be done through the club's main webpage: To register / join COG, click here
For instructions to convert to full membership, click here
-
Can't post after logging to the forum for the first time... Try Again - If you can't post in the forum, sign out of both the membership site and the forum and log in again. Make sure your COG membership is active and your browser allow cookies. If you still can't post, contact the COG IT guy at IT@Concours.org.
You are using an out of date browser. It may not display this or other websites correctly.
You should upgrade or use an alternative browser.
You should upgrade or use an alternative browser.
Replacing rear shock..
- Thread starter mcgyver74
- Start date
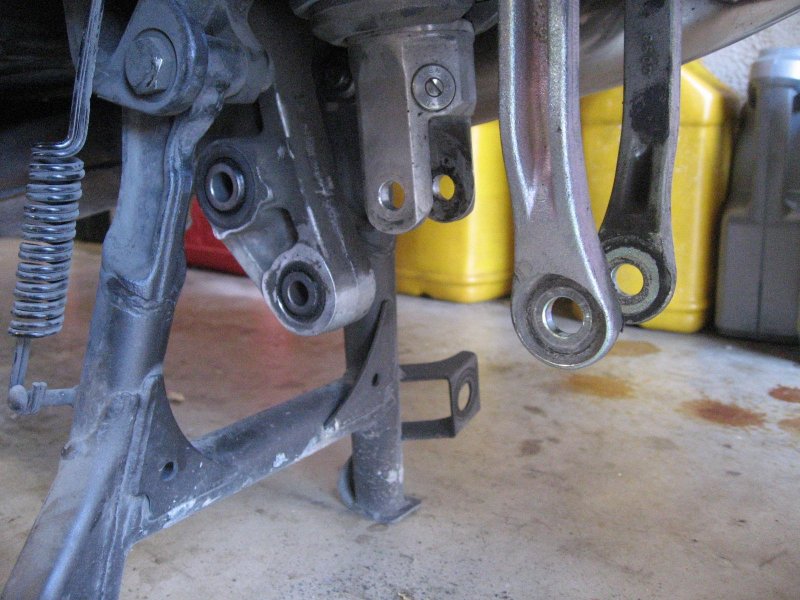
Just pulled my Ohlins out again last night (I'm going back to the 140 n/mm spring). It's pretty easy. You have to unbolt the tie rod arms at the bottom where they connect to the shock arm, and then loosen the other end of them so you can pivot them out of the way. Then unbolt the upper and lower shock bolts, lift up the rear wheel enough to relieve pressure so you can remove the bolts, and drop the shock out. I use a thin board under the rear wheel as a lever arm to lift it up to release pressure from the bolts.
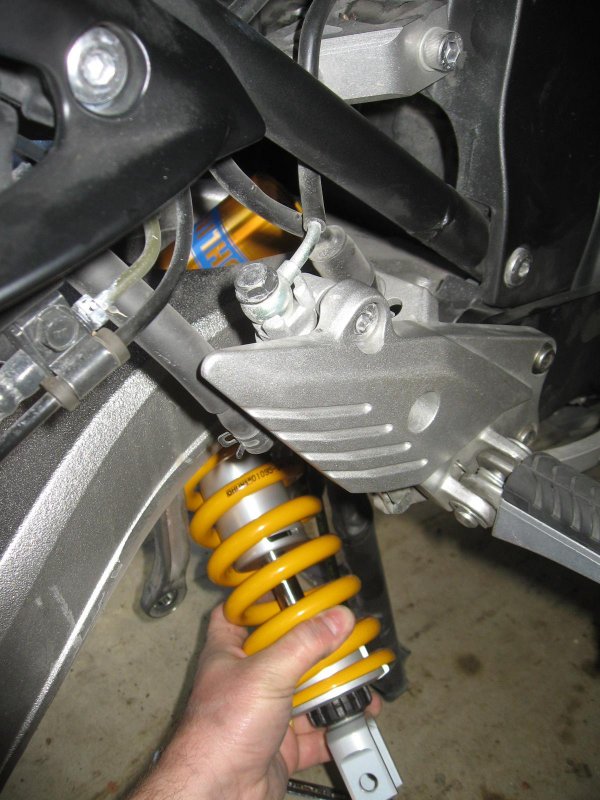
If you are going to install an Ohlins, you also have to remove the muffler, since it has to be installed from the right side, and you'll have to corkscrew the piggyback canister in through the hole in the swingarm.
I've got some photos here that might help.
http://www.pbase.com/fredharmon/ohlins
As a matter of fact, I'm headed out to the garage now to reinstall my OEM shock until I get the Ohlins back.
Great install pics Fred. :great:
For installing the Ohlins do you have to remove the exhaust regardless of which exhaust you have or just if you have the potato launcher? I have the Muzzys full dual system, will it need to be removed for the Ohlins install? If so, the entire exhaust or just from the mid-connection point back??
For installing the Ohlins do you have to remove the exhaust regardless of which exhaust you have or just if you have the potato launcher? I have the Muzzys full dual system, will it need to be removed for the Ohlins install? If so, the entire exhaust or just from the mid-connection point back??
By the way, whenever you are working on suspension components, it's critical you torque them properly, so when you reinstall it, be sure to torque the tie rod nuts to 44ft lbs and the shock mounting hardware to 25ft/lbs.
You'll also have to remove the two bolts that hold on the left side passengar foot pegs so you can remove the remote pre-load adjuster.
In the amount of time between this post and my last one, I went out and reinstalled my OEM shock and muffler, so you can see it really is a pretty easy task.
You'll also have to remove the two bolts that hold on the left side passengar foot pegs so you can remove the remote pre-load adjuster.
In the amount of time between this post and my last one, I went out and reinstalled my OEM shock and muffler, so you can see it really is a pretty easy task.
ZG said:Great install pics Fred. :great:
For installing the Ohlins do you have to remove the exhaust regardless of which exhaust you have or just if you have the potato launcher? I have the Muzzys full dual system, will it need to be removed for the Ohlins install? If so, the entire exhaust or just from the mid-connection point back??
I can't say for sure, but I suspect you will. You need all the room you can get under the bike to manipulate the shock into position. You have to turn it totally sideways and put the piggyback canister up through the swingarm hole first and then corkscrew the shock into place. There is only one way it will go in, and it is from the right bottom side.
Mad River Marc said:How hard is it to get the top bolt back into place? Do I need long pliers to hold it and feed it through or can I do it by hand?
I am able to reach in and extract and install it with my hand. I usually remove the lower bolt first (and install it last) so that the rear wheel isn't applying pressure to the shock. This makes it easier to slide the bolt in and out.
Just be careful though, because the top bolt and bottom bolt are different lengths. The top shock bolt is longer. Torque on both shock bolts is 25 ft/lbs.
Mad River Marc said:Thanks Fred,
Looks like I have a job for tomorrow morning
The fork springs are going to be a little more involved since i don't have the tools to disassemble them*(Hmm Guess that means I need to go buy more tools LOL)
You'll need a spring compressor (hold down) tool for the front forks. Traxxion Dynamics sells a nice fork servicing tool kit.
http://www.traxxion.com/ForkServiceToolKit.aspx
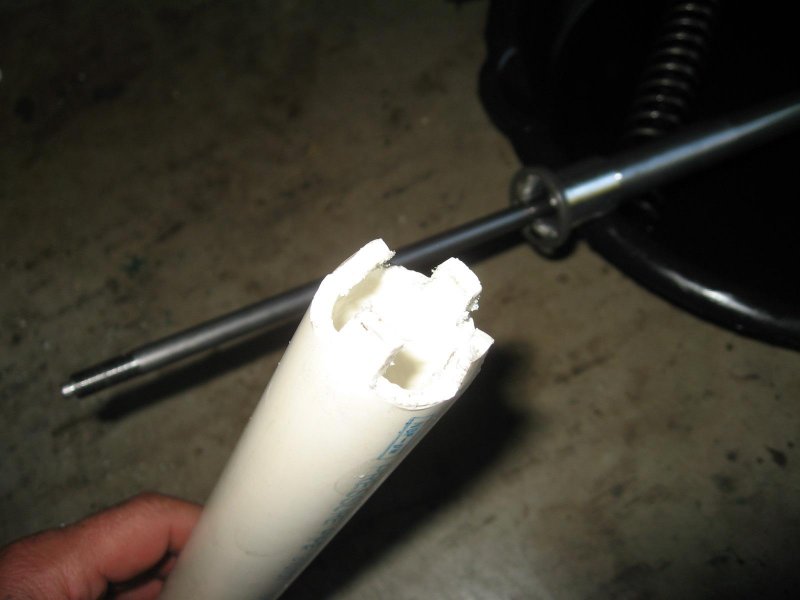
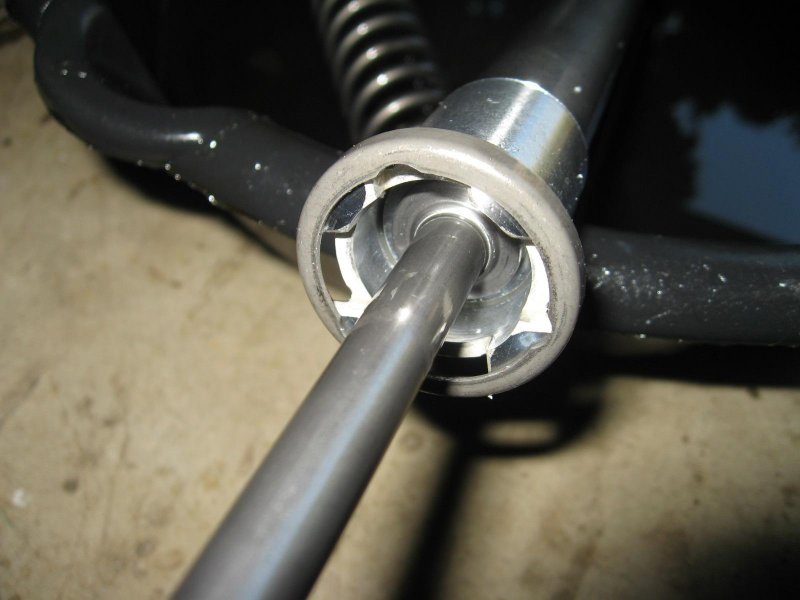
If you want to separate the fork halves you'll also need a tool to hold the damper cartridges from turning I made one out of PVC that works by cutting the end of it so it would fit into the top of the damper cartridges and hold them.
More photos here:
http://www.pbase.com/fredharmon/traxxionak20
By the way, Max at Traxxion also offered to install his C14 fork spring and AK-20 upgrade kit with no labor fee during the rally if folks would remove their forks and ship them to him (on top of a hefty discount on the kit price). I suspect if you call and ask, he would probably still honor this. I think if you "like" Traxxion Dynamics on Facebook you can get a 10% discount too.
Pay close attention to the original position of the locknut under the fork cap, and when you rethread the fork cap back on, be sure to put it to the exact same depth, as this sets the position of the damper adjuster rod that controls damping. You might want to count the number of revelotions it takes to unthread the cap, and then record it, and rethread it on the same number of turns. Or you can measure the threads from the locknut and record it. If you have my videos, watch the section on fork servicing before you start.