• Can't post after logging to the forum for the first time... Try Again - If you can't post in the forum, sign out of both the membership site and the forum and log in again. Make sure your COG membership is active and your browser allow cookies. If you still can't post, contact the COG IT guy at IT@Concours.org.
  • IF YOU GET 404 ERROR: This may be due to using a link in a post from prior to the web migration. Content was brought over from the old forum as is, but the links may be in error. If the link contains "cog-online.org" it is an old link and will not work.

1999 C-10 cuts out when put into first.

Old school. Pull lever, crack open bleeder valve. Over and over and over again. Until I went through 2 reservoirs with no bubbles. Should I get a pump?
 
I was reading an older post on here about bleeding the clutch fluid. And a bleeder on the master cylinder as well as the slave cylinder was referred to. Is there a bleeder valve on the m/c for the clutch?
 
I was reading an older post on here about bleeding the clutch fluid. And a bleeder on the master cylinder as well as the slave cylinder was referred to. Is there a bleeder valve on the m/c for the clutch?
Not on the C10.
 
I am going to back up a little. Remove the slave cylinder. Compress it with a c clamp. When you compress it do it with the reservoir cover removed. Does fluid come back into the reservoir? Don't let it overflow. Next pull the clutch lever. Do you get a solid lever or does it pull all the way into the grip? Repeat until you get a solid lever and the c clamp is held tight by the slave cylinder pushing out on it. If you never get a solid lever, the master is bypassing fluid or air in the system. You can also check for leaks at the slave cylinder. All this is to prove that the hydraulic system is good and able to push on the clutch release rod. No money spent until you find the problem part.
 
I am going to back up a little. Remove the slave cylinder. Compress it with a c clamp. When you compress it do it with the reservoir cover removed. Does fluid come back into the reservoir? Don't let it overflow. Next pull the clutch lever. Do you get a solid lever or does it pull all the way into the grip? Repeat until you get a solid lever and the c clamp is held tight by the slave cylinder pushing out on it. If you never get a solid lever, the master is bypassing fluid or air in the system. You can also check for leaks at the slave cylinder. All this is to prove that the hydraulic system is good and able to push on the clutch release rod. No money spent until you find the problem part.
After hours of re bleeding the line. The i finally have movement in the spring plate when I pull the lever! Just ordered my new clutch cover gasket. Once it arrives and I have everything put back together, I will let everyone know the status.
Do I need to use gasket sealer as well as the gasket? If so. Do I use it on the cover and housing?
 
I am also looking for a new throttle lock if anyone could point me in the right direction I would greatly appreciate it.
 
After hours of re bleeding the line. The i finally have movement in the spring plate when I pull the lever! Just ordered my new clutch cover gasket. Once it arrives and I have everything put back together, I will let everyone know the status.
Do I need to use gasket sealer as well as the gasket? If so. Do I use it on the cover and housing?
Woo hooo!!

Throttle lock discussion.
 
don’t forget to remove the old seal in red, the white traces in the oil, there must be water mixed in blue, and in yellow, it may be an optical effect but it seems that the stem has twisted, it’s not normal
1685879001-image.jpg
 
don’t forget to remove the old seal in red, the white traces in the oil, there must be water mixed in blue, and in yellow, it may be an optical effect but it seems that the stem has twisted, it’s not normal
1685879001-image.jpg
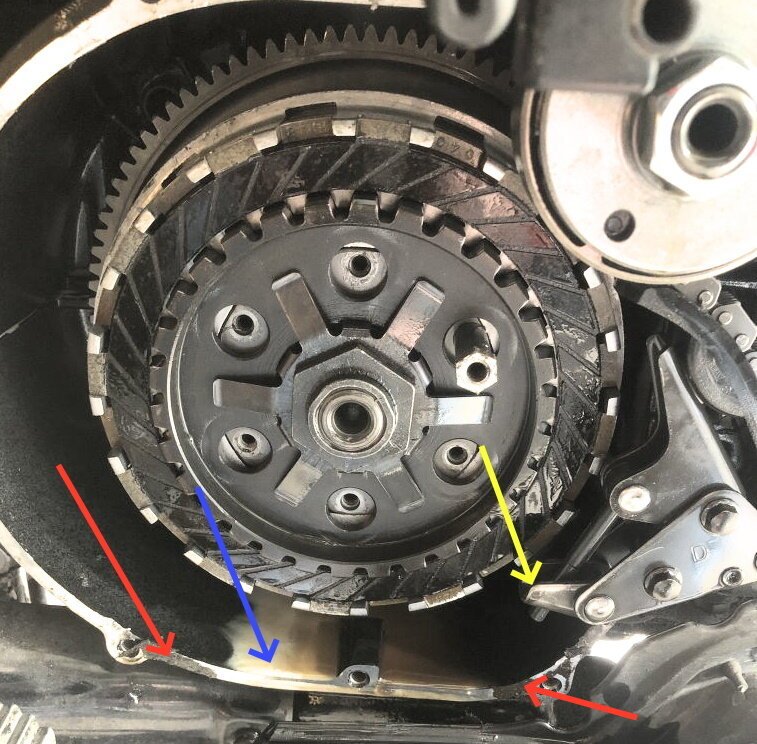
Thank you. I have since cleaned this up. When I get home, I will send new pictures. Please let me know if you still see any issues that need addressed.
 
So my buddy called in a favor and had problems with his Vulcan 1500. Turns out he had no clutch and it would die every time he put it in gear. Stuck a boroscope in and no clutch plate movement. We bled the piss out of it and nothing. Got a mightyvac vacuum bleeder and bled it and bled it. Moved the handlebars and hit the lever to test it and we got 3 big air bubbles and like magic the clutch worked. Don't know how after all that bleeding the air was in there, but it was. Made me think of you the whole time.
 
So my buddy called in a favor and had problems with his Vulcan 1500. Turns out he had no clutch and it would die every time he put it in gear. Stuck a boroscope in and no clutch plate movement. We bled the piss out of it and nothing. Got a mightyvac vacuum bleeder and bled it and bled it. Moved the handlebars and hit the lever to test it and we got 3 big air bubbles and like magic the clutch worked. Don't know how after all that bleeding the air was in there, but it was. Made me think of you the whole time.
That is so crazy!
That’s exactly how it happened on my end! Bled the heck out of it. No bubbles . Then all the sudden two or three huge bubbles. Now I have movement. I get my gasket Friday!
 
Wow.
Very very interesting… and very timely for me….

I’ve been struggling to bleed my grandsons Harley low rider front brakes. Using a mighty Vac, flushed the fluids, tried vac manually bleeding several times…..etc etc.

2days ago I decided to give up and do a complete rebuild (master cylinder, line and caliper) $140.00

The bike is an 05, the brake fluid looked very corrupted, the PO was not good at maintenance …. And before I flushed it, the fluid looked like mud, assuming he mid DOT4 with DOT5.

Besides. My 18 year old grandson is not an experienced rider
…. can’t hurt to be extra safe

Thanks for sharing guys
 
Makes me wonder talking about all the bleeding issues on the clutch side, if the same 'trick' would hold true thats used on yhe front brake lever.

Squeezing it and holding it squozed (sp) overnight, to allow any air in line to travel up and out of the line...???
 
Makes me wonder talking about all the bleeding issues on the clutch side, if the same 'trick' would hold true thats used on yhe front brake lever.

Squeezing it and holding it squozed (sp) overnight, to allow any air in line to travel up and out of the line...???

I’ve never heard of this “holding it squeezed overnight” trick.
I’ll try it
Thanks Pat
 
Makes me wonder talking about all the bleeding issues on the clutch side, if the same 'trick' would hold true thats used on yhe front brake lever.

Squeezing it and holding it squozed (sp) overnight, to allow any air in line to travel up and out of the line...???
It's called gravity bleeding
 
it is a well known trick in France, close the purges and hold the lever against the handlebar with an elastic or other overnight, allows the air bubbles to go back to the master cylinder caps removed.
On the other hand, the flexible tubes must not be above the level of the jar.
I have never had a problem of purging, brake or clutch from the moment when everything is clean inside and liquid changed regularly, for me, once a year.
on the back brakes of the sidecar that are coupled with the baskets is another story, there is a very specific procedure to follow and it is not simple.
one thing also, when the circuit has been completely emptied it is necessary to begin to purge the master cylinder by unscrewing the banjo screw so that the internal pump is primed. ;)
has more
Bernard
 
Well Gentlemen,
She is finally up and running!
I would like to thank everyone here for there guidance and input. I wouldn’t have been able to get her back on the road with out your help.
 
Well Gentlemen,
She is finally up and running!
I would like to thank everyone here for there guidance and input. I wouldn’t have been able to get her back on the road with out your help.
In a nutshell, what was the problem and final cure? Was this all about air in the system or a combination of things?
 
Going to toss my two nickels (inflation) into this fray. I have a 99 C10, rebuilt entire bike last year, new brake pads, discs (Brembo Gold), seals in calipers and master (All Balls), lines (Hel) and of course, fluid. Bled system with MityVac, then did it again. I get fairly good stopping power, however the initial lever travel is more than I am used to and I only get braking power in last 50% of lever travel, however lever never comes to the throttle. Now here‘s the interesting part, I started doing gravity bleeds, wrap Velcro strap around lever and leave her overnight. When I come back many hours later, and release the Velcro, that lever is as solid and sweet feeling as any racebike I used to race! And then…give it an hour and its back to the aforementioned softness. Sound off!
 
Well, I'm not the only one then that has this exact condition. Except that mine is on a 2000 ZRX 1100.
I too used an All Balls kit on the 6 piston calipers but a Brake Crafters MC kit.
All with braided lines.
Bled normaly, vac bled, reverse bled and still have that half lever travel till it gets solid, unless the
lever is pulled back and held over night. Then the brakes are right there and stay for awhile.
Then slowly creeps back to half lever travel, like you say, maybe over an hour.
I've had the calipers off numerous times while bleeding to get any bubbles up to the bleeder and
also to retract and extend the pistons to "exercise" them. Always comes back to the same results.
Over 5 years, I just leave a bunge wrapped around the lever and accept the results.
I wished that I had not done the calipers and MC togeather, so that I could point the finger at the issue.
I come to believe that the seal material in the caliper, or the cup material in the MC is not as the original
Kawsasaki. Maybe by leaving the calipers under pressure, the pistons remain out and the seals take
awhile to relax and retract the pistons that little bit, Or, the MC cup takes a set under pressure and
then again, the material takes awhile to relax.

I too would love to hear from someone in the know as to the culprit.
It's been on my list to rebuild each again, but with factory parts, and one at a time.
 
In the original discussion, James problem was air in his clutch line. So not quite what you 2 are asking about.

Many have had issues bleeding the system, and It's normally air trapped in the system.

That sed; I currently know of 2 others that have had the same issue as you.
On the 2; 1 changed the lines to braided and rebuilt master and Calipers. He even changed to different calipers with no solution. On that one he finally got it working and thinks it was a loose banjo fitting.
On the other bike, no remedy has been found yet. (and he's tried a lot of tricks)

Ride safe, Ted
 
Have you tried doing the bleed at the handlebars?
When the bike sets the air tends to migrate up the line. Bleeding at the bottom may move that air down again, but not out. Letting it set and then bleed at the top worked for me on my brakes.
You can even push fluid in at the caliper, up thru the system, and get any air out at the handlebar..
I think that's why Kawasaki put an extra bleeder at the handlebar.
 
I’ve had similar “issues” when rebuilding calipers/master cylinders several years ago, and most recently when rebuilding a dual piston front caliper and remounting it on the rear wheel using a new Spiegler line. This was using Jim Snyder’s mounting scheme he posted up several years ago.

In both instances, I tied off the pedal/lever in their full pressurized positions overnight to allow the air to work itself out of their respective systems. Like ya’ll, the “joy” was short-lived as the brake actions soon returned to their wussy feel, and the tie down procedure was repeated.

I eventually found what seemed to permanently correct the issue, for me anyway. This was to immediately bleed the brakes the old-fashioned way when the lever action was nice and “tight” after a night of their lever being locked down. With a line on the bleeder screw nipple feeding a catch container (to avoid a mess), pump the lever until it assumes a solid feel, and while holding it firm in that position, crack the bleeder and allow the fluid to escape into the line while maintaining an ongoing steady braking pressure on the lever until it reached its end of travel. Hold it there and immediately close off the bleeder screw. Repeat several times insuring that you maintain an adequate level of fluid in your master cylinder reservoir. Occasionally, I could see additional air burbling through the line with the fluid.

In the case of the recent rear brake change, it maintained a solid feel after the first night of locking down the pedal and bleeding, but I repeated the bleeding process after one more night of lockdown just to make sure all the air was out.

It’s been a week since the last bleeding, and all seems to be good - the brakes remain solid.
 
Last edited:
I’ve had similar “issues” when rebuilding calipers/master cylinders several years ago, and most recently when rebuilding a dual piston front caliper and remounting it on the rear wheel using a new Spiegler line. This was using Jim Snyder’s mounting scheme he posted up several years ago.

In both instances, I tied off the pedal/lever in their full pressurized positions overnight to allow the air to work itself out of their respective systems. Like ya’ll, the “joy” was short-lived as the brake actions soon returned to their wussy feel, and the tie down procedure was repeated.

I eventually found what seemed to permanently correct the issue, for me anyway. This was to immediately bleed the brakes the old-fashioned way when the lever action was nice and “tight” after a night of their lever being locked down. With a line on the bleeder screw nipple feeding a catch container (to avoid a mess), pump the lever until it assumes a solid feel, and while holding it firm in that position, crack the bleeder and allow the fluid to escape into the line while maintaining an ongoing steady braking pressure on the lever until it reached its end of travel. Hold it there and immediately close off the bleeder screw. Repeat several times insuring that you maintain an adequate level of fluid in your master cylinder reservoir. Occasionally, I could see additional air burbling through the line with the fluid.

In the case of the recent rear brake change, it maintained a solid feel after the first night of locking down the pedal and bleeding, but I repeated the bleeding process after one more night of lockdown just to make sure all the air was out.

It’s been a week since the last bleeding, and all seems to be good - the brakes remain solid.
Thank you sir! I will put this process in motion tomorrow.
 
It has firmed it up a bit, I would say about 50% of the slack has been removed, but she is still a little mushy. I did see a couple good sized bubbles exit the bleeder, beside the usual tiny air leak bubbles from around the bleeder. Also did the rear brake.

As mentioned, I had to repeat the process a couple of times before I was convinced I got all the air out. Rode my Connie today for some short errands, and the rear brake is still nice and firm.

Sounds like you're making progress.
 
Top