• Can't post after logging to the forum for the first time... Try Again - If you can't post in the forum, sign out of both the membership site and the forum and log in again. Make sure your COG membership is active and your browser allow cookies. If you still can't post, contact the COG IT guy at IT@Concours.org.
  • IF YOU GET 404 ERROR: This may be due to using a link in a post from prior to the web migration. Content was brought over from the old forum as is, but the links may be in error. If the link contains "cog-online.org" it is an old link and will not work.

Faded labels on controls

Scary Harry

Fear is not boring. COG# 4090
Member
So, my superior 86 is looking rather old and faded. Black not black anymore. White labels completely faded away.
What can I do to put the sparkle back into my C10?

Is it worth etching labels back into the the plastic? can printed decals work?
What toxic chemical can be used to restore the deep black luster into the plastic saddle bags and other parts?

Getting old is not for wimps...
 
Sorry I cannot help you with the label issue - BUT!!

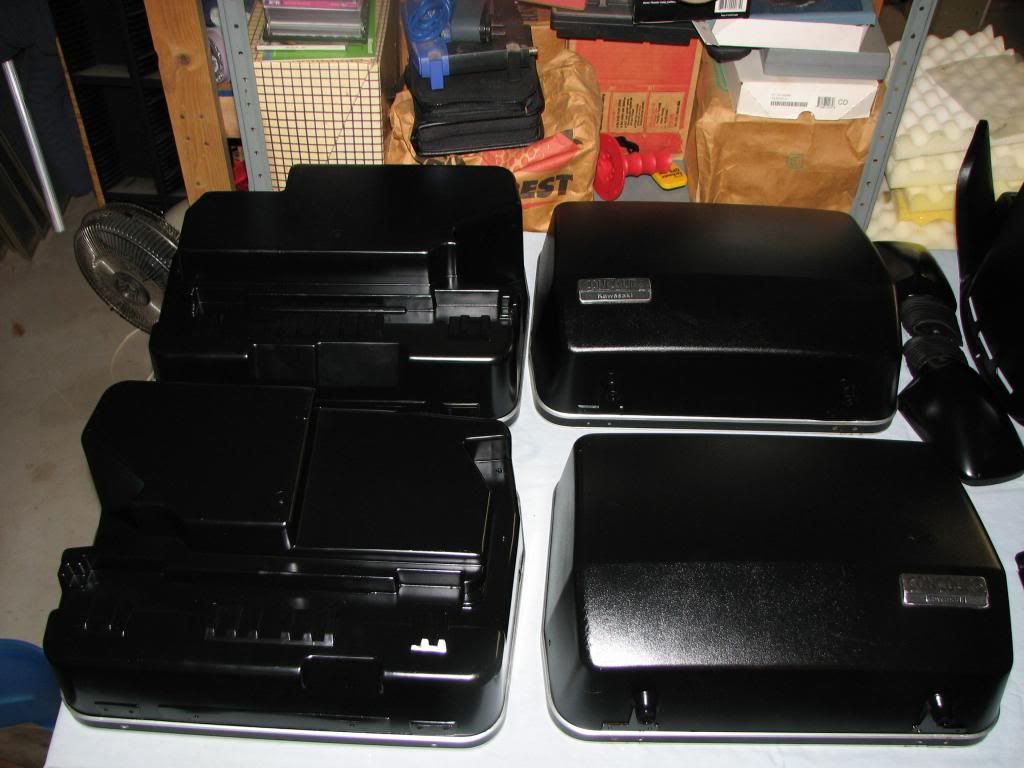
I have had great results in taking the time to re-paint all the black plastics with Krylon Fusion, Satin Black.


Stephen
 
Hot diggity-dog! That looks frikn' AWESOME!
Is that a Wal*Mart paint they sell?!

That may look good on my black shoes that I keep forgetting to polish.

Well done!
 
Harry:

Look for some Letraset dry transfer lettering.  That might be what you're looking for. Might need to experiment with clear coating them for more permanence.

JathkaJoe
 
I was just thinking that maybe if i went to Hobby Lobby and found some rub-on lettering decals and paint over them with clear lacquer, maybe, just maybe, it will look good enough to impress the ladies. Might even fool the youngsters into thinking it's a new model this year.
Just not sure if it will hold up to the sun baking on it.
 
You could always just upgrade...................


Attachments

  • 10600593_557624037703451_2656737606170864193_n.jpg
    10600593_557624037703451_2656737606170864193_n.jpg
    53.7 KB · Views: 170
When it comes to painting the plastics...................

I've done 3 rebuilds so far and each time I have painted all the black plastics for a even appearance.

Very simple yet time consuming.

I actually take apart the bags by driving the hinge pins out.  Remove the latches, handles, and reflectors.  Scrub everything down real good with soap and water.  Lots of time taken to tape off everything.  Then use Prepsol as a final clean. 

Painting is 3-4 coats spread out over a weekend - Morning and Evening of each day.

Stephen

 
I visit the GS Suzuki site, http://www.thegsresources.com , and found a guy that had made labels for the Suzuki controls. Ordered a set and got what I needed for my wife's bike. They were a peel and stick type label and looked like factory; been over a year now [maybe more]; bike is stored in a shop and covered usually so not affected by sunlight.
I inquired about labels for the Concours, but the guy only did certain models of the Suzuki. I 'll try to find that post and see if I can get any additional info. The labels are first class; really look good.
 
:)
A little more info. http://www.thegsresources.com  a site for GS/GSX 1976/1985 Suzukis. Posting found through past postings; titled "GS Switch Control Decals". Pictures are included in that posting.
I sent an email to the poster and am waiting for a reply. Hopefully, he's still around and will shre his methos and materials.
 
Harry Martin said:
I was just thinking that maybe if i went to Hobby Lobby and found some rub-on lettering decals and paint over them with clear lacquer, maybe, just maybe, it will look good enough to impress the ladies. Might even fool the youngsters into thinking it's a new model this year.
Just not sure if it will hold up to the sun baking on it.

I don't care that you do, enough direct sun light (UV) will fade anything! Doesn't matter what it is.

Good Luck............
 
Trapshooter2 said:
Harry Martin said:
I was just thinking that maybe if i went to Hobby Lobby and found some rub-on lettering decals and paint over them with clear lacquer, maybe, just maybe, it will look good enough to impress the ladies. Might even fool the youngsters into thinking it's a new model this year.
Just not sure if it will hold up to the sun baking on it.

I don't care that you do, enough direct sun light (UV) will fade anything! Doesn't matter what it is.

Good Luck............

True - UV is a significant contributor to entropy (hell, all sunlight is, especially if something is left exposed all day long...lotsa energy being dumped into things like tires). But that's why paints either have a UV-blocking agent or require a clear coat with a UV blocking agent. Makes a world of difference.

I've considered this approach for controls for years - just couldn't remember the name "Letraset" (used them long time ago).

 
The Mothers Back to Black works amazingly well.  Turned my rear fender from grey lol back to black. 
 
:)
Here's the reply I received from another website. I'm sure there is someone in COG that has the expertise to do this. Ignore the references to the GS Suzuki. Sure hope someone here can work something out.
Hello Bob,
The first thing you'll need are some very clear photos of the switch control graphics (to aid in reproducing the graphics with a CAD program, such as Adobe Illustrator), and the actual switch controls for taking measurements (for die-cutting). Owners manuals sometimes have good photos of switch controls, too.


Given that I have a graphic design background, reproducing the graphics and matching the GS's fonts was pretty easy; time-consuming, but easy.


All measurements for laser die-cutting were recorded in millimeters for accuracy. Try to limit the number of individual decals per switch if you can; i.e., the right hand STOP/RUN GS decal is one-piece, wrapping the kill switch, whereas the left hand decals had to be separates because, at the time, I didn't want to mess with removing the turn signal button to incorporate the HORN section. I believe your G model may even had a separate decal for CHOKE as well... so I suppose a single left side decal would not have been achievable.


I can't remember exactly the type of vinyl --or adhesive-- used during the print run, so I've included the decal printer's info below. You may be able to find a source closer to you, and they'll offer some help in recommending substrates, adhesives, and whether to laminate or not. (I chose not to laminate the GS decals, as this added a gloss sheen that I felt didn't match the more satin look of our switch plastic)


Bart Simpson | VP West Coast Sales | Graphic Solutions Inc.
:): 800.237.0083 ext. 106 (m) 423.255.8960
*:: 4793 Adams Rd.| Hixson, TN | 37343
8::  bsimpson@godecals.net | www.godecals.net | www.autoauctiondecals.com


Happy to hear you like the GS decals, and hope they're holding up okay. I know the adhesive on the set I installed is getting a bit tired, esp. on the left, turn signal side where my thumb is a constant source of abuse. Guess I'll need to follow my own instructions better next time ;)


Thanks for reaching out, Bob, and hope this helps. Feel free to ask any questions you may have.
Frank Z.
 
What I'm tempted to do is remove the items with labels and take them to a good engraving shop, then fill in the lettering with white epoxy resin.

Anyone ever try that?
 
I've got a dremel tool. Maybe if I stop drinking coffee long enough to get it done...
I may give it a try.
 
I've done engraving on glass with a Dremel, it's pretty easy if you have something to trace. In the case of the glass, I laid it on the old, broken glass but for the controls, if they are completely gone you could use dry transfer and go over that with the Dremel.

Or you could try free-handing it, but you might want to practice on some similar material.
 
Top