I had purchased a new Michelin Road 6 GT front tire (Revzilla) a few months back and planned to install it this spring. I planned to spread the install across two days. Today and tomorrow seemed to be the best fit. I planned to do the front wheel removal today and install the tire tomorrow with my No-Mar tire machine. The bike is a 2011 so I have done the front tire swap approximately 12 times. I have never had an issue. That is until today! I loosened the right lower fork pinch bolts, pulled both front brake calipers, and removed the front fender. So far so good. I next attempted to remove the front axle. I have a special socket tool to insert in the axle. I used the longest 1/2" ratchet I have because I know the axle is fairly tight. I started to loosen the axle but couldn't budge it. I checked everything again and found nothing that would prevent the axle from coming out. I eventually switched to a 1/2" impact wrench. After banging away for awhile it began to loosen. It remained tight the entire way out. I came to the conclusion that it wasn't really the threads on the left hand side that were tight, it was the collar on the right hand side that was tight. After its was completely loose I couldn't pull the axle out. So I lubed the collar up with Liquid Wrench and tightened it back in. Then I loosened it back out and covered the collar with more Liquid Wrench and repeated the process several times. Finally, I loosened the axle out and attached a pair of vice grips to the end and twisted and pulled and finally got the axle out. Very weird. Typically, before I reinstall the axle I coat the shaft (easy boys) with a light waterproof grease. I do not coat the threads or the collar with anything. After this though I may put something on the collar and the threads! Maybe anti-sieze. What a PITA. A ten minute job took a few hours!

-
WOULD YOU LIKE TO BE ABLE TO POST?
You must have an active membership plan
Use the bottons upper right to Log in or Register for membership - or click here to register to join COG
All new registrations are completed and authenticated using the club's main webpage.
For instructions to convert to one of our Full memberships from the Trial membership, click here
-
Can't post after logging to the forum for the first time... Try Again - If you can't post in the forum, sign out of both the membership site and the forum and log in again. Make sure your COG membership is active and your browser allow cookies. If you still can't post, contact the COG IT guy at IT@Concours.org.
You are using an out of date browser. It may not display this or other websites correctly.
You should upgrade or use an alternative browser.
You should upgrade or use an alternative browser.
Front Axle Stuck!
- Thread starter shoupeja
- Start date
Very strange...was there any galling or corrosion on the ID of the collar or OD of the axle?
By the time the axle reaches final torque, the space between the collar and axle should be pretty well sealed, but galling, or fret corrosion, could still take place.
Maybe post photos of the axle and the collar ID.
Glad you got it out.
By the time the axle reaches final torque, the space between the collar and axle should be pretty well sealed, but galling, or fret corrosion, could still take place.
Maybe post photos of the axle and the collar ID.
Glad you got it out.
Did you inspect the inside of the fork housing where it was binding? Like Jorge suggested, my first suspicion would be corrosion inside there, or an aluminum burr or galling creating an interference fit. If you find the corrosion, you could clean it up with some scotchbrite or sandpaper, and if it's a burr, perhaps something more aggressive.
I presume the axle shaft was smooth with no corrosion or signs of damage?
I presume the axle shaft was smooth with no corrosion or signs of damage?
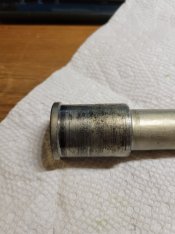
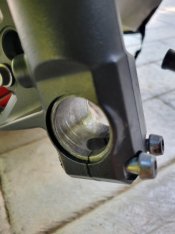
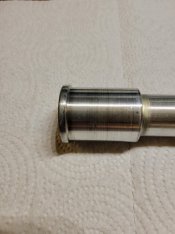
Thanks for the replies! Yes, very strange. And the plot thickens! I got the old tire off and the new tire installed and balanced. I lubed the axle shaft and the axle collar with some waterproof grease. I also put some copper anti-seize on the threads. So now I am attempting to re-install the wheel. I got everything lined up and started to insert the axle. It went in fine until it got to the collar at the end. The collar will not go into the fork leg! I checked the collar itself for any issues and found none. It almost appears as if the small slot that closes around the collar when you tighten the pinch bolts is already collapsed to some extent! I have never had an issue like this before. I attached a pic of the collar on the axle and some pics of the fork leg opening. While there appears to be some marks, the collar is smooth to the touch. I also stuck my finger into the bottom of the fork leg. It is smooth as well. I did tap a small screwdriver in the gap in several places in an attempt to open it to some extent. Well, either the axle collar has become larger - impossible - or the bottom of the fork leg as gotten smaller. I guess this could be possible. I will have to take some sandpaper or crocus cloth to the axle collar to see if I can decrease its diameter a bit. Wow!Did you inspect the inside of the fork housing where it was binding? Like Jorge suggested, my first suspicion would be corrosion inside there, or an aluminum burr or galling creating an interference fit. If you find the corrosion, you could clean it up with some scotchbrite or sandpaper, and if it's a burr, perhaps something more aggressive.
I presume the axle shaft was smooth with no corrosion or signs of damage?
Attachments

I don't think my axle bag those black marks, maybe I just don't remember it.
You might also take a Scotchbrite pad and firmly rub that area of the axle.
I've also spread the gap to make it easier to go in.
BTW...Last time I didn't touch the nut side of the fork. Yesterday I noticed that Irene's Vulcan-S doesn't have pinch bolts on the left fork leg. I'll find out how it's assembled soon when I change her front tire.
Had a C-10 act this way once. I could feel a tiny “burr” on one side of the fork. Must’ve been a millimeter or less from the guy inserting the axle at an angle (I guess). Smoothed it very gently with some very fine sandpaper until it was gone and tapped a screwdriver into the bottom of the fork like Wayne suggested.Greased it up good and practiced inserting the axle a few times without the wheel. Then added the wheel to the process. Done.
If it is like my Versys 650, the left shock end is threaded. The forks also have different inners, so you have to lift from somewhere other than the fork bottom. They will compress different amounts making it impossible to line up the steel axle with the aluminum fork threads. I used a rear paddock stand and a jack under the engine next to the oil filter. Others lift from a ceiling rafter to the frame or handlebars.Yesterday I noticed that Irene's Vulcan-S doesn't have pinch bolts on the left fork leg. I'll find out how it's assembled soon when I change her front tire.
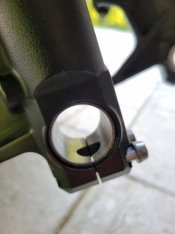
Thanks for all the advice! I did get the axle and wheel installed today! I did sand the collar and the inside of the fork leg with 600 grit sandpaper. So everything was very clean and smooth. The collar would still not go into the fork leg. So I went down the route of opening up the gap at the bottom by tapping in a screwdriver (kind of hard to see in the pic). Sounds like you guys have done this before! I have never had to resort to this! It certainly did the job! With the gap opened a bit, I practiced one time without the wheel. The axle went in just fine. So I went for it and got everything installed and torqued to specs. It seems like with age, the gap at the bottom of the fork leg slowly decreases making the installation a real pain. Anyhow, I am good to go! Thanks to everyone. Kind of good to hear that some have widened this gap just as something that helps the process go easier and not really a complete aberration. After going through this I realized each fork leg has a hole at the bottom that allows moisture to get up onto the axle. Something to remember.
Attachments

If u look up into that hole,.it provides access to the guts of the forks. Should.be a bolt up in there...Thanks for all the advice! I did get the axle and wheel installed today! I did sand the collar and the inside of the fork leg with 600 grit sandpaper. So everything was very clean and smooth. The collar would still not go into the fork leg. So I went down the route of opening up the gap at the bottom by tapping in a screwdriver (kind of hard to see in the pic). Sounds like you guys have done this before! I have never had to resort to this! It certainly did the job! With the gap opened a bit, I practiced one time without the wheel. The axle went in just fine. So I went for it and got everything installed and torqued to specs. It seems like with age, the gap at the bottom of the fork leg slowly decreases making the installation a real pain. Anyhow, I am good to go! Thanks to everyone. Kind of good to hear that some have widened this gap just as something that helps the process go easier and not really a complete aberration. After going through this I realized each fork leg has a hole at the bottom that allows moisture to get up onto the axle. Something to remember.
Yup, that hole provides access to to the bolt that secures the damping cartridge to the lower leg.If u look up into that hole,.it provides access to the guts of the forks. Should.be a bolt up in there...
Looks good!Thanks for all the advice! I did get the axle and wheel installed today! I did sand the collar and the inside of the fork leg with 600 grit sandpaper. So everything was very clean and smooth. The collar would still not go into the fork leg. So I went down the route of opening up the gap at the bottom by tapping in a screwdriver (kind of hard to see in the pic). Sounds like you guys have done this before! I have never had to resort to this! It certainly did the job! With the gap opened a bit, I practiced one time without the wheel. The axle went in just fine. So I went for it and got everything installed and torqued to specs. It seems like with age, the gap at the bottom of the fork leg slowly decreases making the installation a real pain. Anyhow, I am good to go! Thanks to everyone. Kind of good to hear that some have widened this gap just as something that helps the process go easier and not really a complete aberration. After going through this I realized each fork leg has a hole at the bottom that allows moisture to get up onto the axle. Something to remember.
I did not look up into the bottom of the fork leg to see what was on top of the hole. It makes sense that the hole provides access to the fork internals. When I serviced the forks some time back I removed them from the bike (another story getting the lower pinch bolts loose!) and sent them to Traxxion Dynamics. They did an oil change and replaced the fork seals. So I never really had to look into the guts of the fork legs. A nice day today here in South Western PA - happy Mothers Day to all the mothers out there - so I am off for a ride to test my new tire! It will be good to back on the road again!