• Can't post after logging to the forum for the first time... Try Again - If you can't post in the forum, sign out of both the membership site and the forum and log in again. Make sure your COG membership is active and your browser allow cookies. If you still can't post, contact the COG IT guy at IT@Concours.org.
  • IF YOU GET 404 ERROR: This may be due to using a link in a post from prior to the web migration. Content was brought over from the old forum as is, but the links may be in error. If the link contains "cog-online.org" it is an old link and will not work.

help installing header

hammerash

Member
Member
I have only had my 15 for under 2 months so no experience taking it apart yet. Decided to install Black Widow header and Delkevic 18" Carbon Fiber muffler. Arriving this week. I have the factory service manual and found section on exhaust removal. For the muffler, it says only the saddlebag needs removed. I assumed for the header that the lower (black) fairings would have to come off. But it doesn't mention removing those? It says the front middle fairings, horn and radiator. But to get the front middle fairings off, it says to remove rear middle fairings. Those require the inner cover (the black area that holds glove box) to be removed. The upper inner cover requires removing the fuel tank cover. So essentially it is saying I would need to remove the fuel tank cover, inner covers, rear middle fairings, front middle fairings, horn, radiator, and since I have canyon cages those would need to come off too to get the rear middle fairings off. But doesn't say need to remove lower fairings. This just doesn't seem right? What all needs to come off? Don't want to waste time taking all this off if not necessary. But also don't want to scratch my bike up or break tabs on fairings if don't have enough clearance.

for the header nuts, what is best way to remove them. Warm bike up, then remove them? penetrating oil? I have more concern than most on this because about 20 years ago, I decided to sell my 1991 Suzuki Katana since it had become a track bike when I bought my 99 ZX-9R and when got married and had kids I didn't make any track events. I decide to remove the Vance & Hines pipe and take it back to stock before selling. Well, 4 of the 8 bolts snapped! The 4 on the inside cylinders. "these were steel bolts in the aluminum head, not studs/nuts like the concours. Not enough stud left to do much-about 1-2 threads. I drilled out 1 of them, but just kinda didn't have time with newborn and work and the thing is still sitting in my garage! Keep saying one day will get it running. carbs are in a million pieces.

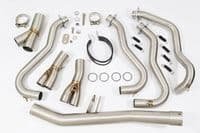
Once exhaust installed, the ECU will be sent to Steve. Also will install the exhaust reducer in the mid pipe per Steve's recommendation. And after reading the old revived thread on Delkevic vibrations, will install rubber at mount and bolt in where baffle would go if needed. oh, that thread says that the Delkevic only mounts by the muffler hanger, but some of the pictures show a bracket welded to mid pipe? see large picture. maybe generic picture, not the actual concours kit? But the Black Widow mid pipe has same bracket (smaller picture). was there change since that thread?
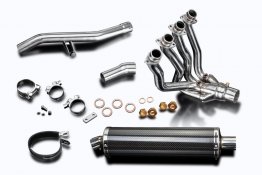
product11885_21__78346.jpg
gtr1400-2007-2021-concours-14-performance-exhaust-system-400mm-oval-black-stainless-silencer-(...jpg
 
I have a 2009 and had no problem removing the exhaust manifold nuts after soaking with penetrating oil and leaving sit overnight. All of my plastics were off the bike as well as the radiator since I just completed a valve adjustment. The thing to keep in mind is to make sure that the header ends up positioned very close to the oil filter. There is not much space between the pipes and lower cowling. I first used the included exhaust paste on connections, which was a huge mistake. My test fit of the lower cowl looked OK until I assembled the entire fairing. Getting the pipes apart after paste is extremely difficult. The clearances between the pipes is quite precise and I had no leaks at all assembled dry. I still put some aluminum tape on the inside of the right lower cowl since the connector spring loop is very close. After 1500 miles riding during some hot days, I have noticed no issues with plastic melting on the lower cowl.

The bike now looks amazing, runs extremely well, and sounds awesome. I wish the best of luck to you in this project.
 
OK thanks Steve. I was trying to visualize the picture of the mid pipe in 3D and it did seem like that bracket was not right to fit the bolt mount place that OEM pipe has.

rlievenski4555, i recall reading the thread about you trying to separate pipes. I may combine the header swap with valve check like you did if have to remove most of the plastic for header. I think removing lower and front middle should be all needed. Question is if able to get those off without removing anything else?

Murph, you aren't the first to praise Kroil. I usually use PB Blaster, but had tried to find Kroil previously. It wasn't available locally.
The tough part would be the 2 screws that connect the lower fairing to the mid coweling. I always remove the pieces from top to bottom giving me room. Never tried the opposite. Having crash bars in the equation makes it even tougher.

When I had to reposition my header, I tried to get to work on removing the header with the radiator in place initially. I quickly changed my mind and pulled it to get the needed working angle and prevent accidental damage.

Not sure this helps…. But my 2 cents.
 
Hammerash, u don't have to.take off the canyon cages. Any off.us have cut a slot in the mid fairing, that let's u flex the panel just enough to.peel the mid fairing from the cage.

There should be a thread or 2 about it with pictures...

The cut is made at the top of the 2nd fin
 

Attachments

  • 16865310154654892586814218620322.jpg
    16865310154654892586814218620322.jpg
    61.4 KB · Views: 60
Do a search for... cutting fairing for canyon cages ....theres pictures attached. Some have cut a section out like the picture shows, but it's possible to just cut yhe fairing at the rib and flex the fairing over the cage. The cuts are hidden like my photo attempts to show.

While removing yhat section u will have to flip it and mibe it around.to finally get it out. Hth
 
Thx for reminder Konehead. I have been reading forums a while but just finally got Connie. I have read about cutting fairing and while out looking at bike today I recalled that. So at least cages don't have to come off. I guess start with removing lower, even though manual doesn't mention removing it for header. I can't see how get it out without removing lower? then see if front mid can come out without rear mid. Trying to see what 2 screws rlievenski4555 is talking about.
 
I think removing lower and front middle should be all needed. Question is if able to get those off without removing anything else?
Well at a minimum the radiator lower mount bolt to get some flex / extra space to not damage the radiator. Although I would advocate for complete removal of radiator, much easier and if coolant is of any age and radiators find have some pebbles / junk in them it’s not a waste anyhow. Amazing how easy it is to clean a radiator up and also just how much ‘stuff’ collects in them.

I like your idea of the valve check at the same time - then definitely just pull the whole radiator…. Think, then you’ll have a fresh machine ready to rip hard with your new exhaust. What good is extra breathing (exhaust improvement) if your machine is not optimized? How many miles and how long since the last valve check?

Lastly, I assume new header crush gaskets come with the header? If not get new crush gaskets from Kawasaki; you don’t want to do all this work and have a leaking header. I don’t hear any noise about this on the forum but Kawasaki manual is very clear if removing header replace crush gaskets.

Wayne, Carol & Blue
 
I just recently purchased bike. 2015 with 31K. Valves not done! I used that in negotiating. I have debated on doing them ASAP or during winter. I had another bike lined up with about 8k in great shape ( as is mine) but not many farkles where mine is loaded. The consensus was this one was better deal. Kinda sucks to have to do valves now. I know i should. I have done them on previous bikes, but I am not the quickest! Next 2 weekends I am busy so no riding - which means may be good time to do them. But I can see that balloning- i want to put cruise on too! And fuseblock, and maybe jacks for heated gear. Hardwire My zumo. The to do list could grow!!

So, i just pulled the oem muffler/mid pipe. 2 big dents in pipe right near where attached to header? Didn't seem normal, but looking at the diagrams in the service manual, I guess it is. Header came today. Yes, has exhaust port gaskets and mid pipe gasket. Muffler coming tomorrow.
 
@hammerash I suggest doing the valves. You can control the scope creep and return to the machine this winter.

Do the valves, air filter, plugs, coolant, oils, exhaust, ECU. With these items complete you can go for as long of a ride as you want or rip as hard as you want and not worry about the valves that are now guaranteed (figure of speech) to be out of tolerance tight.

Wayne, Carol & Blue
 
I just recently purchased bike. 2015 with 31K. Valves not done! I used that in negotiating. I have debated on doing them ASAP or during winter. I had another bike lined up with about 8k in great shape ( as is mine) but not many farkles where mine is loaded. The consensus was this one was better deal. Kinda sucks to have to do valves now. I know i should. I have done them on previous bikes, but I am not the quickest! Next 2 weekends I am busy so no riding - which means may be good time to do them. But I can see that balloning- i want to put cruise on too! And fuseblock, and maybe jacks for heated gear. Hardwire My zumo. The to do list could grow!!

So, i just pulled the oem muffler/mid pipe. 2 big dents in pipe right near where attached to header? Didn't seem normal, but looking at the diagrams in the service manual, I guess it is. Header came today. Yes, has exhaust port gaskets and mid pipe gasket. Muffler coming tomorrow.
I have read posts from riders who think that valve checks can be done in longer intervals than the 15K suggested by Kawasaki. My experience is that at 15,400 miles my check found 13 of 16 valves out of spec to the tight side. Some were a couple thousands out or more. I have to imagine that the cam lobes get less oil and wear more when valves are so tight.

It is not an easy job and requires one to be very methodical and precise. Very doable though. Be sure to order new O rings for the oil transfer tubes and consider new frame support bolts. The manual suggests to replace every time. The Murphs kit is great and I highly suggest adding the spark plugs.

Good luck!
I do know that the same bike in Canada or Europe lists valve check at 42,000 Km (26,000 miles) vs the 15,000 miles recommended for US. EPA is likely responsible for the difference. Still, I am over that amount too.

I haven't yet looked over manual for valve check and what they suggest replacing. Bolts? Doubt they are they torque to yield so do they have rubber washer attached? I think that is what my ninja has. I have done 2 valve checks, removing cams both times, and never replaced any bolts, gaskets, washers. Dont think has oil transfer tubes. Never had leak. But I get the suggestion-hate to get back together and then have leak and have to take apart again. I guess search for some threads on valve check. Think shims aren't same size as ninja, 9.48mm diameter for concours vs 7.48mm for ninja, which is unfortunate since I have some laying around. $12 a shim-ouch!

On topic, the delkevic muffler arrived. Nice looking piece. Longer to get it than the header from UK.
Plenty of threads on valve adjusts, hit me up if you want to check your parts list, save you some money, spend some other money.

Wayne, Carol & Blue
 
I do know that the same bike in Canada or Europe lists valve check at 42,000 Km (26,000 miles) vs the 15,000 miles recommended for US. EPA is likely responsible for the difference. Still, I am over that amount too.

I haven't yet looked over manual for valve check and what they suggest replacing. Bolts? Doubt they are they torque to yield so do they have rubber washer attached? I think that is what my ninja has. I have done 2 valve checks, removing cams both times, and never replaced any bolts, gaskets, washers. Dont think has oil transfer tubes. Never had leak. But I get the suggestion-hate to get back together and then have leak and have to take apart again. I guess search for some threads on valve check. Think shims aren't same size as ninja, 9.48mm diameter for concours vs 7.48mm for ninja, which is unfortunate since I have some laying around. $12 a shim-ouch!

On topic, the delkevic muffler arrived. Nice looking piece. Longer to get it than the header from UK
The bolts hold the supports that connect the engine to the frame. Each is marked with an “R” and noted in the maintenance manual for replacement every time they are removed. The oil transfer tubes are inside the valve cover. I recall that there are 10 or so O-rings on them and Kawasaki wants around $5.50 for each. There are other sources that have metric o-rings that are temperature and oil resistant. I found some at Granger.
 
I think they say to replace the bolts because they have loctite on them. They aren't torque to yield (stretch). I used thread restorers on all the bolts and their bosses that had thread locker then used Loctite Blue when i reinstalled to factory spec.

I did not change the oil tube o-rings when i did mine at 26k, they were still pliable and fit well.

Rockymountainatvmc.com has shims for a great price and half sizes if you really want to dial them in.
 
EPA is likely responsible for the difference. Still, I am over that amount too.
Interesting, I thought Canada and Europe had tougher emissions standards. May be a perceived riding style difference. Which bike had the 6th speed gearbox in Europe but a 5 speed in the US? That was over different riding styles .....Mericans' were too hard on the narrower gears.. o_O
 
Top