• Can't post after logging to the forum for the first time... Try Again - If you can't post in the forum, sign out of both the membership site and the forum and log in again. Make sure your COG membership is active and your browser allow cookies. If you still can't post, contact the COG IT guy at IT@Concours.org.
  • IF YOU GET 404 ERROR: This may be due to using a link in a post from prior to the web migration. Content was brought over from the old forum as is, but the links may be in error. If the link contains "cog-online.org" it is an old link and will not work.

Petcock Problems...

I did a search, and couldn't seem to find this issue.  I was curious if anyone else had ever had this problem.

I had some medical problems last fall, which left my bike stranded at a friend's house all winter (and spring).  Needless to say, the gas wasn't in the best condition.  It did drive home, but had flat spots, etc.  Pulled the carbs (and found one loose jet), and cleaned them.  After a successful test drive of about 50 miles, I parked at home, and promptly noticed yee old gas puddle under the drain line (provided by Sunny Steve with the overflows).

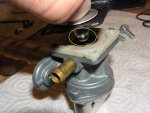
Well, long story short, I found that vacuum would OPEN the petcock, but releasing that vacuum would not close it.....unless the cover was unscrewed, releasing the vacuum.

I never even KNEW there was a check valve built into the vacuum port of the petcock. 

My assumption is there is supposed to be a controlled bleed back, letting the valve close, and that this bleed just got gunked up....


Anyone have any more information on this situation??
 
I find it interesting...42 views, and no replies.  Does anyone else even know that there IS a check valve in the vacuum port?  I assume to prevent the petcock from vibrating with the #2 cylinder pulses.  If you are in doubt, try this the next time you have your petcock apart....with the vacuum port cover off, blow into (and then suck out of) that vacuum port....you will see a tremendous difference!!!

I wonder what percentage of petcock failures are due to this simple issue??
 
This is exactly why I installed the Pingel fuel valve several years ago. After reading all of the hydrolock threads and petcock issues I decided not to wait until something happened. The Pingel fuel valve is a quality product that gives maximum fuel flow and doesn't rely on vacuum for its operation.
 
Stoodybaker said:
I find it interesting...42 views, and no replies.

Out of the thousands that visit the site daily, the 42 views might not have had an answer for you, in fact some of those were probably bots. But be patient, your question isn't even a day old.

You are correct, the petcock is designed to hold vacuum for a short time, for the reasons you mention, I would assume. I haven't taken it apart, but I would assume there is a provision for that vacuum to release, which may have gummed up in yours.
However, if you have gas coming out of the overflow, you also have a leaking float valve.
 
There is no check valve AFAIK.

I think the valve usually fails where the oring plunger meets the seat.  My seat had a fair amount of oxidation that kept it from sealing.  Not sure how the cover removal close it for you.
 
I haven't taken mine apart to see, but someone else did a while ago, and posted pics of it. Yes there is a check valve, it's in the vacuum nipple.
 
So maybe you got debris in your petcock AND one or more carburetor  float valves.  Now you gotta fix both.
Sounds like the tank has to come off to dump and clean out the bad  gas- then  remove the petcock and check or replace the screen as they deform with age and no longer filter  the fuel.
Maybe it is time to replace the whole  petcock. You get a new screen with it.  That is what I did when mine got to about 10 years old. Only 6 more years left on this one.
Good thing you got overflow tubes.  :) ;)

 
Short answer is just buy a new OEM petcock for around $70 on Murphs. Or convert to the Pingel, I need to do one of these myself.
 
I have an '82 KZ550A, the petcock on it leaked, in my research last year, I found that the KZ and the C-10 had the same part number except for a letter suffix. I bought this unit from Mike, its actually a Yamaha part, it bolts right up to my KZ and the Concours, the only thing I can see that's different and that justifies the suffix in the part number is that the Concours outlet that goes to the carbs goes to the rear and the KZ's goes to the front, the unit from Mike goes to the rear and is compliant for the Concours. These part numbers are factory Kawasaki part numbers. 
 
I'm thinkin' Eagle Mike is fixing to get some petcock business.

I also have some of his stuff on a KLR, seems to be a good place to deal with.
 
The petcock is just a bit over a year old, and I did fix the problem (cleaning the check valve).  It was kind of interesting, if you pulled a vacuum, you could SEE the valve stay open by looking down the fuel tube. 
 
  Have never had a problem with the C10 vacuum petcock in 20 yrs. I replaced the original about 4 yrs ago because it was 16 yrs old and reading post like this.  To me whether manual or vacuum petcock it or most anything can fail. I think the vacuum petcock is just as reliable as the human brain. Both go "OOPS!" on occasion. :mad:
 
Strawboss said:
I have an '82 KZ550A, the petcock on it leaked, in my research last year, I found that the KZ and the C-10 had the same part number except for a letter suffix. I bought this unit from Mike, its actually a Yamaha part, it bolts right up to my KZ and the Concours, the only thing I can see that's different and that justifies the suffix in the part number is that the Concours outlet that goes to the carbs goes to the rear and the KZ's goes to the front, the unit from Mike goes to the rear and is compliant for the Concours. These part numbers are factory Kawasaki part numbers.
I have an 09 KLR and a 00 Concours it appears the bolt spacing on the Concours is wider than the KLR.
 
Sounds like you have 2 problems. 

Even with the petcock on Prime, you have float valves in the carbs which should prevent fuel flow when bike isn't running.  Sometimes those can get stuck and tapping on the carb can jiggle them into place.

I rebuilt my 87 petcock vacuum at least once, maybe, maybe twice in 25 years.  I also stretched the spring a little so it had a little more closing force as recommended in the Concourier like 15 or more years ago.
 
Stoodybaker said:
I find it interesting...42 views, and no replies.  Does anyone else even know that there IS a check valve in the vacuum port?  I assume to prevent the petcock from vibrating with the #2 cylinder pulses.  If you are in doubt, try this the next time you have your petcock apart....with the vacuum port cover off, blow into (and then suck out of) that vacuum port....you will see a tremendous difference!!!

I wonder what percentage of petcock failures are due to this simple issue??

#1:  I saw your post at 6:45 am this morning.  My workplace allows us to access the internet occasionally such as when we are otherwise between job functions, but we cannot sign-in and reply to forums.  Otherwise I would have replied right then.  Many others have this same situation. 

#2:  The Concours OEM fuel valve does not have a true "check valve".  What you are looking at is the poppet valve that is connected to and actuated by the diaphragm, which is what the vacuum pulls against to open the valve to allow fuel to flow.  The valve is supposed to close when the vacuum goes away and the return spring takes over and pushes it closed. Typical failure modes for the OEM valve are: weak spring; dirt in, or damage to, the O-ring; torn diaphragm; internal leakage past the diaphragm, etc.  I  rebuilt my OEM valve and still had trouble with it so like many others I replaced it a few years ago with the Pingel valve.  There are other methods of installing manual valves, or even converting the Concours OEM valve to manual operation.  If you choose to rebuild your OEM valve, recommend you use genuine Kawasaki branded parts.  The K&N kits you can get from several suppliers have a reputation as being sort of hit-or-miss as to the quality/fit of their parts. 

#3:  If you want to examine the guts of the valve, just take out the four screws that attach the side cover to the valve body and it will all fall out in your hand. 

Picture of diaphragm/poppet assembly below
 

Attachments

  • Copy of P5210045+(2).JPG
    Copy of P5210045+(2).JPG
    271.6 KB · Views: 190
Find the part numbers for the 1982 KZ550A and the 2001 Concours, the only difference is the suffix at the end, same part number. I bought the petcock shown on the web site, it bolts right up to my Concours, the only reason I did not use it is because I'm using Bergmens petcock converter sold by Murph. I don't know all the differences with the various years of KLR'S and their part numbers they have and what fits what and what doesn't, this is a Yamaha part. If you are concerned, that's ok, Murph is great and he takes care of you and you know absolutely you are getting the correct part, go with him, its not much more money and you have piece of mind.
 
#2:  The Concours OEM fuel valve does not have a true "check valve".  What you are looking at is the poppet valve that is connected to and actuated by the diaphragm, which is what the vacuum pulls against to open the valve to allow fuel to flow.  The valve is supposed to close when the vacuum goes away and the return spring takes over and pushes it closed. Typical failure modes for the OEM valve are: weak spring; dirt in, or damage to, the O-ring; torn diaphragm; internal leakage past the diaphragm, etc.  I  rebuilt my OEM valve and still had trouble with it so like many others I replaced it a few years ago with the Pingel valve.  There are other methods of installing manual valves, or even converting the Concours OEM valve to manual operation.  If you choose to rebuild your OEM valve, recommend you use genuine Kawasaki branded parts.  The K&N kits you can get from several suppliers have a reputation as being sort of hit-or-miss as to the quality/fit of their parts. 

Actually, the vacuum port DOES have a check valve....in the vacuum section.  I know there is a poppet valve in the gas portion, but the check valve is to prevent the poppet valve from pulsing with the vacuum signal.  I wonder how many "leaking" petcocks out there are due to a simple obstruction of the leakback feature in this check valve.
 
I ordered a new OEM petcock from Murphs', so I can put that out of my mind. But my carbs do need a SISF job or at least a once over by me this season as well.
 
Well, I looked at both of my old OEM valves and it turns out Stoodybaker is correct, there IS a tiny check valve inside the vacuum port.  In the several times I've had these apart I guess I never tried blowing in there. Learn something every day.

Below are some pics of the valves with all the parts showing.  One is the original unit that leaked and got repaired and the other is an OEM unit I got to replace it.  I flipped over the valve body and the diaphragm assembly so you can see both sides.  As I said before, I have replaced this stuff with a Pingel valve.

pics below
 

Attachments

  • P1040107 - Copyemailsmall.JPG
    P1040107 - Copyemailsmall.JPG
    296.9 KB · Views: 221
tw_1956 said:
Strawboss said:
I have an '82 KZ550A, the petcock on it leaked, in my research last year, I found that the KZ and the C-10 had the same part number except for a letter suffix. I bought this unit from Mike, its actually a Yamaha part, it bolts right up to my KZ and the Concours, the only thing I can see that's different and that justifies the suffix in the part number is that the Concours outlet that goes to the carbs goes to the rear and the KZ's goes to the front, the unit from Mike goes to the rear and is compliant for the Concours. These part numbers are factory Kawasaki part numbers.
I have an 09 KLR and a 00 Concours it appears the bolt spacing on the Concours is wider than the KLR.

+1 on this.  I bought one before seeing this and the bolt spacing is different on the Concours, as I discovered about an hour ago when I went to swap them.
 
Bill Hookman said:
tw_1956 said:
Strawboss said:
I have an '82 KZ550A, the petcock on it leaked, in my research last year, I found that the KZ and the C-10 had the same part number except for a letter suffix. I bought this unit from Mike, its actually a Yamaha part, it bolts right up to my KZ and the Concours, the only thing I can see that's different and that justifies the suffix in the part number is that the Concours outlet that goes to the carbs goes to the rear and the KZ's goes to the front, the unit from Mike goes to the rear and is compliant for the Concours. These part numbers are factory Kawasaki part numbers.
I have an 09 KLR and a 00 Concours it appears the bolt spacing on the Concours is wider than the KLR.

+1 on this.  I bought one before seeing this and the bolt spacing is different on the Concours, as I discovered about an hour ago when I went to swap them.
There's allot of KLR owners you may be able to sell it to.
 
Another +1 on not buying EagleMike's manual petcock.  Spacing is wrong on my 92 Connie.  Not sure why but there seem to be different tanks out there.  Measure your tank before you buy.  Center to center the bolts on EAGLE MIKE'S PETCOCK are about 1-5/16".  I did not measure the tank, but one measurement should suffice.

How I fixed my petcock (working so far for a day):
1. Disassemble the vacuum operated side of the petcock.
2. Remove gaskets and plastic square from the poppet valve that the spring pushes on.
3. Attain some type of suitable gasket material, cut to the shape of the cap that was removed in step one. If your gaskets on the poppet valve are in good shape, use the one which originally sealed against the cap, still remove the plastic square and other gasket.
4. Reassemble: I put the gasket against the cap, and put the poppet valve and spring inside so it closes up the hole it seats against.
5. Disassemble the valve side of the petcock. 

Refer to the above picture: http://forum.cog-online.org/index.php/topic,51552.msg366862.html#msg366862
Identify which lever you have. I have the bottom lever shown. While looking at the round gasket with 5 holes, normal fuel flows to the center, and reserve fuel flows to the hole on the left. Fuel flows through the bottom hole to the other side of the petcock and out the nipple towards the engine.  On the lever, the straight groove will channel fuel from the center to the bottom hole for regular flow (handle up on mine). The curved groove will be for reserve flow (handle is towards the front on mine).

6. The handle on the lever was too long to turn upsidedown, so I cut it shorter, since the new ON position is straight up.  Notice in the above picture that the new lever is 180 degrees from the old.  If I had that lever I would not have needed this step.
7. Optional but recommended if you tend to forget things.  Flip the retainer over and inscribe new position indication marks on it.  Suggest Off in the forward position, On in the center position, Reserve in the rear position.  With the handle cut, the uncut side will point towards each indication.  I also inscribed arrows on the sides of the handle indicating the direction it should point.
8. There is a stop on the retainer, to turn past this file it off.  Optionally, filing off the center stop from the lever handle should work, but I did not do this.
9.  Reassemble the valve side of the petcock. 
10. Remember to seal the old vacuum port.  Test for leaks.
 
I recently rebuilt my petcock using the kit from Murphs because it was leaking a few drops of gas whenever I switched from ON to RES or vice versa. I hadn't detected any leakage through the valve yet, but I didn't want to take any chances. After I disassembled it, I noticed that all the mating surfaces were not very smooth. So I sanded them down on a very flat surface using progressively finer sandpaper, starting at 120 and ending at 420. After I put it back together and put it back into the tank I verified correct operation with the tank still off the bike and half full (god it's heavy that way). No leaks anywhere after hours of letting it sit and switching it back and forth between all three positions many times. It's been several weeks now and I've had no leaks of any kind with it.

I think the reason many people fail when rebuilding these is due to the poor quality of the mating surfaces. If these are cleaned up and smoothed out as I did, I believe that more rebuilds would be successful. There are also a number of delicate seals in these things that must be installed correctly. I highly recommend that the first time you try this you take pictures as your take it apart. Use the "macro" or "close up" feature of your camera/phone if it has one so you can get really close. I found this very helpful when putting it back together to make sure I got it right.
 
PaulP said:
I recently rebuilt my petcock using the kit from Murphs because it was leaking a few drops of gas whenever I switched from ON to RES or vice versa. I hadn't detected any leakage through the valve yet, but I didn't want to take any chances. After I disassembled it, I noticed that all the mating surfaces were not very smooth. So I sanded them down on a very flat surface using progressively finer sandpaper, starting at 120 and ending at 420. After I put it back together and put it back into the tank I verified correct operation with the tank still off the bike and half full (god it's heavy that way). No leaks anywhere after hours of letting it sit and switching it back and forth between all three positions many times. It's been several weeks now and I've had no leaks of any kind with it.

I think the reason many people fail when rebuilding these is due to the poor quality of the mating surfaces. If these are cleaned up and smoothed out as I did, I believe that more rebuilds would be successful. There are also a number of delicate seals in these things that must be installed correctly. I highly recommend that the first time you try this you take pictures as your take it apart. Use the "macro" or "close up" feature of your camera/phone if it has one so you can get really close. I found this very helpful when putting it back together to make sure I got it right.

+1 on this
Get the mating surfaces right, use care not to knick any rubber parts, everything clean and in the right places, you should be good.
 
Strawboss said:

I saw this post, clicked the link and purchased, then read subsequent posts indicating that this petcock does not "bolt right up."

I can confirm that it does not.  I emailed Eagle Mike and explained my plight and he agreed to except the return but was none to happy about because he said that several others had made the same mistake.  He also said that he had asked the other returnees for the connie bolt hole distance and that none had replied.  I hope they weren't coggers.

Here is my partial reply to Eagle Mike:

I measured the petcock bolt hole spacing on my C-10 Concours as best I could without pulling the tank.  Eyeballing across the center of the bolt heads it looks like the spacing on bike's petcock bolts is 1 and 9/16 inches or 42mm.  I measured the manual petcock that you sent as 1 and 5/16 or 34mm.  34mm is the more accurate measure.  The ruler I used didn't show 32nds of an inch.  I'll post that info in the forum where I learned about your petcock and hopefully you won't be troubled any more.
 
Hello all,
New to this bike and am looking for help with this petcock issue. Mine is leaking gas from someplace around it. What is the best way to remove it? Take the tank off and remove it to rebuilt it or leave the tank on? What is the best way for gas removal from the tank? I've had a cruiser for 10 years and took the leap to the concours because I've always wanted one. Extremely happy with my purchase. Thank you guys for all your help in advance. Oh and mine is a 01 with 45,000 miles on it
 
I always ran the gas down to where it switched to reserve, pull the tank and put it on its side and just popped the sucker out.  Or drain using a small hose.

I  would replace the guts with OEM,  Knl are just not as good.  Make sure you clean everything well and be sure it is put together JUST like it was taken apart.  Note there is a weep hole in the plastic wafer and put it back in same location.  Also might stretch the spring just a little bit.  That will help it seat.

PS:  Note that if it is leaking through the weep hole it will only do it when running and it is an DO IT NOW fix.  If it turns loose you will have gas going everywhere.  Been there done that, in the dark.
 
Then mine is leaking through the weep hole...lol It's only leaking when the bike is on and its slowly getting worse as I'm riding. I didn't notice it at first because I've never had a bike leak there.
 
smithr1 said:
I always ran the gas down to where it switched to reserve, pull the tank and put it on its side and just popped the sucker out.  Or drain using a small hose.

I  would replace the guts with OEM,  Knl are just not as good.  Make sure you clean everything well and be sure it is put together JUST like it was taken apart.  Note there is a weep hole in the plastic wafer and put it back in same location.  Also might stretch the spring just a little bit.  That will help it seat.

PS:  Note that if it is leaking through the weep hole it will only do it when running and it is an DO IT NOW fix.  If it turns loose you will have gas going everywhere.  Been there done that, in the dark.

I agree on that process, I set the tank on its right side, on a tire with a towel on it to hold the tank...

I also stress, as you have the tank off, completely drain it, swish it out with clean fuel, drain it again, and even swab those pesky bottom corners where fuel sits using a coat hanger and old tee shirt swab to insure its clean... and dry.. then when you refill, use FRESH fuel from a NEW gascan, dump the old fuel, or use it in your mower...
 
hhhhmmmm

As someone who has recently taken his petcock completely apart and studied EVERY single part and component through the cleaning/rebuilding process, I can say with confidence that if there is some kind of check valve functionality there, I missed it.

Not doubting it's there, I just didn't see it unless it is part of the way the diaphragm.
 
Jim Snyder said:
I like the price on the eagle mike petcock ($24.95) You can't even touch a rebuild kit for that.

I believe the rebuild kit I bought (K&L) was slightly cheaper...maybe.
 
2 kinds of COGers methinks. A. 'I know the bike wasn't perfect off the Showroom floor, and I will deal with it's flaws FOREVER...like my wife'. B. 'I know the bike wasn't perfect off the Showroom floor, and I'm having that changed NOW....like my wife'.  PINGEL, SISF, Rifle, Murph's , Plastic Surgeons, Fat Dr's and Divorce Lawyers exist for essentially the same reason...'Life is short, here's some $$Money$$. Make it better'.  So, I go with................... B.  Final answer. Locomotiveman
 
EUREKA!!! That old hose that connects loosely to my pet **** is very critical to fuel supply and needs to be replaced at once!!! Thought I was running out of gas when I was not getting gas to the carburetors. 
 
Top