How have most of you installed the controller for your Rostra? (On the bars I mean) Is there a bracket available for mounting on the left bar?
Thanks
Thanks

flashback50 said:How have most of you installed the controller for your Rostra? (On the bars I mean) Is there a bracket available for mounting on the left bar?
Thanks
C14lvr said:Murph sells a nice one. That's what I always do, when I buy my kits from him.
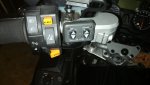
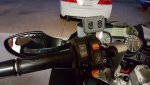
ghostrider990 said:I purchased the right hand SS mount from Murph, but beginning to think that mounting the CC controller on the left handlebar, makes WAY more sense ergonomically.
Hoping to tackle the Rostra install process in the coming weeks of winter....although, it looks to be shaping-up
to be a very mild winter, so time may be tighter than expected!
gr
flashback50 said:C14lvr said:Murph sells a nice one. That's what I always do, when I buy my kits from him.
Thanks,
I looked at Murph's mount but it looks like it won't work with a 2010 and up with heated grips. The screw it attaches to is covered by the heated grip wire guard on the right side.
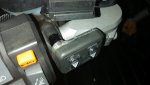
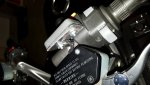
Zarticus said:I used Murphs mount on the left side, Attached it to the top bolt holding the clutch lever/Master cylinder to the bar :beerchug:
Zarticus said:I used Murphs mount on the left side, Attached it to the top bolt holding the clutch lever/Master cylinder to the bar :beerchug:
I Will when I get home from vacation in a couple days :beerchug:ghostrider990 said:Zarticus said:I used Murphs mount on the left side, Attached it to the top bolt holding the clutch lever/Master cylinder to the bar :beerchug:
Hey Zart -
Can you post-up a pic of your rendition of Murph's mount??
And Yes....mine is a 2012, so I must have missed that little tidbit of info when I purchased!
Damn, I need to get ON this install....but I'm S C A R E D!!! :-\
gr
Zarticus said:I Will when I get home from vacation in a couple days :beerchug:ghostrider990 said:Zarticus said:I used Murphs mount on the left side, Attached it to the top bolt holding the clutch lever/Master cylinder to the bar :beerchug:
Hey Zart -
Can you post-up a pic of your rendition of Murph's mount??
And Yes....mine is a 2012, so I must have missed that little tidbit of info when I purchased!
Damn, I need to get ON this install....but I'm S C A R E D!!! :-\
gr
:rotflmao: I'm so sorry, Got caught up with some medical problems while on vacation & forgot all about it. Will post a picture tonight !!!!!!!!ghostrider990 said:Zarticus said:I Will when I get home from vacation in a couple days :beerchug:ghostrider990 said:Zarticus said:I used Murphs mount on the left side, Attached it to the top bolt holding the clutch lever/Master cylinder to the bar :beerchug:
Hey Zart -
Can you post-up a pic of your rendition of Murph's mount??
And Yes....mine is a 2012, so I must have missed that little tidbit of info when I purchased!
Damn, I need to get ON this install....but I'm S C A R E D!!! :-\
gr
Still on vacation Zart?? ;D
That looks very nice, Ryan. Did you seal the unit from the inside with silicone to weather-proof it? I noticed you don't have any type of cover over it.rmills944 said:I just made a bracket for a friend yesterday. We did cut off the nubs on the controller and drill it for bolts and screws instead. The installer for the system just had an ugly mount for this system and mounted it to the brake reservoir so it kept moving when you hit buttons. This works much better. We used a sheet of 16ga. aluminum, jigsaw, grinder, and drill mainly to make the mounting plate.
Only thing left is to prime it and paint flat black
mattchewn said:SC,
Murph has a waterproof new switch cover for the Rostra now!! Use it. Easy peasy! :motonoises: :motonoises:
Matt
Sailor_chic said:Until then, my method is proven.

Bwaaa haaaa! Too funny, Nicole.Sailor_chic said:Oh, that's grease for a fishing reel!
RodneyW said:I'm going to install a Rosta in the next day or so. I've done it on other bikes, so I don't think it will be too bad, but I am wondering about opinions on the best place for the servo unit. I have searched and read, and it appears that most place it down low in front, on the left side. Is this the preferred spot?
I've nearly worn out my search button on this one! Thanks for the photo!Big Al said:RodneyW said:I'm going to install a Rosta in the next day or so. I've done it on other bikes, so I don't think it will be too bad, but I am wondering about opinions on the best place for the servo unit. I have searched and read, and it appears that most place it down low in front, on the left side. Is this the preferred spot?
I mounted mine top right of tank about 3 years ago and has worked fine in that location.
Here's a picture I took showing horn compressor location that just happens to show actuator location also.
http://forum.cog-online.org/index.php?topic=63556.msg508925#msg508925
Many have located in this location from years back with good results. Suggest you do some searches for "Rostra" on COG to show you the many details of the install.
mattchewn said:Rodney,
Mine is mounted down on the left side of the radiator. This location does not work if you have Canyon Cages though. So if you have them or plan on getting them something to consider. Having the unit tucked in behind the fairing is nice, and leaves room for my Stebel compressor up on the right side under the upper panel!
Matt
Matt,mattchewn said:Rodney,
Mine is mounted down on the left side of the radiator. This location does not work if you have Canyon Cages though. So if you have them or plan on getting them something to consider. Having the unit tucked in behind the fairing is nice, and leaves room for my Stebel compressor up on the right side under the upper panel!
Matt
Sailor_chic said:If I may make a suggestion on sealing the switches?
Remove the front cover. Then remove the rubber keypad from the cover. Apply silicone sealant to inside of the cover and replace the rubber keypad. This will seal the face of the switch housing. Once the cover is reinstalled onto switch body, use silicone sealant to close the gaps on the back side.
This is how I have done mine, and it seems to be quite effective. I have ridden in torrential downpours for extended periods, with this setup.