Hello Group, I have a 70,000 mile Connie that I have owned for three years. I have been fixing my own cars for 53 yeas and I am having a fun (and aggravating) time learning about the Connie. This post is for other new owners of older Connie's who are going to replace the water pump.
This Concours Owners Group Tech Article will get you started on a water pump replacement:
Water Pump Seal Replacement
http://cog-online.org/clubportal/clubstatic.cfm?clubID=1328&pubmenuoptID=29600
A very complete cooling system repair article is in the Summer 2006 Concourier, page 12, by Rich Riczinger, COG #5977
https://cog.memberize.net/clubportal/clubdocs/1328/06%20Summer%20LowRes.pdf
The coolant drain plug is on the steel water pipe tube 4” ahead of the pump itself on the lower left corner of the engine. The pump is behind the hydraulic clutch actuator (remove 3 screws with a 8 mm nut driver) and secured with two screws. Hold the new pump near the old pump to identify which screws are the pump attachment screws.
Here is my short list of parts used.
Water pump. Aftermarket water pump kit with two o-rings. Vendor Murphs' Kits Item OEMK-10
Coolant. Asian vehicle coolant. Check the color of coolant in your bike. The Connie owners manual says green coolant was the original equipment. My bike came with pink coolant and I am sticking with it. I got about ¾ of a gallon when I drained my bike.
Commentators say oil drain not needed if the bike is on the center stand.
Oil. 2.9 quarts of 10w 40 motorcycle oil. You have to drain the oil, as my bike only had 1500 miles since a filter change, I did not change the oil filter.
Commentators recommend replacing the hose clamps and re-tightening the clamps after 100 miles of riding.
Tools: Philips screw driver short, Philips screw driver regular, 7 mm, 8 mm and 10 mm nut drivers, 8mm and 10mm socket and socket wrench. Tap and die size 6 mm x 1.0 pitch for cleaning bolts and holes. Breaker bar with 3/4” socket for removing shift lever nut.
Supplies I used for the job. You need to promptly store the old coolant so pets will not drink it. You will be laying down and you will need good light.
Other items needed
Big sheet of clean cardboard as work surface. I don't have a bike lift, so I laid on the cardboard to reach the water pump.
Two work lights on low stands. Bright lights are essential when getting older.
Spray bottle of degreaser, a bottle brush and spray bottle of distilled water to rinse parts.
Empty gallon plastic bottle, labeled “Used coolant. Toxic. Date”
Funnel and rags for adding coolant to the bike without messing up the paint on the motorcycle.
Sturdy plastic bus tray. Catch coolant drain or leak.
Distilled water and a spray bottle, 1 gallon.
Clear acrylic spray paint.
Armor-all and a rag.
Neoprene rubber, 1/16” thick from hardware store. Hollow punches in 3/4”, 5/8” and 7/32” to make fairing screw gaskets.
Fairing screws, mainly 6 mm dia. 1.0 pitch x 17 mm length stainless steel Philips head.
Fender washers, stainless steel metric fender washer 6 mm hole size.
The time required for this job was 8 or 9 amateur mechanic work days. I'll tell you my mistakes and you can do better.
1 days Clean work area, remove fairing, remove the L shaped plastic air damper. Drain and store the coolant. Remove the shift lever linkage.
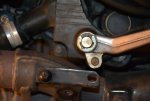
DSC1851.JPG Waterpumpisbehindtheshiftleverbracket
1 day Drain the engine oil and remove the water pump.
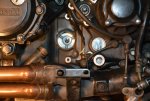
DSC1862.JPG Holeincenterispumpopening. Inner water tube being held in place.
1 day Clean and paint rotted water tube ends, scrub the rubber coolant tubes and hose clamps.
1 day Learn how the inner o-ring water tube fits into the water pump. Use the pump that is not in the bike. Hold the pump and the tube in your hands. Learn the gentle push, twist and clunk motion. When the water pump is installed in the bike, there is not much room for your fingers, but you will clearly know when you have seated the water tube, due to your previous practice with the parts off of the bike.
1 day Assemble inner water pipe with Loctite on the water pipe retaining screw. Another COG user noted, the water pipe retaining screw can vibrate out. Loctite on this screw is to prevent that from happening to you. Tighten the one hose clamp at the upper end of the inner water tube.
Assemble outer water pipe with three hose clamps. Tighten all four hose clamps.
1 day Using a Stant radiator pressure test tool with the “Honda Isuzu small neck adapter” pump the Kawasaki cooling system to 17 PSI. Using the Stant tester requires disconnect the ground cable, unbolt the gas tank, and move the tank back 1” until the Stant adapter can screw onto the Kawasaki coolant fill tube. Otherwise pour in 1 quart distilled water and look for water gushing out that inner water pipe connection at the pump.
--------------------
Purging the air from the water pump with a hand operated vacuum pump. This is the way I did it. The water pump will have air trapped inside. If you have a mechanics hand operated vacuum pump here is a way to remove most of the air. Pour 1 quart of distilled water or coolant into the cooling system through the cooling system filler. Near the right front corner of the fuel tank is the cooling system filler neck. Using the radiator cap as a size guide, make a rubber gasket to fit in the filler neck. Find a fender washer to drop in the filler neck. Connect your mechanic's vacuum pump and extract air from the cooling system until you see 550 mmHg vacuum. Release the vacuum. Fill with coolant and then suck out the top 4" of coolant. Using the washer and rubber gasket extract air from the cooling system again. This time you are purging air from the thermostat housing and any other cooling system high spots with trapped air. The thermostat is on the right center of the bike under the back 1/3 of the fuel tank. It has a bleeder fitting accessible with a 10 mm hex socket or nut driver.
----------------
Purging the air from the water pump or "burping" the pump. I am repeating repair advice from Rich's 2006 Summer Concourier article: When all the water tubes are attached, add enough distilled water or coolant to fill the water pump. Then, loosen the a water pump cover bolt so trapped air is released and liquid fills the impeller housing. Either the pump cover bolt at 11 AM or the pump cover bolt at 2:30 PM can be used for this air release procedure.
--------------------
1 day Add coolant. Add engine oil. Replace the hydraulic clutch and observe wires are not pinched. Replace the shift lever mechanism. I used Loctite on the 3/4” nut. Install the belly pan. Install the L shaped inner plastic part. Check that you have installed this odd L shape part.
Make sure you have oil in the engine if you elect to roll the bike outside and do a engine run leak test at this point. Because I had used the Stant static pressure test I proceeded to completely button up the bike without running the engine.
Install left side fairing, install the overflow tank round shaped fairing piece.
DSC1938.JPG MarkedwithyellowchalkistheLshapedinnerplasticpart.
1 day. Ride the bike on the commute to work. See coolant leak in evening.
It turns out, you really need to do a warm engine 7000 rpm road test after replacing the water pump.
1 day Set bike on centerstand, remove left fairing, remove L shaped left inner plastic part, top up coolant, run engine and find which connection is leaking. Do five mile road test.
Replacement metal tubes for the Kawasaki are listed as available parts.
The two metal tubes connecting the water pump to the radiator showed a moderate amount of metal corrosion on my motorcycle. Replacement tubes are as follows for a 2000 Concours. Except for the stiff price, I would like very much to buy the two water tubes as an investment in making my bike run until 140K miles.
As shown at Babbitsonline:
32102 PIPE 32102-1023 $88.15
39192 PIPE-WATER 39192-1028 $92.51
Learning the right motion for installing the inner water pipe and the tricky o-ring.
Pushing the inner water tube past the o-ring and seating the tube fully inside the water pump is quite a difficult maneuver. The reason the after market pump vendor sends two o-rings with each water pump is because it is easy to roll or sever that o-ring during installation.
I spent a couple of hours trying to make that water pipe connection. I slept on the problem and came up with this alternate strategy. Take the old water pump and the tubing and the o-ring and hold the pieces in your hands and gently experiment with the assembly problem. My solution was: seat the clean o-ring in the round machined groove. Slide the clean water pipe into the opening and feel how the pipe needs just a slight twist and very gentle shove.
This COG entry is licensed under the Creative Commons share and share alike license. You are free to copy, adapt and attribution appreciated.
Date March 18, 2017
This Concours Owners Group Tech Article will get you started on a water pump replacement:
Water Pump Seal Replacement
http://cog-online.org/clubportal/clubstatic.cfm?clubID=1328&pubmenuoptID=29600
A very complete cooling system repair article is in the Summer 2006 Concourier, page 12, by Rich Riczinger, COG #5977
https://cog.memberize.net/clubportal/clubdocs/1328/06%20Summer%20LowRes.pdf
The coolant drain plug is on the steel water pipe tube 4” ahead of the pump itself on the lower left corner of the engine. The pump is behind the hydraulic clutch actuator (remove 3 screws with a 8 mm nut driver) and secured with two screws. Hold the new pump near the old pump to identify which screws are the pump attachment screws.
Here is my short list of parts used.
Water pump. Aftermarket water pump kit with two o-rings. Vendor Murphs' Kits Item OEMK-10
Coolant. Asian vehicle coolant. Check the color of coolant in your bike. The Connie owners manual says green coolant was the original equipment. My bike came with pink coolant and I am sticking with it. I got about ¾ of a gallon when I drained my bike.
Commentators say oil drain not needed if the bike is on the center stand.
Oil. 2.9 quarts of 10w 40 motorcycle oil. You have to drain the oil, as my bike only had 1500 miles since a filter change, I did not change the oil filter.
Commentators recommend replacing the hose clamps and re-tightening the clamps after 100 miles of riding.
Tools: Philips screw driver short, Philips screw driver regular, 7 mm, 8 mm and 10 mm nut drivers, 8mm and 10mm socket and socket wrench. Tap and die size 6 mm x 1.0 pitch for cleaning bolts and holes. Breaker bar with 3/4” socket for removing shift lever nut.
Supplies I used for the job. You need to promptly store the old coolant so pets will not drink it. You will be laying down and you will need good light.
Other items needed
Big sheet of clean cardboard as work surface. I don't have a bike lift, so I laid on the cardboard to reach the water pump.
Two work lights on low stands. Bright lights are essential when getting older.
Spray bottle of degreaser, a bottle brush and spray bottle of distilled water to rinse parts.
Empty gallon plastic bottle, labeled “Used coolant. Toxic. Date”
Funnel and rags for adding coolant to the bike without messing up the paint on the motorcycle.
Sturdy plastic bus tray. Catch coolant drain or leak.
Distilled water and a spray bottle, 1 gallon.
Clear acrylic spray paint.
Armor-all and a rag.
Neoprene rubber, 1/16” thick from hardware store. Hollow punches in 3/4”, 5/8” and 7/32” to make fairing screw gaskets.
Fairing screws, mainly 6 mm dia. 1.0 pitch x 17 mm length stainless steel Philips head.
Fender washers, stainless steel metric fender washer 6 mm hole size.
The time required for this job was 8 or 9 amateur mechanic work days. I'll tell you my mistakes and you can do better.
1 days Clean work area, remove fairing, remove the L shaped plastic air damper. Drain and store the coolant. Remove the shift lever linkage.
DSC1851.JPG Waterpumpisbehindtheshiftleverbracket
1 day Drain the engine oil and remove the water pump.
DSC1862.JPG Holeincenterispumpopening. Inner water tube being held in place.
1 day Clean and paint rotted water tube ends, scrub the rubber coolant tubes and hose clamps.
1 day Learn how the inner o-ring water tube fits into the water pump. Use the pump that is not in the bike. Hold the pump and the tube in your hands. Learn the gentle push, twist and clunk motion. When the water pump is installed in the bike, there is not much room for your fingers, but you will clearly know when you have seated the water tube, due to your previous practice with the parts off of the bike.
1 day Assemble inner water pipe with Loctite on the water pipe retaining screw. Another COG user noted, the water pipe retaining screw can vibrate out. Loctite on this screw is to prevent that from happening to you. Tighten the one hose clamp at the upper end of the inner water tube.
Assemble outer water pipe with three hose clamps. Tighten all four hose clamps.
1 day Using a Stant radiator pressure test tool with the “Honda Isuzu small neck adapter” pump the Kawasaki cooling system to 17 PSI. Using the Stant tester requires disconnect the ground cable, unbolt the gas tank, and move the tank back 1” until the Stant adapter can screw onto the Kawasaki coolant fill tube. Otherwise pour in 1 quart distilled water and look for water gushing out that inner water pipe connection at the pump.
--------------------
Purging the air from the water pump with a hand operated vacuum pump. This is the way I did it. The water pump will have air trapped inside. If you have a mechanics hand operated vacuum pump here is a way to remove most of the air. Pour 1 quart of distilled water or coolant into the cooling system through the cooling system filler. Near the right front corner of the fuel tank is the cooling system filler neck. Using the radiator cap as a size guide, make a rubber gasket to fit in the filler neck. Find a fender washer to drop in the filler neck. Connect your mechanic's vacuum pump and extract air from the cooling system until you see 550 mmHg vacuum. Release the vacuum. Fill with coolant and then suck out the top 4" of coolant. Using the washer and rubber gasket extract air from the cooling system again. This time you are purging air from the thermostat housing and any other cooling system high spots with trapped air. The thermostat is on the right center of the bike under the back 1/3 of the fuel tank. It has a bleeder fitting accessible with a 10 mm hex socket or nut driver.
----------------
Purging the air from the water pump or "burping" the pump. I am repeating repair advice from Rich's 2006 Summer Concourier article: When all the water tubes are attached, add enough distilled water or coolant to fill the water pump. Then, loosen the a water pump cover bolt so trapped air is released and liquid fills the impeller housing. Either the pump cover bolt at 11 AM or the pump cover bolt at 2:30 PM can be used for this air release procedure.
--------------------
1 day Add coolant. Add engine oil. Replace the hydraulic clutch and observe wires are not pinched. Replace the shift lever mechanism. I used Loctite on the 3/4” nut. Install the belly pan. Install the L shaped inner plastic part. Check that you have installed this odd L shape part.
Make sure you have oil in the engine if you elect to roll the bike outside and do a engine run leak test at this point. Because I had used the Stant static pressure test I proceeded to completely button up the bike without running the engine.
Install left side fairing, install the overflow tank round shaped fairing piece.
DSC1938.JPG MarkedwithyellowchalkistheLshapedinnerplasticpart.
1 day. Ride the bike on the commute to work. See coolant leak in evening.
It turns out, you really need to do a warm engine 7000 rpm road test after replacing the water pump.
1 day Set bike on centerstand, remove left fairing, remove L shaped left inner plastic part, top up coolant, run engine and find which connection is leaking. Do five mile road test.
Replacement metal tubes for the Kawasaki are listed as available parts.
The two metal tubes connecting the water pump to the radiator showed a moderate amount of metal corrosion on my motorcycle. Replacement tubes are as follows for a 2000 Concours. Except for the stiff price, I would like very much to buy the two water tubes as an investment in making my bike run until 140K miles.
As shown at Babbitsonline:
32102 PIPE 32102-1023 $88.15
39192 PIPE-WATER 39192-1028 $92.51
Learning the right motion for installing the inner water pipe and the tricky o-ring.
Pushing the inner water tube past the o-ring and seating the tube fully inside the water pump is quite a difficult maneuver. The reason the after market pump vendor sends two o-rings with each water pump is because it is easy to roll or sever that o-ring during installation.
I spent a couple of hours trying to make that water pipe connection. I slept on the problem and came up with this alternate strategy. Take the old water pump and the tubing and the o-ring and hold the pieces in your hands and gently experiment with the assembly problem. My solution was: seat the clean o-ring in the round machined groove. Slide the clean water pipe into the opening and feel how the pipe needs just a slight twist and very gentle shove.
This COG entry is licensed under the Creative Commons share and share alike license. You are free to copy, adapt and attribution appreciated.
Date March 18, 2017