
-
WOULD YOU LIKE TO BE ABLE TO POST? REGISTER FOR COG MEMBERSHIP
All registration must be done through the club's main webpage: To register / join COG, click here
For instructions to convert to full membership, click here
-
Can't post after logging to the forum for the first time... Try Again - If you can't post in the forum, sign out of both the membership site and the forum and log in again. Make sure your COG membership is active and your browser allow cookies. If you still can't post, contact the COG IT guy at IT@Concours.org.
You are using an out of date browser. It may not display this or other websites correctly.
You should upgrade or use an alternative browser.
You should upgrade or use an alternative browser.
What were they thinking (part 2, front axel bolt)
- Thread starter rrsperry
- Start date
I found a bolt with a 7/8" head on it, (5/8" I think) then found a nut that fit the bolt and welded the nut on.
The 7/8" bolt head fit right into the 22mm hex on the axle and then you just use your choice of tools on the welded on nut.
I'll try to post a picture later.
The 7/8" bolt head fit right into the 22mm hex on the axle and then you just use your choice of tools on the welded on nut.
I'll try to post a picture later.
It's not a problem, but I've already got a metric crap ton of metric sockets...lol
I bought a ProMotion combo hex thing on Amazon, be here in the AM.. $18. No worries, I just tell the wife it's for a tool. She never argues with me on tools. (In fact she usually says, "if you want it go buy it"). It worked for the 2016 Corvette, and the Connie...
But really a 24mm nut would have killed them? ;lol
CW said:Spark plug socket turned backwards work?
Worked for me.
Try using the socket wrench and extension from the other side of the wheel. Feed the extension through the axle to the socket.
If you have to use two extensions, feed the longest one through the other side and the other one from the socket side. Try it. You'll see that it works.
Attachments
CW said:Spark plug socket turned backwards work?
Yes the peanut spark plug socket, then stick a short extension inside the socket and attach a ratchet. You don't have to loosen the left side pinch bolts either, just unscrew the axle from the right side (right pinch bolts loose of course) and then remove the axle. Easy!
Well i didn't have any spark plug sockets that would fit. So I just ordered the combo tool.
Changed the stock rear BT021 out for an Angel GT A spec, installed the Vance and Hines CS ONE exhaust. Tomorrow the front tire, and fender extender. (assuming I get the combo tool today like Amazon promises..lol)
Is it spring yet?
Changed the stock rear BT021 out for an Angel GT A spec, installed the Vance and Hines CS ONE exhaust. Tomorrow the front tire, and fender extender. (assuming I get the combo tool today like Amazon promises..lol)
Is it spring yet?
Ok, took off the wheel, changed the crap 021's for Angel GT's. Back together.
Ok, those engineers should be flogged. The only good thing I can say is it's pretty easy to remove and install the brake calipers.
But the axel and "nut"? Are other Japanese bikes like that? I don't remember my VFR being so bad...
Ok, those engineers should be flogged. The only good thing I can say is it's pretty easy to remove and install the brake calipers.
But the axel and "nut"? Are other Japanese bikes like that? I don't remember my VFR being so bad...

I'm sure most of you know this, but it is a good time to review. There is a precision cut piece of metal tubing between the wheel bearings. The purpose of this tube is to keep the distance between the inner bearing races constant and correct. Over torquing the axle bolt can literally squash this tube, shortening it, resulting in stressed bearings. Most motorcycles have this set up in both wheels. I have seen a local shop use an air wrench to tighten the front axle of my friends FJR1300. I had to use an air wrench on my axle tool to loosen it. Bad.
Thank you for sharing this, and it is used as a spacer, but some of your fears are a bit incorrect,Buzzard said:I'm sure most of you know this, but it is a good time to review. There is a precision cut piece of metal tubing between the wheel bearings. The purpose of this tube is to keep the distance between the inner bearing races constant and correct. Over torquing the axle bolt can literally squash this tube, shortening it, resulting in stressed bearings. Most motorcycles have this set up in both wheels. I have seen a local shop use an air wrench to tighten the front axle of my friends FJR1300. I had to use an air wrench on my axle tool to loosen it. Bad.
Using an air wrench on the axle nut is over kill, for sure, I would never use a tool for install that would prevent me from disassembling the parts on the road, using normally carried hand tools.
As far as "crushing" that tubular spacer, its simply not possible to do from tightening the axle nut, no matter what tools are used, the compressive strength of that tube is about 50x stronger than any force that could be generated by the mechanical force induced by the threafs on both the axle and nut....the threads would strip well prior to crushing the tube...
As for overtightening also, please note that each bore that the bearings are seated in, have an internal lip at their base, preventing over insertion... the bearings outer race will go solid against one during install, and when the second bearing is installed on the far side, it should only be tapped in untill it "bumps" the spacer tube, and you install the circlips that retain the bearings.
I hope this simplifies the assembly a bit, for those not familiar with the design elements.
I find the torque spec on the axles, both front and rear, to be somewhat excessive, but due to liability concerns of the manufacturer, they state them as "designed loading".
I've never had issue loading the axles on any bike using a 1/2" drive wratchet wrench, and a breaker bar on the opposite side, you can generate a lot of torque with those tools, more than enough to work correctly...
I also find that the suggestion of leaving the pinch bolts on the nut side of the forks tight, to hold the nut, so you can loosen the axle bolt, puts excessive wear on the actual threads of both the nut, and the axle, as the nut is now "clamped tight" and compressed slightly... If you only have one wrench, you can leave the pinch bolts.on the head of the axle tight to hold it,nwhile removing the nut on the far end.. I lube the axle threads with anti sieze, and coat the shaft with grease, and tighten the axle and nut prior to clamping the ends tight, and that is only after spinning the wheel and clamping the brakes on a dozen times to centralize the wheel between the forks...
These are lessons gleaned from 45 years of fixing bikes, with issues that were egsacerbated by incorrect procedures.
They are just trying to sell Snap on tools!rrsperry said:Ok, what's with the 22mm hex required for the front bolt? That sure looks like an answer to a question nobody was asking. So ok, new tool ordered.


Jjjtx
Crotch Rocket
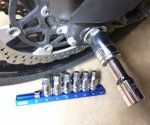
Don't forget guys, you can simply buy a single hex socket at sears for 10-15 bucks and be done with it.
I went to Northern tool and grabbed a full set of 7 sockets instead and got a nice set to keep in the tool box.
Made by Klutch and comes with a magnetic base to keep them tidy in the toolbox.
I went to Northern tool and grabbed a full set of 7 sockets instead and got a nice set to keep in the tool box.
Made by Klutch and comes with a magnetic base to keep them tidy in the toolbox.
Attachments
Jjjtx
Crotch Rocket
mattchewn said:so,
Does this mean we are over complaining about KiPass? :??: :rotflmao: :rotflmao: :rotflmao:
Matt
So far I have reserved my comments about that, but yes. Way too much bishen about that. Get over it.
JTX said:Don't forget guys, you can simply buy a single hex socket at sears for 10-15 bucks and be done with it.
I went to Northern tool and grabbed a full set of 7 sockets instead and got a nice set to keep in the tool box.
Made by Klutch and comes with a magnetic base to keep them tidy in the toolbox.
I'm all for good tools, but namebrand means nothing.... take for example those "nice" hex bits in your photo....
They may LOOK pretty, but in fact they have the major flaw I see on all of the bits sold today, when you want to use them on the Cheese steel bolts of a C14...
Look closely at how they turned a good tool, into one guranteed to round out the internal hex on the bolts, due to the massive chamfers they added to the ends of the bits... rendering them useless for getting full bite on the total depth of the socket head....
:truce: :-X :truce: :??:
Now, take those bits to your belt sander, or bench grinder, and completely dress the ends of perpendicular to the bit, removing all the stock to get back to a point where the hex is fully hex, and the chambers are completely gone.... and you have a full hex with sharp corners that fully engage the total depth of the screws socket to prevent them from stripping out....
:great: :great:
I've ground every hex bit I own in this manner, as one by one they all caused grief from lack of full engagement...
And NEVER use ball end hex tools to "break a bolt free", only use them to spin a loosened bolt....
JTX said:Valid points. But these axles are not at extreme torques.
Correct, and I wasn't directing my advice as to that big hex on the axle, I was directing it to all the other fasteners on the bike, like the ones on the brake calipers, rotors, battry cover, plastic panels, frame stiffeners around the engine, handlebars, etc....
After hearing about how many people have stripped out those hexes in the last 9+ years, I felt it was valid to make people aware of the issue.
Tis true. Just replaced my wind screen fasteners for the exact same reason. :'( All my hex key's now have the MOB treatment.MAN OF BLUES said:JTX said:Valid points. But these axles are not at extreme torques.
Correct, and I wasn't directing my advice as to that big hex on the axle, I was directing it to all the other fasteners on the bike, like the ones on the brake calipers, rotors, battry cover, plastic panels, frame stiffeners around the engine, handlebars, etc....
After hearing about how many people have stripped out those hexes in the last 9+ years, I felt it was valid to make people aware of the issue.
my axle tools are simple ones from McMaster Carr..
I purchased an "L" key, and cut a "stub" from the end of it, and use the stub, and the "L" with an 8" piece of pipe, as carry tools..
I also picked up a hexbit socket stub tool, for shop use..
https://www.mcmaster.com/#standard-hex-l-keys/=16j5seu
I purchased an "L" key, and cut a "stub" from the end of it, and use the stub, and the "L" with an 8" piece of pipe, as carry tools..
I also picked up a hexbit socket stub tool, for shop use..
https://www.mcmaster.com/#standard-hex-l-keys/=16j5seu
Bruiser
Sport Tourer
They also sell these at Harbor freightJTX said:Don't forget guys, you can simply buy a single hex socket at sears for 10-15 bucks and be done with it.
I went to Northern tool and grabbed a full set of 7 sockets instead and got a nice set to keep in the tool box.
Made by Klutch and comes with a magnetic base to keep them tidy in the toolbox.
Jjjtx
Crotch Rocket
Bruiser said:They also sell these at Harbor freightJTX said:Don't forget guys, you can simply buy a single hex socket at sears for 10-15 bucks and be done with it.
I went to Northern tool and grabbed a full set of 7 sockets instead and got a nice set to keep in the tool box.
Made by Klutch and comes with a magnetic base to keep them tidy in the toolbox.
Yeah I wouldn't be surprised. The N/T Was half mile away so I went with them.
Considering that 93 foot lbs of torque on the axel bolts is needed to hold everything together under load, I find it amazing that some of the Ducati’s have single swing arm designs. The amount of load that single attachment point receives while cornering must be enormous. That would need to be a beefy swing arm and must weigh a lot.
4Bikes said:Considering that 93 foot lbs of torque on the axel bolts is needed to hold everything together under load, I find it amazing that some of the Ducati’s have single swing arm designs. The amount of load that single attachment point receives while cornering must be enormous. That would need to be a beefy swing arm and must weigh a lot.
True, but it helps if the bike doesn't weight 700 lbs. My Multistrada weighs 461 dry.
I will argue this point, from experience. I have not had the wheel bearings out of my C14, but have done many in other bikes, dirt bikes most often. These spacers are most often aluminum, and I have had to replace several due to deformation (shortening) of this spacer. If the one in a C14 is stainless steel, OK, tighten the living crap out of it. The axle is tightened about the inner races of the wheel bearing. The outer races are staid in the wheel by a boss on one side, a circlip or other keeper on the other. The inner race is located by the axle or wheel spacer on one side, the inner spacer on the other. I know from experience that I can ruin the spacer in the rear wheel of my KTM with a half inch drive socket and ratchet. Too much torque on the tightening of the axle is not a good thing. Keeping it within factory specs is safe.MAN OF BLUES said:Thank you for sharing this, and it is used as a spacer, but some of your fears are a bit incorrect,Buzzard said:I'm sure most of you know this, but it is a good time to review. There is a precision cut piece of metal tubing between the wheel bearings. The purpose of this tube is to keep the distance between the inner bearing races constant and correct. Over torquing the axle bolt can literally squash this tube, shortening it, resulting in stressed bearings. Most motorcycles have this set up in both wheels. I have seen a local shop use an air wrench to tighten the front axle of my friends FJR1300. I had to use an air wrench on my axle tool to loosen it. Bad.
Using an air wrench on the axle nut is over kill, for sure, I would never use a tool for install that would prevent me from disassembling the parts on the road, using normally carried hand tools.
As far as "crushing" that tubular spacer, its simply not possible to do from tightening the axle nut, no matter what tools are used, the compressive strength of that tube is about 50x stronger than any force that could be generated by the mechanical force induced by the threafs on both the axle and nut....the threads would strip well prior to crushing the tube...
As for overtightening also, please note that each bore that the bearings are seated in, have an internal lip at their base, preventing over insertion... the bearings outer race will go solid against one during install, and when the second bearing is installed on the far side, it should only be tapped in untill it "bumps" the spacer tube, and you install the circlips that retain the bearings.
I hope this simplifies the assembly a bit, for those not familiar with the design elements.
I find the torque spec on the axles, both front and rear, to be somewhat excessive, but due to liability concerns of the manufacturer, they state them as "designed loading".
I've never had issue loading the axles on any bike using a 1/2" drive wratchet wrench, and a breaker bar on the opposite side, you can generate a lot of torque with those tools, more than enough to work correctly...
I also find that the suggestion of leaving the pinch bolts on the nut side of the forks tight, to hold the nut, so you can loosen the axle bolt, puts excessive wear on the actual threads of both the nut, and the axle, as the nut is now "clamped tight" and compressed slightly... If you only have one wrench, you can leave the pinch bolts.on the head of the axle tight to hold it,nwhile removing the nut on the far end.. I lube the axle threads with anti sieze, and coat the shaft with grease, and tighten the axle and nut prior to clamping the ends tight, and that is only after spinning the wheel and clamping the brakes on a dozen times to centralize the wheel between the forks...
These are lessons gleaned from 45 years of fixing bikes, with issues that were egsacerbated by incorrect procedures.
Torque specs on the axles aside, if properly assembled neither one can come loose while under way. The front axle has pinch bolts at each end that hold the axle and prevent it from turning or loosening. So unless both pinch bolts on one end fail or come loose, the front axle is going to stay fixed in place regardless of torque.
The rear axle has the cotter pin that will keep the nut from coming loose unless the cotter pin falls out or breaks.
So I am in favor of using the Kawasaki specified torque values as a starting point. I prefer to use anti-seize compound on both the front and the rear to avoid the situation where corrosion makes the use of an impact wrench necessary. I'd never use one to tighten but it's often quite helpful for loosening something that was tightened by a gorilla or locked into place by corrosion. Impact often wins where no amount of hand-applied torque will loosen the fastener. There is a sound scientific principle behind why impact does what it does where other methods often fail.
Buzzard said:I will argue this point, from experience. I have not had the wheel bearings out of my C14, but have done many in other bikes, dirt bikes most often. These spacers are most often aluminum, and I have had to replace several due to deformation (shortening) of this spacer. If the one in a C14 is stainless steel, OK, tighten the living crap out of it. The axle is tightened about the inner races of the wheel bearing. The outer races are staid in the wheel by a boss on one side, a circlip or other keeper on the other. The inner race is located by the axle or wheel spacer on one side, the inner spacer on the other. I know from experience that I can ruin the spacer in the rear wheel of my KTM with a half inch drive socket and ratchet. Too much torque on the tightening of the axle is not a good thing. Keeping it within factory specs is safe.MAN OF BLUES said:Thank you for sharing this, and it is used as a spacer, but some of your fears are a bit incorrect,Buzzard said:I'm sure most of you know this, but it is a good time to review. There is a precision cut piece of metal tubing between the wheel bearings. The purpose of this tube is to keep the distance between the inner bearing races constant and correct. Over torquing the axle bolt can literally squash this tube, shortening it, resulting in stressed bearings. Most motorcycles have this set up in both wheels. I have seen a local shop use an air wrench to tighten the front axle of my friends FJR1300. I had to use an air wrench on my axle tool to loosen it. Bad.
Using an air wrench on the axle nut is over kill, for sure, I would never use a tool for install that would prevent me from disassembling the parts on the road, using normally carried hand tools.
As far as "crushing" that tubular spacer, its simply not possible to do from tightening the axle nut, no matter what tools are used, the compressive strength of that tube is about 50x stronger than any force that could be generated by the mechanical force induced by the threafs on both the axle and nut....the threads would strip well prior to crushing the tube...
As for overtightening also, please note that each bore that the bearings are seated in, have an internal lip at their base, preventing over insertion... the bearings outer race will go solid against one during install, and when the second bearing is installed on the far side, it should only be tapped in untill it "bumps" the spacer tube, and you install the circlips that retain the bearings.
I hope this simplifies the assembly a bit, for those not familiar with the design elements.
I find the torque spec on the axles, both front and rear, to be somewhat excessive, but due to liability concerns of the manufacturer, they state them as "designed loading".
I've never had issue loading the axles on any bike using a 1/2" drive wratchet wrench, and a breaker bar on the opposite side, you can generate a lot of torque with those tools, more than enough to work correctly...
I also find that the suggestion of leaving the pinch bolts on the nut side of the forks tight, to hold the nut, so you can loosen the axle bolt, puts excessive wear on the actual threads of both the nut, and the axle, as the nut is now "clamped tight" and compressed slightly... If you only have one wrench, you can leave the pinch bolts.on the head of the axle tight to hold it,nwhile removing the nut on the far end.. I lube the axle threads with anti sieze, and coat the shaft with grease, and tighten the axle and nut prior to clamping the ends tight, and that is only after spinning the wheel and clamping the brakes on a dozen times to centralize the wheel between the forks...
These are lessons gleaned from 45 years of fixing bikes, with issues that were egsacerbated by incorrect procedures.
Well, when you do get around to removing the spacers on either a C14, or a C10, stick a magnet against them....
Until then, trust me when I say they are steel.... this ain't a KTM....
Ride safe.
Buzzard said:MOB, thanks for the info. Steel is good. I guess that a dirt bike (KTM) has weight issues, so they use aluminum. Just imagine the inner races being forces together, say .080". That's a lot of side loading of the bearings. Not good.
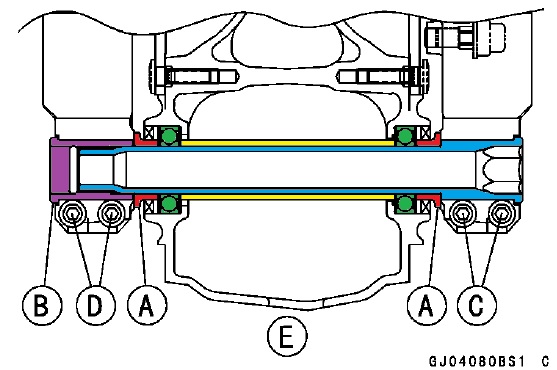
It doesn't work that way. See the diagram below that I captured from the FSM and color coded. The GREEN shows the bearings themselves and you can see the inner races. The YELLOW is the sleeve that fits inside the wheel between the bearings. The BLUE is the axle itself and the PURPLE is the axle nut. The RED shows the two spacers.
As you can see, regardless of how tight you make the axle nut, you're not going to put pressure on the bearings, just the STEEL inner races. Since the axle and the axle nut are aluminum, there is absolutely no way you can tighten this assembly enough to crush the bearing inner races. The aluminum will give way long before the steel does.
Bottom line is that the axle tension does NOT side-load the bearings in any way. They are free to turn at all times.
jwh20 said:Buzzard said:MOB, thanks for the info. Steel is good. I guess that a dirt bike (KTM) has weight issues, so they use aluminum. Just imagine the inner races being forces together, say .080". That's a lot of side loading of the bearings. Not good.
It doesn't work that way. See the diagram below that I captured from the FSM and color coded. The GREEN shows the bearings themselves and you can see the inner races. The YELLOW is the sleeve that fits inside the wheel between the bearings. The BLUE is the axle itself and the PURPLE is the axle nut. The RED shows the two spacers.
As you can see, regardless of how tight you make the axle nut, you're not going to put pressure on the bearings, just the STEEL inner races. Since the axle and the axle nut are aluminum, there is absolutely no way you can tighten this assembly enough to crush the bearing inner races. The aluminum will give way long before the steel does.
Bottom line is that the axle tension does NOT side-load the bearings in any way. They are free to turn at all times.
While I agree on the fact you can't crush the spacer, and other things as noted, which I posted, I will say this....
Go stick a.magnet on the axle... and the nut.... :-X
Let's put it this way, the nut will strip first..... and also the reason I cautioned about leaving the nut clamped up tight when loosening the axle....
Oh, the rear axle and nut, and spacer, are all steel ... :great:
smithr1 said:The part in yellow is Aluminum though. At least mine was.
Over all I agree though. May be better to loosen both the clamps and wrench hold both ends.
I thought we were talking about the red parts, the spacers. They are steel. I've never had the spacer out of mine so I'm not really sure. But even if it is aluminum, it will be in compression vs. the axle which will be under tension. I think the threads on the axle or axle nut are the weakest link here and will give way before any of the other parts do.
MAN OF BLUES said:Buzzard said:I will argue this point, from experience. I have not had the wheel bearings out of my C14, but have done many in other bikes, dirt bikes most often. These spacers are most often aluminum, and I have had to replace several due to deformation (shortening) of this spacer. If the one in a C14 is stainless steel, OK, tighten the living crap out of it. The axle is tightened about the inner races of the wheel bearing. The outer races are staid in the wheel by a boss on one side, a circlip or other keeper on the other. The inner race is located by the axle or wheel spacer on one side, the inner spacer on the other. I know from experience that I can ruin the spacer in the rear wheel of my KTM with a half inch drive socket and ratchet. Too much torque on the tightening of the axle is not a good thing. Keeping it within factory specs is safe.MAN OF BLUES said:Thank you for sharing this, and it is used as a spacer, but some of your fears are a bit incorrect,Buzzard said:I'm sure most of you know this, but it is a good time to review. There is a precision cut piece of metal tubing between the wheel bearings. The purpose of this tube is to keep the distance between the inner bearing races constant and correct. Over torquing the axle bolt can literally squash this tube, shortening it, resulting in stressed bearings. Most motorcycles have this set up in both wheels. I have seen a local shop use an air wrench to tighten the front axle of my friends FJR1300. I had to use an air wrench on my axle tool to loosen it. Bad.
Using an air wrench on the axle nut is over kill, for sure, I would never use a tool for install that would prevent me from disassembling the parts on the road, using normally carried hand tools.
As far as "crushing" that tubular spacer, its simply not possible to do from tightening the axle nut, no matter what tools are used, the compressive strength of that tube is about 50x stronger than any force that could be generated by the mechanical force induced by the threafs on both the axle and nut....the threads would strip well prior to crushing the tube...
As for overtightening also, please note that each bore that the bearings are seated in, have an internal lip at their base, preventing over insertion... the bearings outer race will go solid against one during install, and when the second bearing is installed on the far side, it should only be tapped in untill it "bumps" the spacer tube, and you install the circlips that retain the bearings.
I hope this simplifies the assembly a bit, for those not familiar with the design elements.
I find the torque spec on the axles, both front and rear, to be somewhat excessive, but due to liability concerns of the manufacturer, they state them as "designed loading".
I've never had issue loading the axles on any bike using a 1/2" drive wratchet wrench, and a breaker bar on the opposite side, you can generate a lot of torque with those tools, more than enough to work correctly...
I also find that the suggestion of leaving the pinch bolts on the nut side of the forks tight, to hold the nut, so you can loosen the axle bolt, puts excessive wear on the actual threads of both the nut, and the axle, as the nut is now "clamped tight" and compressed slightly... If you only have one wrench, you can leave the pinch bolts.on the head of the axle tight to hold it,nwhile removing the nut on the far end.. I lube the axle threads with anti sieze, and coat the shaft with grease, and tighten the axle and nut prior to clamping the ends tight, and that is only after spinning the wheel and clamping the brakes on a dozen times to centralize the wheel between the forks...
These are lessons gleaned from 45 years of fixing bikes, with issues that were egsacerbated by incorrect procedures.
Well, when you do get around to removing the spacers on either a C14, or a C10, stick a magnet against them....
Until then, trust me when I say they are steel.... this ain't a KTM....
Ride safe.
Challenge accepted. I believe they are aluminum or some other alloy but they are definitely NOT steel and not magnetic. Here are the two spacers off the front wheel of a 2009 Concours being tested with my handy telescopic magnet. Just so you know I'm not faking it I use it to pickup my ratchet handle:
https://youtu.be/uDObyzXHGho
Question for you;jwh20 said:MAN OF BLUES said:Buzzard said:I will argue this point, from experience. I have not had the wheel bearings out of my C14, but have done many in other bikes, dirt bikes most often. These spacers are most often aluminum, and I have had to replace several due to deformation (shortening) of this spacer. If the one in a C14 is stainless steel, OK, tighten the living crap out of it. The axle is tightened about the inner races of the wheel bearing. The outer races are staid in the wheel by a boss on one side, a circlip or other keeper on the other. The inner race is located by the axle or wheel spacer on one side, the inner spacer on the other. I know from experience that I can ruin the spacer in the rear wheel of my KTM with a half inch drive socket and ratchet. Too much torque on the tightening of the axle is not a good thing. Keeping it within factory specs is safe.MAN OF BLUES said:Thank you for sharing this, and it is used as a spacer, but some of your fears are a bit incorrect,Buzzard said:I'm sure most of you know this, but it is a good time to review. There is a precision cut piece of metal tubing between the wheel bearings. The purpose of this tube is to keep the distance between the inner bearing races constant and correct. Over torquing the axle bolt can literally squash this tube, shortening it, resulting in stressed bearings. Most motorcycles have this set up in both wheels. I have seen a local shop use an air wrench to tighten the front axle of my friends FJR1300. I had to use an air wrench on my axle tool to loosen it. Bad.
Using an air wrench on the axle nut is over kill, for sure, I would never use a tool for install that would prevent me from disassembling the parts on the road, using normally carried hand tools.
As far as "crushing" that tubular spacer, its simply not possible to do from tightening the axle nut, no matter what tools are used, the compressive strength of that tube is about 50x stronger than any force that could be generated by the mechanical force induced by the threafs on both the axle and nut....the threads would strip well prior to crushing the tube...
As for overtightening also, please note that each bore that the bearings are seated in, have an internal lip at their base, preventing over insertion... the bearings outer race will go solid against one during install, and when the second bearing is installed on the far side, it should only be tapped in untill it "bumps" the spacer tube, and you install the circlips that retain the bearings.
I hope this simplifies the assembly a bit, for those not familiar with the design elements.
I find the torque spec on the axles, both front and rear, to be somewhat excessive, but due to liability concerns of the manufacturer, they state them as "designed loading".
I've never had issue loading the axles on any bike using a 1/2" drive wratchet wrench, and a breaker bar on the opposite side, you can generate a lot of torque with those tools, more than enough to work correctly...
I also find that the suggestion of leaving the pinch bolts on the nut side of the forks tight, to hold the nut, so you can loosen the axle bolt, puts excessive wear on the actual threads of both the nut, and the axle, as the nut is now "clamped tight" and compressed slightly... If you only have one wrench, you can leave the pinch bolts.on the head of the axle tight to hold it,nwhile removing the nut on the far end.. I lube the axle threads with anti sieze, and coat the shaft with grease, and tighten the axle and nut prior to clamping the ends tight, and that is only after spinning the wheel and clamping the brakes on a dozen times to centralize the wheel between the forks...
These are lessons gleaned from 45 years of fixing bikes, with issues that were egsacerbated by incorrect procedures.
Well, when you do get around to removing the spacers on either a C14, or a C10, stick a magnet against them....
Until then, trust me when I say they are steel.... this ain't a KTM....
Ride safe.
Challenge accepted. I believe they are aluminum or some other alloy but they are definitely NOT steel and not magnetic. Here are the two spacers off the front wheel of a 2009 Concours being tested with my handy telescopic magnet. Just so you know I'm not faking it I use it to pickup my ratchet handle:
https://youtu.be/uDObyzXHGho
What steel is not magnetic?
Matt
Question for you;
What steel is not magnetic?
Matt
Most stainless steel alloys are non-magnetic. These are not steel though, they are too light. I believe they are aluminum.
The spacers on the outside of the wheel are definitely not aluminum. Aluminum would be destroyed instantly by the smallest amount of grit getting on the lip of the dust seal. They are stainless or some variant of it. I have had to replace them after about 50K on one bike so far.
Matt
Matt
mattchewn said:The spacers on the outside of the wheel are definitely not aluminum. Aluminum would be destroyed instantly by the smallest amount of grit getting on the lip of the dust seal. They are stainless or some variant of it. I have had to replace them after about 50K on one bike so far.
Matt
Feels like Aluminum to me but perhaps plated Aluminum. The ones from this bike had the plating flaking off. Note that the color under the plating is quite different.

They need to be replaced, but of course, the local dealer has none. "We can order them for you" they say.

mattchewn said:What year they off of?
The ones I replaced previously were off a '09 and did not have any flaking evidence and there was a deep groove worn into each one probably over .040 deep on each one. They were also quite heavy. This was last year when I replaced them.
Matt
2009 with 26,000 miles. I suppose it's possible that there is more than one type used.
400 series stainless steel is non-magnetic. WE use it at work for that purpose. Most softer steels and aluminum used for rubbing seal journals are typically hard coated (aluminum anodized) or ceramic spray coated and ground to size. I would suspect if the spacers are aluminum or dead soft they were treated with a hard coating of some sort.
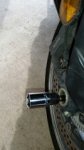
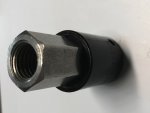
It's called a coupling nut
5/8-11 coupling nut specifically
available in steel or stainless 18-8
5/8-11 internal thread and 7/8 hex x 2" length
7/8=.875
22mm=.866
works great, fits the axle nicely and it's very affordable
Under $3.00 US at Ace Hardware or True Value or your participating hardware store
buy an extra for your friends
I installed mine in a 1/2" drive 22mm socket as shown
Attachments
JDSCO said:It's called a coupling nut
5/8-11 coupling nut specifically
available in steel or stainless 18-8
5/8-11 internal thread and 7/8 hex x 2" length
7/8=.875
22mm=.866
works great and it's very affordable
Under $3.00 US at Ace Hardware or True Value or your participating hardware store
buy an extra for your friends
I installed mine in a 1/2" drive 22mm socket as shown
:beerchug: :beerchug: :great: :great: :great:
WINNER, WINNER, ..CHICKEN DINNER......SWEET.
dummy me.. and after all the years I told people how the make the "custom" wrench out of nuts, washers, and all thread rod, for removing the guts inside the C10 forks... never even entered my mind... DOHHHH.
Somebody make this a STCKY in the tool section please....
JDSCO said:It's called a coupling nut
5/8-11 coupling nut specifically
available in steel or stainless 18-8
5/8-11 internal thread and 7/8 hex x 2" length
7/8=.875
22mm=.866
works great, fits the axle nicely and it's very affordable
Under $3.00 US at Ace Hardware or True Value or your participating hardware store
buy an extra for your friends
I installed mine in a 1/2" drive 22mm socket as shown
Now why didn't I think of that?.......wait a minute......don't answer that!
") )
)strum said:Tried the spark plug socket thing. Non of mine will except an extension from the inside.
Most have a rubber insert that helps hold the plug into the socket for easy removal but in all mine that just pushed right out. But only 1 of my 3 plug sockets worked. It did work and I used it... Then after the job was done I found that I had ordered the one Murph has months before when I was planning ahead :/
smithr1 said:strum said:Tried the spark plug socket thing. Non of mine will except an extension from the inside.
Most have a rubber insert that helps hold the plug into the socket for easy removal but in all mine that just pushed right out. But only 1 of my 3 plug sockets worked. It did work and I used it... Then after the job was done I found that I had ordered the one Murph has months before when I was planning ahead :/
Yeah I understand about the rubber but none of mine will except an extension from the inside. Im sure some works but I was just saying the Pro Motion tool or Murphs just makes this work out great. You can put a good 1/2" Drive socket (cant remmember the size from here) on the rear of the the tool and use a pull handle.
By "Pull handle" do you mean breaker bar or ratchet?