• Can't post after logging to the forum for the first time... Try Again - If you can't post in the forum, sign out of both the membership site and the forum and log in again. Make sure your COG membership is active and your browser allow cookies. If you still can't post, contact the COG IT guy at IT@Concours.org.
  • IF YOU GET 404 ERROR: This may be due to using a link in a post from prior to the web migration. Content was brought over from the old forum as is, but the links may be in error. If the link contains "cog-online.org" it is an old link and will not work.

yet another horn upgrade/install

postrucks

Moped
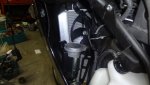
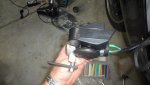
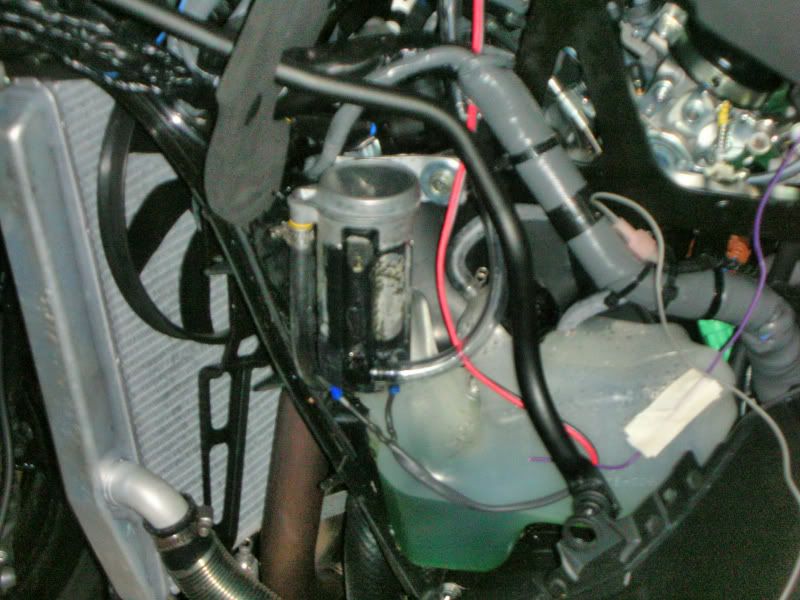
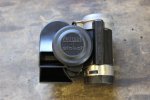
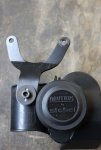
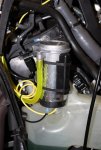
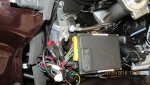
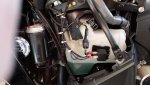
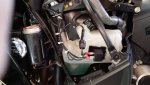
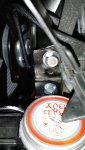
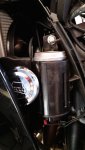
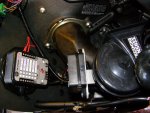
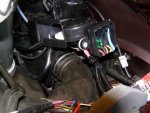
Hi fellas, recently installed a stabel nautilus horn. Here is a couple of pics. Boy is it loud! Its mounted on the left side, next to the left lower fairing. All I used for mounting was just a "3 piece of strap with a couple of holes. Used one of the secondary support frame bolts to mount it. Wiring was easy. A fused 12 gauge wire from the battery to a relay, then from the relay to the horn positive connection. Then from the horn negative connection to ground ( the same mounting bolt). Then use the orignal horn wires to trigger the relay. Installed the relay next to the relays mounted on the upper left side. Very happy with the 139 db loud sound.
 
oops the pictures didn't make it the first time
 

Attachments

  • 8-20-12 023.JPG
    8-20-12 023.JPG
    88 KB · Views: 624
  • 8-20-12 021.JPG
    8-20-12 021.JPG
    83.8 KB · Views: 578
Nice place to mount your horn.  When I got my new C14, boy was I surprised at the puny little horn.  I got a self contained air horn, called a Bad Boy, and was able to mount it under the right side plastic just in front of the gas tank.  It rests on top of the right side intake plenum...it is LOUD!  The really nice thing about it, is it's a plug and play, and only cost $35
 
I mounted my compressor in much the same place as OP, but since I split the plastic horns off, the compressor is in very tight to the subframe:

1212C14-April13.jpg


Using a simple L bracket made of aluminum flat stock, I mounted the plastic horns to the same bolt hole the OEM horn had mounted. The L bracket is a bit more than 90 degrees, so it tilts the bottom of the plastic horn just slightly back towards the radiator. This way, it projects the sound right out the front for maximum effect, and its not too loud in the cockpit.

Ran a hose from the compressor up along the heat dam, to the plastic horns. I used Murph's harness and just patched the leads to the compressor to be longer, since I left the controller on the right side close to the OEM horn harness leads.
 
Bruce said:
Nice place to mount your horn.  When I got my new C14, boy was I surprised at the puny little horn.  I got a self contained air horn, called a Bad Boy, and was able to mount it under the right side plastic just in front of the gas tank.  It rests on top of the right side intake plenum...it is LOUD!  The really nice thing about it, is it's a plug and play, and only cost $35

Looks like the Bad Boy is now offered in a louder version.  Hmmm, may be a future project.
http://www.wolo-mfg.com/air.htm
 
JR said:
I mounted my compressor in much the same place as OP, but since I split the plastic horns off, the compressor is in very tight to the subframe:

1212C14-April13.jpg


Using a simple L bracket made of aluminum flat stock, I mounted the plastic horns to the same bolt hole the OEM horn had mounted. The L bracket is a bit more than 90 degrees, so it tilts the bottom of the plastic horn just slightly back towards the radiator. This way, it projects the sound right out the front for maximum effect, and its not too loud in the cockpit.

Ran a hose from the compressor up along the heat dam, to the plastic horns. I used Murph's harness and just patched the leads to the compressor to be longer, since I left the controller on the right side close to the OEM horn harness leads.

How did you split the compressor from the horns? I have the Wolo Bad-Boy and want to do something similar to what you did but can't find a way to split them. Your compressor looks like a Wolo without the graphics. Maybe our horns are a different design?
 
Big Al said:
JR said:
I mounted my compressor in much the same place as OP, but since I split the plastic horns off, the compressor is in very tight to the subframe:

1212C14-April13.jpg


Using a simple L bracket made of aluminum flat stock, I mounted the plastic horns to the same bolt hole the OEM horn had mounted. The L bracket is a bit more than 90 degrees, so it tilts the bottom of the plastic horn just slightly back towards the radiator. This way, it projects the sound right out the front for maximum effect, and its not too loud in the cockpit.

Ran a hose from the compressor up along the heat dam, to the plastic horns. I used Murph's harness and just patched the leads to the compressor to be longer, since I left the controller on the right side close to the OEM horn harness leads.

How did you split the compressor from the horns? I have the Wolo Bad-Boy and want to do something similar to what you did but can't find a way to split them. Your compressor looks like a Wolo without the graphics. Maybe our horns are a different design?

I used a screw driver  to pry the plastic part off. Found pictures showing it on Google. Mine was a Stebel. Then I cut the channel part of the plastic loose and put it back on compressor since it's part of the intake. Attached hose to that too, routed it up behind heat shield foam, and glued a microphone mesh ball over the end of the hose to act as a filter.
 
Big Al said:
Bump...

Does anybody know how to split the compressor from the horns on a Wolo/Stebel?
There should be some kind of plastic loop near one end of the horn that basically connects to the metal frame of the compressor.  In the picture you can barely see it.  It's right above the big round disk .  That little loop.  Break that or pry it off and the horn will split from the compressor.  That's how the Stebel was and I'm assuming the Wolo will be very similar or almost identical.

Then you can cut the snorkel off of the horn and reattach it to the compressor.  I used just a bit of silicone and a couple zip ties.  Then mount the horns where ever you want and run a hose between the compressor and horn unit. 
 

Attachments

  • IMG_9577b.jpg
    IMG_9577b.jpg
    315.7 KB · Views: 138
Justin726 said:
There should be some kind of plastic loop near one end of the horn that basically connects to the metal frame of the compressor.  In the picture you can barely see it.  It's right above the big round disk .  That little loop.  Break that or pry it off and the horn will split from the compressor. 

Then you can cut the snorkel off of the horn and reattach it to the compressor.  I used just a bit of silicone and a couple zip ties.  Then mount the horns where ever you want and run a hose between the compressor and horn unit.
Sweet tip :great:

I just picked one of these up and that looks like the way to do it. Mount the compressor and horn away from each other, put the horn up where the stock one is.

I just pulled it apart, now I need to get my lazy ass in the garage and install it. At least the kegerator is full in the out there.  :beerchug:
 
Gumby said:
Justin726 said:
There should be some kind of plastic loop near one end of the horn that basically connects to the metal frame of the compressor.  In the picture you can barely see it.  It's right above the big round disk .  That little loop.  Break that or pry it off and the horn will split from the compressor. 

Then you can cut the snorkel off of the horn and reattach it to the compressor.  I used just a bit of silicone and a couple zip ties.  Then mount the horns where ever you want and run a hose between the compressor and horn unit.
Sweet tip :great:

I just picked one of these up and that looks like the way to do it. Mount the compressor and horn away from each other, put the horn up where the stock one is.

I just pulled it apart, now I need to get my lazy a** in the garage and install it. At least the kegerator is full in the out there.  :beerchug:
I was able to use the stock horn mount with the new air horn.  I did have to throw the bracket into the bench vice a few times just to tweak it and get the angle right to keep the horn from rubbing the radiator, but with a little trial and error it really didn't take all that long.  Obviously just get your air line tip threaded into the horn before putting the horn on the bike.

The compressor I mounted above the coolant reservoir like others do.  I used a little bit of silicone to attach the snorkel back onto the compressor and threw on a couple zip ties just for good measure.  Made a quick bracket to mount it and ran the air line.
 

Attachments

  • IMG_9653a.jpg
    IMG_9653a.jpg
    188.2 KB · Views: 181
  • IMG_9678a.jpg
    IMG_9678a.jpg
    211.3 KB · Views: 194
JR said:
Big Al said:
JR said:
I mounted my compressor in much the same place as OP, but since I split the plastic horns off, the compressor is in very tight to the subframe:

1212C14-April13.jpg


Using a simple L bracket made of aluminum flat stock, I mounted the plastic horns to the same bolt hole the OEM horn had mounted. The L bracket is a bit more than 90 degrees, so it tilts the bottom of the plastic horn just slightly back towards the radiator. This way, it projects the sound right out the front for maximum effect, and its not too loud in the cockpit.

Ran a hose from the compressor up along the heat dam, to the plastic horns. I used Murph's harness and just patched the leads to the compressor to be longer, since I left the controller on the right side close to the OEM horn harness leads.

How did you split the compressor from the horns? I have the Wolo Bad-Boy and want to do something similar to what you did but can't find a way to split them. Your compressor looks like a Wolo without the graphics. Maybe our horns are a different design?

I used a screw driver  to pry the plastic part off. Found pictures showing it on Google. Mine was a Stebel. Then I cut the channel part of the plastic loose and put it back on compressor since it's part of the intake. Attached hose to that too, routed it up behind heat shield foam, and glued a microphone mesh ball over the end of the hose to act as a filter.

Appreciate you bumping such an old thread. I used to have it mounted (whole) behind radiator on left side. Recent installation of canyon cages forced me to move it back to stock horn location with a custom bracket so it clears suspension travel and radiator. Much louder in front but I wonder how weatherproof it will be... even with the horn pointed down.
 
That's why my compressor is separate, over where it is shown. The plastic horn has no moving parts, and when you trigger the horn, the air pressure will blow it out if any water got there. I've had mine installed for 2 years now and ridden in raging thunderstorms and dusty conditions and everything in between and not had a minutes problem with the horn working.
 
JR said:
That's why my compressor is separate, over where it is shown. The plastic horn has no moving parts, and when you trigger the horn, the air pressure will blow it out if any water got there. I've had mine installed for 2 years now and ridden in raging thunderstorms and dusty conditions and everything in between and not had a minutes problem with the horn working.

Separate because of suspension travel issues, water, or both? I would like to split them but Rostra takes up right top side, maybe can find room on left top next to glove box/relay area... have to check it out. Not anxious to remove any side plastic after just installing canyon cages... hope I can find someplace on top left for the compressor. What type/size hose did you use and where did you get it?
 
Once you separate the horn from the compressor then just take the compressor into any local auto store. They usually have a good selection of hose and you can get an exact fit.

You will need a hose end for the horn since the compressor has the male end and the horn has the female end. The auto store might even have the right air hose adapter to screw into the hole in the horn. If not, then a trip to the hardware store might be needed for this piece.
 
If you can mount the entire horn in front, and it's pointing to the front (or down, but not behind or to the side), that would be my preferred method. The entire unit is weatherproof folks. It'd also get water in a downpour wherever it is.  Could folks with the entire horn installed in front post pictures please ;D?

Before I continue, what the hell is 'canyon cages'? Have heard those freaking words many times and don't know what it is. Curious. Thanks ;D.

Now back to the airhorn. Keep in mind these things folks:
1. Every inch of extra hose from compressor to horn is going to delay reaction time. A couple of feet might not be that much, but you're wasting precious time when you might need it the most.
2. You want the ABSOLUTE SHORTEST wire from the battery to the compressor, for the same reason as the hose. So if you have wire left over in your installation, rather than bundling in loops, cut it to the exact length needed, and you'll have better compressor spooling too.
3. Mount compressor in a RIGID place. If it's just ziptied, it spools slower too.

The above things are not mandatory, but if you could minimize or eliminate them, it'd be better.  If I find the space to mount it in front, I'd do it too. Otherwise maybe just a dual electric horn arrangement. Take care.
 
Just be aware the compressors are designed to be mounted vertically. This keeps the air snorkel in the vertical position as well which makes it more difficult for water or rocks to be sucked up into the compressor. The more horizontal the unit is mounted, the easier it will be for debris to enter the compressor.

Maybe the entire unit can be mounted up front in one piece and in the vertical position, but it would be very tight.  If anybody has accomplished this please share. 
 
JC said:
If you can mount the entire horn in front, and it's pointing to the front (or down, but not behind or to the side), that would be my preferred method. The entire unit is weatherproof folks. It'd also get water in a downpour wherever it is.  Could folks with the entire horn installed in front post pictures please ;D?

Before I continue, what the hell is 'canyon cages'? Have heard those freaking words many times and don't know what it is. Curious. Thanks ;D.

Now back to the airhorn. Keep in mind these things folks:
1. Every inch of extra hose from compressor to horn is going to delay reaction time. A couple of feet might not be that much, but you're wasting precious time when you might need it the most.
2. You want the ABSOLUTE SHORTEST wire from the battery to the compressor, for the same reason as the hose. So if you have wire left over in your installation, rather than bundling in loops, cut it to the exact length needed, and you'll have better compressor spooling too.
3. Mount compressor in a RIGID place. If it's just ziptied, it spools slower too.

The above things are not mandatory, but if you could minimize or eliminate them, it'd be better.  If I find the space to mount it in front, I'd do it too. Otherwise maybe just a dual electric horn arrangement. Take care.

Some problems with this.

1) Trivial, the length of hose we are running causes no effect. I press the horn button, the horn blows the second I press it. Having said that, all air compressor based horns take a split second to come to maximum loudness. Unless you run an air tank to hold pressure close to the horn, which some air horn setups for tractors do.

2) The length of wire is more a matter of resistance (heat) than horn response. Electrons travel at virtually the speed of light.

3) The compressor would "spool" just fine hanging on a string from the handlebars, it doesn't matter to it.

But I agree, there are several good places to mount the compressor so you can detach the plastic horn and hang it where the OEM horn used to be, to get maximum sound projection out the front.
 
JC,  for Canyon Cages go to mcenterprises.com  Or Amazon, I bought mine there...I think.  There are other sources I can't remember.

I mounted my horn(s)  a bit different than most.  Suspended from the black plastic panels on both sides of the fuel tank.  Stebel on the right,  Fiamm Freeway blaster on the left, ('08-no glove box there).  Stainless button head bolts w/fender washers and nylock nuts.  And no, they are not heavy enough to sag those panels.
However, I realize most of you won't want holes in that panel with stainless heads visible there. :(
There are plenty of better methods and locations but I saw space there and went for it. ::)
Just thought of this...when I finally get around to INSTALLING the Canyon Cages I might have to move the horns...don't know, hope not.
 
Big Al said:
JR said:
That's why my compressor is separate, over where it is shown. The plastic horn has no moving parts, and when you trigger the horn, the air pressure will blow it out if any water got there. I've had mine installed for 2 years now and ridden in raging thunderstorms and dusty conditions and everything in between and not had a minutes problem with the horn working.

Separate because of suspension travel issues, water, or both? I would like to split them but Rostra takes up right top side, maybe can find room on left top next to glove box/relay area... have to check it out. Not anxious to remove any side plastic after just installing canyon cages... hope I can find someplace on top left for the compressor. What type/size hose did you use and where did you get it?

If you cut your mid-fairing per instructions found on this and other websites you can remove your side plastic without bothering the Canyon Cages. I've had mine off several times for "upgrades". Look above at my photos, the compressor tucks away very nicely beside the coolant reservoir, and mine seems to like it there, as I've had no problems despite some awfully hot and awfully cold and just darn torrential rainy riding days.

I didn't want to put the one-piece Stebel hanging where the OEM horn had been for several reasons. First reason is as you surmise, suspension travel. I could see no way to keep the compressor off the back of the front fender during hard braking. Maybe it is possible, I just didn't think so. Second reason, weight. That's more weight than I want to hang off the OEM horn wishbone bracket. If you did put the compressor where it could get wheel spray then you'd have to put a snorkel on the intake. I did that anyway, even though mine is fairly out of the weather over by the coolant reservoir, just to be sure.
 
JR said:
Big Al said:
JR said:
That's why my compressor is separate, over where it is shown. The plastic horn has no moving parts, and when you trigger the horn, the air pressure will blow it out if any water got there. I've had mine installed for 2 years now and ridden in raging thunderstorms and dusty conditions and everything in between and not had a minutes problem with the horn working.

Separate because of suspension travel issues, water, or both? I would like to split them but Rostra takes up right top side, maybe can find room on left top next to glove box/relay area... have to check it out. Not anxious to remove any side plastic after just installing canyon cages... hope I can find someplace on top left for the compressor. What type/size hose did you use and where did you get it?

If you cut your mid-fairing per instructions found on this and other websites you can remove your side plastic without bothering the Canyon Cages. I've had mine off several times for "upgrades". Look above at my photos, the compressor tucks away very nicely beside the coolant reservoir, and mine seems to like it there, as I've had no problems despite some awfully hot and awfully cold and just darn torrential rainy riding days.

I didn't want to put the one-piece Stebel hanging where the OEM horn had been for several reasons. First reason is as you surmise, suspension travel. I could see no way to keep the compressor off the back of the front fender during hard braking. Maybe it is possible, I just didn't think so. Second reason, weight. That's more weight than I want to hang off the OEM horn wishbone bracket. If you did put the compressor where it could get wheel spray then you'd have to put a snorkel on the intake. I did that anyway, even though mine is fairly out of the weather over by the coolant reservoir, just to be sure.

I am aware of cutting the fairing but choose not to do so at this time. First, canyon cage R&R isn't that difficult with the right tools. Second, side fairing removal situations can often be side-stepped by removing top plastic, side/back fasteners and flexing (and bracing) the side fairing (backside) allowing for quite a bit of space to fiddle around in. I have made adjustments to Rostra linkage and other minor mechanics by doing this. Saves lots of time over complete fairing removal. Of course, forward access (radiator area) requires complete removal.

I have tried various bracket modifications to mount the complete Wolo horn unit in the stock horn location. Finally, I made a compound bracket using both bolt holes and mounted the Wolo sideways and slanted backwards towards radiator. Horn works OK and suspension travel gap (bottomed out without hitting fender) is about 2". Problem is I don't like it... I don't like it so close to the radiator, and I don't like (as you mentioned) hanging so much weight in that area. BTW... why would you try to use the stock wishbone bracket... much easier to fabricate a proper bracket that incorporates space limitation geometry, yes?

So... I separated the horn today, tapped the compressor to accept a threaded nylon hose barb, and extended the nipple on the horn. Found (I think) a good compressor location next to the Rostra at top/right location. I like it better there (much easier to get at with very short path to horn) and won't have any temperature considerations. It will be mounted horizontally as I believe that is not a problem.

I will post some pics soon showing the compressor/horn mounting I use in case that creates new ideas... many ways to skin this cat.
 
Flat-spot said:
JC,  for Canyon Cages go to mcenterprises.com
Okay, so they're crash bars. Didn't sound like that. He he. Thanks for the info man. And no, I didn't like them ;D.
 
Big Al said:
I am aware of cutting the fairing but choose not to do so at this time. First, canyon cage R&R isn't that difficult with the right tools. Second, side fairing removal situations can often be side-stepped by removing top plastic, side/back fasteners and flexing (and bracing) the side fairing (backside) allowing for quite a bit of space to fiddle around in. I have made adjustments to Rostra linkage and other minor mechanics by doing this. Saves lots of time over complete fairing removal. Of course, forward access (radiator area) requires complete removal.

Every time you take those bolts out, they weaken. The Kawasaki service manual is clear about limited reuse of engine mount bolts. For at least one of them they require service personnel to replace with a new bolt each time it is removed. I'm sure MCE says something about it somewhere.

I know many will chime in and say "oh I take mine out all the time....." and I agree, there is a serviceable life to those bolts beyond recommended usage. But why push it? All you have to do is make two trivial cuts that can't even be seen and make no difference to panel stability, and you never have to remove an engine bolt again.

I too have done some work by just removing fasteners in the "back" and pulling the panel(s) outward to do something simple. But you could never hang a compressor beside the reservoir without removing the panel completely.

YMMV
 
JR said:
Big Al said:
I am aware of cutting the fairing but choose not to do so at this time. First, canyon cage R&R isn't that difficult with the right tools. Second, side fairing removal situations can often be side-stepped by removing top plastic, side/back fasteners and flexing (and bracing) the side fairing (backside) allowing for quite a bit of space to fiddle around in. I have made adjustments to Rostra linkage and other minor mechanics by doing this. Saves lots of time over complete fairing removal. Of course, forward access (radiator area) requires complete removal.

Every time you take those bolts out, they weaken. The Kawasaki service manual is clear about limited reuse of engine mount bolts. For at least one of them they require service personnel to replace with a new bolt each time it is removed. I'm sure MCE says something about it somewhere.

Regarding your above statement... bolts are weakened (and need replacement) when over-tightened (see below quote and link), not loosened, yes? The aluminum threads are the weak link/fail point and not the bolt. Heli-coils would work wonders to "beef-up" the mount. I looked in the Kawasaki service manual (engine R&R sections) but couldn't find anything regarding engine mount bolts re-use. Where did you find that? I couldn't find anything in the MCE documentation either... in fact MCE says to retain all original hardware for possible future re-use.

"All of the elongation applied within the elastic range is relieved when the load is removed. The amount of elongation increases when more load is applied. When a bolt is stressed beyond its proof load (maximum load under which a bolt will behave in an elastic manner), the elastic elongation changes to plastic deformation and the strain will no longer be proportional to stress."

From: http://www.enerpac.com/en-us/bolting-theory

I know many will chime in and say "oh I take mine out all the time....." and I agree, there is a serviceable life to those bolts beyond recommended usage. But why push it? All you have to do is make two trivial cuts that can't even be seen and make no difference to panel stability, and you never have to remove an engine bolt again.

I said "choose not to do so at this time"... LOL. If fairing R&R becomes too frequent a hassle (it hasn't so far), I will cut the fairing.

I too have done some work by just removing fasteners in the "back" and pulling the panel(s) outward to do something simple. But you could never hang a compressor beside the reservoir without removing the panel completely.

Yes... this is one of the reasons why I mounted the compressor next to the Rostra controller (top right)... easy access to all components and a short tubing run to the horn.

YMMV
 
A picture of compressor mount location snuggled next to Rostra controller.


Attachments

  • comp_mount.jpg
    comp_mount.jpg
    110.6 KB · Views: 180
I find this all a bit humerous about the BadBoy horn.. and trying to mount it and cobble up something.
I have one sitting here, along with my Rostra cruise, both uninstalled, but I was curious when I got the horn, and made a bunch of jumpers with alligator clips, just to hear it... I stuck it inside the upper right fairing, just laid it in there fully assembled on some foam rubber padding, and tried it..
Man, its f'n loud, then stuck it on the front fender.. there is no discrenable difference, unless you are holding a db meter at 5 ft, and really care about a 1db loss..
Mount it vertically as the prescribe, up in the right front... and its still frikkn loud.
:)) :)) :)) :)) :)) :))

I look back in time, remembering people that actually cut holes in the front of the fairing to place the horn opening to road spray, just so they had "the most sound output" what a hoot....
Bury it, keep it dry, it will out last the engine. :rotflmao:
 
JR said:
Obviously just get your air line tip threaded into the horn before putting the horn on the bike. 

What type/size adapter are you using to connect the hose to the plastic horn?  Are you force threading it in or tapping it first?
 
patatty,
I was able to find a brass nipple that threaded directly into the horn assembly at Home Depot. Since it was such a good fit I did not even bother to tap threads into the plastic. IIRC it was a 1/8 pipe thread to 3/8" nipple.
Matt
 
mattchewn said:
patatty,
I was able to find a brass nipple that threaded directly into the horn assembly at Home Depot. Since it was such a good fit I did not even bother to tap threads into the plastic. IIRC it was a 1/8 pipe thread to 3/8" nipple.
Matt

Thanks Matt.

Scott
 
patatty said:
JR said:
Obviously just get your air line tip threaded into the horn before putting the horn on the bike. 

What type/size adapter are you using to connect the hose to the plastic horn?  Are you force threading it in or tapping it first?

I used a urethane barb fitting which was a press fit into the plastic horn. Then, before putting it in permanently I coated it with plastic epoxy (the kind specifically for all plastics and hard rubber materials) and pressed it in. Its never coming out.  :great:
 
I tapped both the horn (plastic) and compressor (metal) and used a nylon (threaded at one end, hose barb at the other) part I found at Ace Hardware. I used teflon tape on the threads to ensure no leakage. The same nylon part snugly fit both the horn and compressor.
 
JR said:
I used a urethane barb fitting which was a press fit into the plastic horn. Then, before putting it in permanently I coated it with plastic epoxy (the kind specifically for all plastics and hard rubber materials) and pressed it in. Its never coming out.  :great:

Big Al said:
I tapped both the horn (plastic) and compressor (metal) and used a nylon (threaded at one end, hose barb at the other) part I found at Ace Hardware. I used teflon tape on the threads to ensure no leakage. The same nylon part snugly fit both the horn and compressor.

Thank you both!
 
patatty said:
JR said:
I used a urethane barb fitting which was a press fit into the plastic horn. Then, before putting it in permanently I coated it with plastic epoxy (the kind specifically for all plastics and hard rubber materials) and pressed it in. Its never coming out.  :great:

Big Al said:
I tapped both the horn (plastic) and compressor (metal) and used a nylon (threaded at one end, hose barb at the other) part I found at Ace Hardware. I used teflon tape on the threads to ensure no leakage. The same nylon part snugly fit both the horn and compressor.

Thank you both!

If I remember, you don't have to tap the compressor side (at least, on a Stebel Nautilus), it has the kind of bulb-end fitting a hose fits over and you use a clamp.

 
JR said:
patatty said:
JR said:
I used a urethane barb fitting which was a press fit into the plastic horn. Then, before putting it in permanently I coated it with plastic epoxy (the kind specifically for all plastics and hard rubber materials) and pressed it in. Its never coming out.  :great:

Big Al said:
I tapped both the horn (plastic) and compressor (metal) and used a nylon (threaded at one end, hose barb at the other) part I found at Ace Hardware. I used teflon tape on the threads to ensure no leakage. The same nylon part snugly fit both the horn and compressor.

Thank you both!

If I remember, you don't have to tap the compressor side (at least, on a Stebel Nautilus), it has the kind of bulb-end fitting a hose fits over and you use a clamp.

Not on a Wolo... refer to the picture I posted on 12/20 that shows the tapped compressor...
 
Ah, difference in horn makes then. With the Stebel, you don't have to bother tapping the compressor for the inlet hose, which saves a step.
 
Flat-spot said:
JC,  for Canyon Cages go to mcenterprises.com  Or Amazon, I bought mine there...I think.  There are other sources I can't remember.

I mounted my horn(s)  a bit different than most.  Suspended from the black plastic panels on both sides of the fuel tank.  Stebel on the right,  Fiamm Freeway blaster on the left, ('08-no glove box there).  Stainless button head bolts w/fender washers and nylock nuts.  And no, they are not heavy enough to sag those panels.
However, I realize most of you won't want holes in that panel with stainless heads visible there. :(
There are plenty of better methods and locations but I saw space there and went for it. ::)
Just thought of this...when I finally get around to INSTALLING the Canyon Cages I might have to move the horns...don't know, hope not.

Love to see pics...I may do that.  I actually have black pan heads that will be almost invisible.
 
Mark,  I went to the garage and tried, but couldn't even get my phone into a position that would show you much at all.  The next time I have those panels off I'll try to remember to take some photos.
 
Finally put the horn on today, and this thread was a ton of help.

Thanks everyone.....
 
Last year I bough a new left over 2013 C14 and like all of you have mentioned, it came with an anemic sounding horn so I went out and purchased the $35 Wolo Bad Boy but soon discovered there isn't a lot of room under either the left or right side covers.  After about thirty minutes surveying what room I did have, I decided to cut down a piece of angled metal I had, drill two mounting holes and use that as a mounting bracket.  I removed one of the upper engine brackets and bolted one end of the bracket to it and them simply mounted the horn to the remaining hole.  It's a tight fit but the horn is slightly visible through the left side of the lower cowl and provides excellent sound through the side vents. 
 

Attachments

  • 20140907_074603.jpg
    20140907_074603.jpg
    165.8 KB · Views: 108
  • 20140907_074600.jpg
    20140907_074600.jpg
    163 KB · Views: 119
  • 20140907_074549.jpg
    20140907_074549.jpg
    108.4 KB · Views: 111
  • 20140907_074538.jpg
    20140907_074538.jpg
    96 KB · Views: 123
bikrpitts said:
Last year I bough a new left over 2013 C14 and like all of you have mentioned, it came with an anemic sounding horn so I went out and purchased the $35 Wolo Bad Boy but soon discovered there isn't a lot of room under either the left or right side covers.  After about thirty minutes surveying what room I did have, I decided to cut down a piece of angled metal I had, drill two mounting holes and use that as a mounting bracket.  I removed one of the upper engine brackets and bolted one end of the bracket to it and them simply mounted the horn to the remaining hole.  It's a tight fit but the horn is slightly visible through the left side of the lower cowl and provides excellent sound through the side vents.

Same place I had mine until my Canyon Cage install forced me to move it.
 
bikrpitts said:
I was thinking about a purchase for the cage and wondered if I could make it all fit.

Was the bolt to short ?

Bolt length wasn't the problem. With all the modification needed to have the horn fit in (or near) the same location after CC install, it was far easier to move the horn. It is actually better (louder) in its new location (compressor next to Rostra actuator at top right, horn in factory location). Obviously, I had to split the Wolo to accomplish this.
 
Found this using the "search", and it has been very helpful as I just bought the Wolo "Bad Boy" horns from H.F.. For anyone using the stock mounting location for just the trumpet portion, I plan to split the unit and mount compressor and trumpet separately, is the clearance sufficient and what did you use on the trumpet to mount to? If someone had a pic, sorry but I must have missed it. The trumpet portion of mine has no mounting location, just the semi-cylindrical plastic that wrapped around the compressor, I was going to Dremmel that off.
 
Air horns like the stebel are nice but a bit slow to react once you hit the button. On my Multistrada I piggy backed the stebel to the original horn. now I have both a different tones and the OEM horn is instant and then after a slight pause the Stebel kicks in, man does it wake up the neighbors.  :-\
 
I have the Banshee horn, also modulates the hi/low beams when the horn is going off. The stock horns are first to energize,
1/2 sec later the Banshee starts up and modulating lights. I mounted it on the top right, in front of my Fuzeblock.
 

Attachments

  • P4130286 (1024x768).jpg
    P4130286 (1024x768).jpg
    235.7 KB · Views: 103
  • P4130283 (1024x768).jpg
    P4130283 (1024x768).jpg
    233.7 KB · Views: 103
Ninja said:
Air horns like the stebel are nice but a bit slow to react once you hit the button. On my Multistrada I piggy backed the stebel to the original horn. now I have both a different tones and the OEM horn is instant and then after a slight pause the Stebel kicks in, man does it wake up the neighbors.  :-\


If the Stebel is wired and fused direct to battery with appropriate heavy wire and relay,  there is NO delay and it's louder.  The circuit through the original horn is not nearly heavy enough.
 
Yep, that's how I have it wired and it still lags the OEM horn just moment or so before it over takes the OEM horn.
 
My Stebel is very quick to respond. Of course there is a micro second delay, but barely noticeable.  I would have to say that the simple physics of an electric operated airhorn will be slower then just an electric horn . Air moves much slower then electrical current.
 
Top