• Can't post after logging to the forum for the first time... Try Again - If you can't post in the forum, sign out of both the membership site and the forum and log in again. Make sure your COG membership is active and your browser allow cookies. If you still can't post, contact the COG IT guy at IT@Concours.org.
  • IF YOU GET 404 ERROR: This may be due to using a link in a post from prior to the web migration. Content was brought over from the old forum as is, but the links may be in error. If the link contains "cog-online.org" it is an old link and will not work.

Dead Engine at Highway Speeds

davidhhubbs6694

Member
Member
Hello!

I've been reading around, but it's hard to keep track of everything even with notes.

I bought a 2006 ZG1000 that I knew needed carb work as it only ran with choke open. Turns out the tank was rusty too.

Rebuilt carbs (float level between 17-18mm) got (most) rust out of the tank, played around with second fuel filter that made no difference in fueling. Changed spark plugs as old ones had symptoms of rich fuel (likely from riding with choke) and #1 had a tiny bit of oil.

After full carb rebuild with brand new parts and de-rusting tank it ran fine until I took it on the highway.

At 55mph and above it starts losing acceleration/jerking until it dies at 6th gear.

It won't restart unless I pull the choke and sit there killing the poor starter. Then I can ride home (below 55mph).

The problem goes away 80-90% if I open the fuel cap leading me to believe it's fuel starvation and maybe spark plug timing.

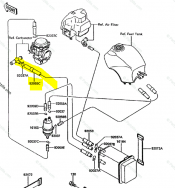
I changed all the fuel and vacuum lines - no dice.

Is there anything I can do to alleviate this that doesnt involve riding with gas cap open?

Secondary Incline fuel filter in/out made no difference.

Also:
-Have not done valves or carb timing yet
-Have not tested spark plug voltage (new ones seem to perform well but I still get LOUD back/after fire on decel and occasionally accel)
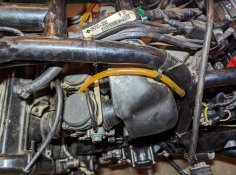
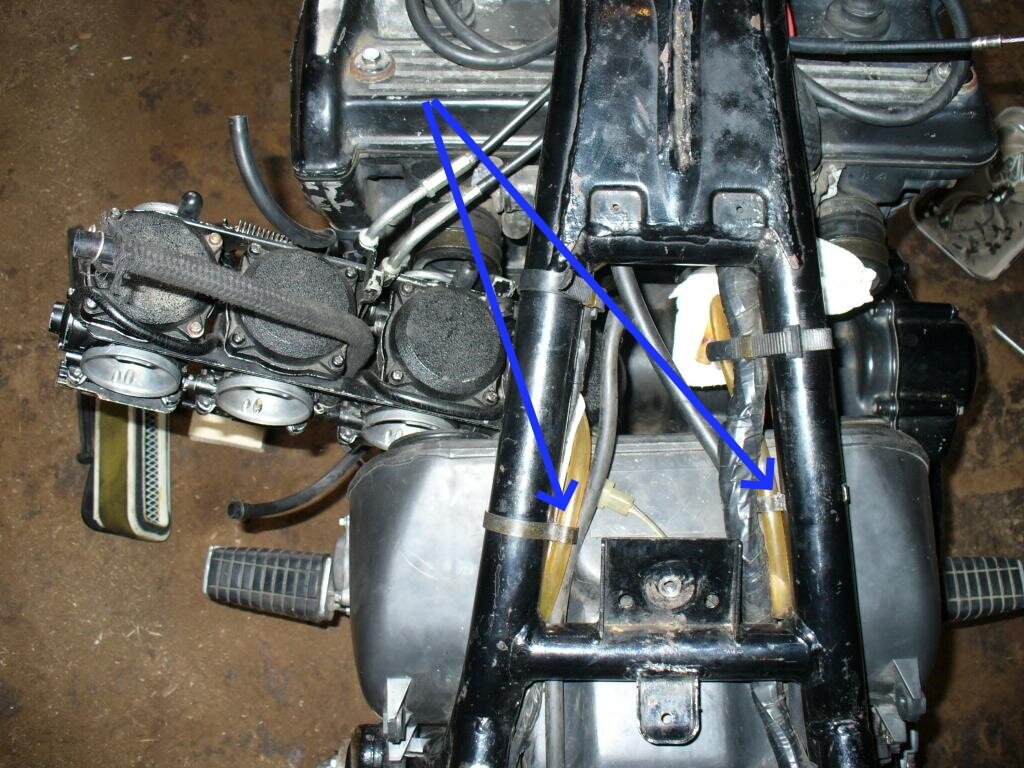
Edit: don't know if free power mod is done as there are black/yellow ground cables all over the place plugged into different parts of the frame/battery

Any and all help is appreciated. I'd love for this thing to be my daily commuter with gas approaching $7 in SoCal.

Thank you for reading and your time

-David

Edit: forgot to add I have California EVAP model
 
Last edited:
Check and clean the fuel cap vent...
I removed the security screw on the inside and that didn't help sadly. I'll look up schematics where the vent is and try to clean it/fix it.

Did you remove the petcock and check the filter on it ?
When I cleaned the tank I cleaned out the petcock screen and sprayed the whole thing with carb cleaner with the screen/gasket off. The petcock leaks a little fuel even in the on position when I pull the fuel line off, but only a little.
 
I would replace that petcock . It could be part of the issue but more importantly , you could be risking hydrolock with it leaking , even just a little .
 
I would replace that petcock . It could be part of the issue but more importantly , you could be risking hydrolock with it leaking , even just a little .
I'll grab a Kawasaki OEM from Part/Revzilla and replace it. Even if it didn't need it, it is pretty old and rusty fuel damaged.

Would you mind explaining how that could hydrolock? I'm not too familiar with the condition and the fuel tube as far as I'm aware is always full of fuel even when not pulled by the vacuum. At least to my understanding.
If a float valve were to hang open the leaky petcock could fill a cylinder while the bike is parked . One tap on the starter and boom , bent rod . Overflow tubes installed in the bowls can prevent this . There have been many reports of hydrolock here through the years . It seems to be the number one Connie killer .
 
If a float valve were to hang open the leaky petcock could fill a cylinder while the bike is parked . One tap on the starter and boom , bent rod . Overflow tubes installed in the bowls can prevent this . There have been many reports of hydrolock here through the years . It seems to be the number one Connie killer .
Thank you for the explanation. There are tubes between the bowls of the carbs. I had to replace one of the o-rings on one since it would leak when running.

Are those tubes between the bowls the overflow tubes or should I install a mod?
 
Yes there is fuel in the tube when the engine is not running, but there can be no flow because the petcock is closed. Like putting your finger on the top of a straw. If the petcock is leaking in the run position, and a float valve is also leaking, the cylinder can fill with fuel.

Overflow tubes would be installed in all 4 carb bowls. It involves removing the bowls, drilling the bottom and press fitting a stand pipe (Overflow tube). If the float valve leaks fuel will come down this tube and out the drain point on the bottom of the bowl. The quick test is to connect a tube to the drain fitting to the bowl and lightly blow into it. No overflows no airflow.

The gas cap has 2 check valves as part of the vent. When you open the cap, the projection at the 5:00 position looking down on the closed cap is the inlet for air to enter the tank. Air comming out of the tank takes a different route in the cap.
Thank you for the explanation. I'll order a new oem petcock.


Edit: I just learned I can buy a rebuild kit for the petcock. I'll be doing that for $30~ instead of $140~ for a new one. Unless the rebuild doesn't fix it lol
 
Last edited:
the repackaging of the tap is working well


do not forget to change the spark plugs and clean any oxidation on the spools and

 
Last edited:
In addition to a non-functioning tank vent, another possible issue may be the fuel line kinking. Most often this may occur after the fuel line is replaced and the line length and routing are not optimal, or the line was replaced with a thinner walled poly line. After the bike has been run for a bit, the fuel line warms up making it easier for a bend in the line to kink and restrict or block fuel flow. With a flow restriction, the issue may only manifest itself when more fuel is being used at higher RPM.
 
In addition to a non-functioning tank vent, another possible issue may be the fuel line kinking. Most often this may occur after the fuel line is replaced and the line length and routing are not optimal, or the line was replaced with a thinner walled poly line. After the bike has been run for a bit, the fuel line warms up making it easier for a bend in the line to kink and restrict or block fuel flow. With a flow restriction, the issue may only manifest itself when more fuel is being used at higher RPM.
+1. This was the very first issue I encountered with my bike years ago . Tygon fuel line , never again .
 
David, you didn't mention if the engine rev's freely in the lower gears?
I suspect it does, and that also indicates that something is reducing your fuel flow over a period of time.
That starvation is most likely due to gas cap vent or kinked fuel hose.

On the cap, (before the starvation) ride the bike at 55+ with the cap slightly open.
If it solves the problem, you've found it.

I suspect the issue is a kinked hose. Without removing plastic, inspect the fuel line. If you see an area that is partially kinked, or has a section of hose that is deformed by a bend, that is the most likely area. After it gets hot, that area can kink more.

1 other possibility is your vacuum hose to the petcock.
ie; 1 member paired the vacuum lines instead of just running 1 line from the #2 carb and had issues because the pairing effected the vacuum to the petcock.
 
Last edited:
In addition to a non-functioning tank vent, another possible issue may be the fuel line kinking. Most often this may occur after the fuel line is replaced and the line length and routing are not optimal, or the line was replaced with a thinner walled poly line. After the bike has been run for a bit, the fuel line warms up making it easier for a bend in the line to kink and restrict or block fuel flow. With a flow restriction, the issue may only manifest itself when more fuel is being used at higher RPM.
I had that happen on the Silver wing. Tygon fuel line is ok for a straight run, but as Steve said will kink, in the right situation, when it's hot.
 
In TYGON there are several types, it is not necessary to take the thinnest and especially it is necessary to pay attention to the curves.
There are also the event tubes of the carburetors, if they are clogged or partially it looks like a lack of gasoline.

1697731275-p1050124-2522433-1.jpg
 
Last edited:
In addition to a non-functioning tank vent, another possible issue may be the fuel line kinking. Most often this may occur after the fuel line is replaced and the line length and routing are not optimal, or the line was replaced with a thinner walled poly line. After the bike has been run for a bit, the fuel line warms up making it easier for a bend in the line to kink and restrict or block fuel flow. With a flow restriction, the issue may only manifest itself when more fuel is being used at higher RPM.
Luckily I replaced the filtered line from previous owner with a very thick walled fuel line and went with the OEM routing I saw from photos. Still had fuel starvation on highway unless I opened the cap. I'll be able to work on the bike later this week.
David, you didn't mention if the engine rev's freely in the lower gears?
I suspect it does, and that also indicates that something is reducing your fuel flow over a period of time.
That starvation is most likely due to gas cap vent or kinked fuel hose.

On the cap, (before the starvation) ride the bike at 55+ with the cap slightly open.
If it solves the problem, you've found it.

I suspect the issue is a kinked hose. Without removing plastic, inspect the fuel line. If you see an area that is partially kinked, or has a section of hose that is deformed by a bend, that is the most likely area. After it gets hot, that area can kink more.

1 other possibility is your vacuum hose to the petcock.
ie; 1 member paired the vacuum lines instead of just running 1 line from the #2 carb and had issues because the pairing effected the vacuum to the petcock.
When riding the bike with the fuel cap open on the highway the fuel issue went away until about 80mph in 6th. 80mph in 5th was fine, but 6th felt wobbly and rough. Could by something else for that 6th gear thing, but at least I know the fuel cap is 80-90% of the problem most likely.

I'll have to report in when I get the time. Wish I had a garage to work in about this time of year lol
 
If the engine will rev in the lower gears to high rpm's/redline, the issue can't be spark timing.

But, if you have resistance in the spark plug wires/caps, there is a chance that you have weak spark in 6th gear.
(because you're making less voltage/amps from the lower RPM's)

But I still suspect it's a fuel issue.
 
Last edited:
If the engine will rev in the lower gears to high rpm's/redline, the issue can't be spark timing.

But, if you have resistance in the spark plug wires/caps, there is a chance that you have weak spark in 6th gear. (because you're making less voltage/amps from the lower RPM's)
It revs low just fine in lower gears/speeds. It even revs high just fine in low gears. It's just high speed/gears where it cuts out and then I have to sit there with the choke open cranking the starter like crazy lol

Starts right up if I don't fuel starve it. Don't even need the choke most the time.
 
Have you tried without the air filter and without the side cover?
when it chokes, you tried to put a can the starter to enrich ?
 
Have you tried without the air filter and without the side cover?
when it chokes, you tried to put a can the starter to enrich ?
I have not tried it without the air filter and cover.

I'm not sure what you mean by the second sentence. I have not tried starter fluid or seafoam beside some of the fuel mixture that I ran through.
 
Another possibility (that is free to check!) are the carb vent tubes that ferabern143 mentioned several posts before this:

https://forum.concours.org/index.php?threads/dead-engine-at-highway-speeds.56736/post-679668

If those have been lengthened so the open ends hang down at the bottom of the frame where the battery and gas tank vent tubes go, or otherwise routed to where air flow can get to them, the air at speed can generate a vacuum on those tubes that can starve your carbs.

Stop for a bit or go slow - then it will run fine. Get up to speed ie: 50-55mph then it will starve. DAMHIKIJK :cool:
 
Last edited:
Another possibility (that is free to check!) are the carb vent tubes that ferabern143 mentioned several posts before this:

https://forum.concours.org/index.php?threads/dead-engine-at-highway-speeds.56736/post-679668

If those have been lengthened so the open ends hang down at the bottom of the frame where the battery and gas tank vent tubes go, or otherwise routed to where air flow can get to them, the air at speed can generate a vacuum on those tubes that can starve your carbs.

Stop for a bit or go slow - then it will run fine. Get up to speed ie: 50-55mph then it will starve. DAMHIKIJK :cool:
I haven't seen any vent tubes. Does the CA model have them? All I have are tubes for EVAP

Edit: 1 and 4 nipples have blue line. 2 nipple has petcock vacuum. 3 nipple has white tube to the circle canister. T junction between 1 and 2 as well 3 and 4 has the yellow lines to the square canister. Main line between 2 and 3 has the fuel line to the petcock. Other tiny lower nipples have the tiny vacuum tubes hooked between them. No uncovered nipples or junctions.
 
Last edited:
I haven't seen any vent tubes. Does the CA model have them? All I have are tubes for EVAP

Edit: 1 and 4 nipples have blue line. 2 nipple has petcock vacuum. 3 nipple has white tube to the circle canister. T junction between 1 and 2 as well 3 and 4 has the yellow lines to the square canister. Main line between 2 and 3 has the fuel line to the petcock. Other tiny lower nipples have the tiny vacuum tubes hooked between them. No uncovered nipples or junctions.
Yup, they do go to the canister on the CA models so suggestion might not be applicable in your case with a CA bike.

They terminate as open ended tubes under the curved part of the upper frame for the 49 state bikes.

See tubes and frame clips indicated by the blue arrows.
1697755150212.png

Also shown highlighted in yellow on this parts diagram:
1697755344429.png

Looks like those go to the canister for the CA model.
1697755568344.png
 

Attachments

  • 1697755546062.png
    1697755546062.png
    160.4 KB · Views: 38
  • 1697755660201.png
    1697755660201.png
    161.8 KB · Views: 40
Last edited:
Yup, they do go to the canister on the CA models so suggestion might not be applicable in your case with a CA bike.

They terminate as open ended tubes under the curved part of the upper frame for the 49 state bikes.

See tubes and frame clips indicated by the blue arrows.
View attachment 37229

Also shown highlighted in yellow on this parts diagram:
View attachment 37230

Looks like those go to the canister for the CA model.
View attachment 37232
I see. Yeah I have those labeled as the yellow lines and they go straight to canister.
 
I pulled apart the gas cap and it doesn't have those orange things. What am I looking at here?

Should I just get a new gas cap as well?

NEVER MIND

THE VALVES WERE BLACK AND DISGUSTING

I pulled them out.

Also the new fuel line I put on apparently was too large and the petcock leaked into it. Luckily since the fitting was loose it leaked onto the ground and not into the cylinders
 

it’s rusty over there, with the compressed air blown all the pipes once disassembled, as on the views of STASH.
 

it’s rusty over there, with the compressed air blown all the pipes once disassembled, as on the views of STASH.
Thank you for the links. Those really helped
 
you have to disassemble and clean everything well ;)

when removing the four rusty screws, there is a baffle-shaped seal, also to be disassembled, the impurities had to go up to the.
it’s in French but with the photos it goes well otherwise you have to do the translation in subtitle.

 
Last edited:
A short bit on the highway and it was fine. Tried it again after stopping for dinner and now it runs worse than ever. Can idle below 1k, but can't go anywhere without stalling no matter what the choke is on. I'm about giving up on this project bike. I have mo clue what the problem is!
 
Last edited:
A short bit on the highway and it was fine. Tried it again after stopping for dinner and now it runs worse than ever. Can idle below 1k, but can't go anywhere without stalling no matter what the choke is on. I'm about giving up on this project bike. I have mo clue what the problem is!
I'm going to guess the carbs somehow got clogged up again. Giving it throttle bogs it down, smells like gas, only runs with choke on, and only moves if I slip the clutch. Don't know if carbs, valves, petcock, spark plug wires, or compression. Either way I don't have another day off until next Thursday 🤷 so I guess I'll just wait for the valve job parts and petcock rebuild parts to come in. Maybe I'll take a look at some new spark plug wires and redo the the carbs AGAIN while I'm at it.

Thanks for all the help, folks. It was running really well for about 10 minutes there on the highway. Too bad it started dieing again.
 
I also think, especially carburettors, to be silent all disassembled, as well as diffusers, I boil with lemon juice and I pass all the ducts of the bodies to compressed air with WD40.
If necessary I use needles which at the base are for cleaning the nozzles of oxyacetylene torches.
Ultrasonic cleaning is good but it must be done several times, I do it again manually, the results are much better.

1697782197-20190208-074648-gf.jpg

1697782209-20190208-075109-gf.jpg

8802639872030.jpg
 
Last edited:
"Davidhhubbs6694", would it be possible for you to give me the numbers of your CDI, since it is a Californian model, and that normally it is not the same as the other ZG 1000, or to make a photo.
Thank you very much ;)
 
"Davidhhubbs6694", would it be possible for you to give me the numbers of your CDI, since it is a Californian model, and that normally it is not the same as the other ZG 1000, or to make a photo.
Thank you very much ;)
The writing on the igniter (which has a Mitsubishi logo) says: 21119-1111
J4T01274 7829
 
Rebuilt the petcock with the Murph's kits rebuild kit. Thing leaked all over the place. Worked fine before Murph's. Forget about leaking into the fuel tubes and cylinders, the petcock couldn't keep the gas within the fuel system and now it's all over my parking spot.
 
Upon closer inspection, the murphs kit rebuild o ring and little disc with 4 holes in it were far larger than OEM. I can't get them back in after taking them out. The thing is I don't remember them being difficult to put in. When originally installed, the lever was SUPER tight. Maybe the friction of me turning it enlarged the o ring and enlarged+ripped the rubber disc. I'm going to reinstall my OEM parts. I'm glad I didn't throw them away. Sad to have wasted money on murph's.
 
Well I put the old parts back in the petcock and it doesn't leak anymore. Waste of money on the Murph's kit.

And now all the float bowl tubes leak on the carbs! Time to replace all the o-rings...
 
Murphs petcock kits have been sold to hundreds of people over the years. To say it was a waste of money is not fair to him or his business. He has been selling C-10 parts for years that are hard to get and is a valued distributor on this site and will do his best to help anyone. I have never read anything ever where someone said his parts were a waste of money.

Dean
Sorry you're so offended at it, but the kit leaked. A lemon is a lemon. Even Honda makes lemons. Is what it is. No need to get upset over it.

I also want to emphasize that multiple times I posited that it was my fault something happened to it as my prior posts mentioned that the rubber pieces were not so large when I received the kit. At no point did I state nor imply Murph screwed me over. It's a "waste of money" to A) repair something that didn't need repairs in the first place and B) to break said repair either through operator error or the parts being a lemon. Who knows...all I know is now I have to take off my carbs again because the o-rings started leaking...
 
Last edited:
BTW - when I rebuilt the leaking OEM petcock, I used the process outlined in the article on page 18/19 from the Spring 2009 Concourier which is available in the Tech Pages. Lots of excellent info there - well worth the cost of admission.
 
Not sure what you mean by carb tubes now leaking!!!. If you mean the tubes that connect the carbs together and deliver fuel to the float bowls. The petcock didn't cause that. They are full of fuel anytime the engine is running and the vacuum petcock is open. They were already bad. Did you replace them when you did the carb cleaning and rebuild? Did you fill the carbs and check for leaks before you reinstalled them after rebuild?

If you leaked enough fuel to cause it to cover your parking spot, DO NOT HIT THE STARTER BUTTON. Remove the tank and spark plugs and check for fuel in a cylinder. Hydro lock will wreak your engine.
 
David, I assure you that if you contact Murph he'll work with you on the petcock kit.
He's always treated his customers fine.

I also have questions on the carb tubes leaking?
Did you also rebuild the carbs?

Ride safe, Ted
 
I replaced my old 78 KZ 650 petcock with a Pingel. I love it.
A bit pricy, and manual only.
The petcock on my c10 has started leaking a little bit when I use prime setting.
I will replace it with a Pingel next season
 
Old Timer trick #1;
If your petcock leaks a little fuel when you turn it
Remove the front of the Petcock.
Clean the contact surfaces and the O-rings.
Rub Face Soap onto the contact surfaces and O-rings.
Reassemble.

Soap is not dissolved by gasoline.
It will seal and lubricate the contact surfaces and O-rings.

Old Timer trick #2;
If you're on the road and the diaphragm in the petcock fails
** The fuel will be leaking from the weep hole at the edge of the petcock.
Lay the bike on its right side, disconnect the vacuum line from the petcock, (and plug it with a stick)
Make a putty from face soap and seal the weep holes and edges of the petcock. (around the diaphragm area)
NOTE: The soap repair can be done to the petcock on the bike or remove the petcock.
Reinstall the petcock.
Do NOT hook up the vacuum line.
Stand the bike up.
Turn the petcock to prime for running the bike.
Turn the petcock to Run or Reserve to stop fuel flow.
Ride it. (Do NOT ride in a rainstorm because water does dissolve soap).

Soap is not dissolved by gasoline.
It will seal the diaphragm area and weep holes to stop the leak.

Ride safe, Ted
 
BTW - when I rebuilt the leaking OEM petcock, I used the process outlined in the article on page 18/19 from the Spring 2009 Concourier which is available in the Tech Pages. Lots of excellent info there - well worth the cost of admission.
I have a Clymer Manual

Not sure what you mean by carb tubes now leaking!!!. If you mean the tubes that connect the carbs together and deliver fuel to the float bowls. The petcock didn't cause that. They are full of fuel anytime the engine is running and the vacuum petcock is open. They were already bad. Did you replace them when you did the carb cleaning and rebuild? Did you fill the carbs and check for leaks before you reinstalled them after rebuild?

If you leaked enough fuel to cause it to cover your parking spot, DO NOT HIT THE STARTER BUTTON. Remove the tank and spark plugs and check for fuel in a cylinder. Hydro lock will wreak your engine.
They weren't leaking last time I pulled them off. I filled up the empty tank, turned the petcock to prime, and they started leaking after a little bit.

David, I assure you that if you contact Murph he'll work with you on the petcock kit.
He's always treated his customers fine.

I also have questions on the carb tubes leaking?
Did you also rebuild the carbs?

Ride safe, Ted
I rebuilt the carbs, but I only replaced the o-rings on one of the gloat bowl connector tubes since that was the only one that leaked. Now they all are leaking so I'm going to replace all thebo-rings. Luckily I have a metric o-ring kit.

Old Timer trick #1;
If your petcock leaks a little fuel when you turn it
Remove the front of the Petcock.
Clean the contact surfaces and the O-rings.
Rub Face Soap onto the contact surfaces and O-rings.
Reassemble.

Soap is not dissolved by gasoline.
It will seal and lubricate the contact surfaces and O-rings.

Old Timer trick #2;
If you're on the road and the diaphragm in the petcock fails
** The fuel will be leaking from the weep hole at the edge of the petcock.
Lay the bike on its right side, disconnect the vacuum line from the petcock, (and plug it with a stick)
Make a putty from face soap and seal the weep holes and edges of the petcock. (around the diaphragm area)
NOTE: The soap repair can be done to the petcock on the bike or remove the petcock.
Reinstall the petcock.
Do NOT hook up the vacuum line.
Stand the bike up.
Turn the petcock to prime for running the bike.
Turn the petcock to Run or Reserve to stop fuel flow.
Ride it. (Do NOT ride in a rainstorm because water does dissolve soap).

Soap is not dissolved by gasoline.
It will seal the diaphragm area and weep holes to stop the leak.

Ride safe, Ted
Thanks for the tips. The petcock was leaking from the fuel nipple. The little four hole rubber disc on the inside had expanded and ripped. The o-ring on the lever had also expanded. I'm guessing fuel was leaking through the rip in the four hole disc.
 
Yeah, I've put in petcock rebuild kits in both of my C10s (OEM and aftermarket) and it's surprisingly easy to get the bits and pieces not quite properly positioned and resulting in a leak. I bet murphs' kit could be made to not leak unless some part of it is actually defective.
 
Yeah, I've put in petcock rebuild kits in both of my C10s (OEM and aftermarket) and it's surprisingly easy to get the bits and pieces not quite properly positioned and resulting in a leak. I bet murphs' kit could be made to not leak unless some part of it is actually defective.
I believe it's defective through operator error. I suspect I used too high a concentration of Berryman's B-12 assuming it was safe for rubber. That high concentration sat in the petcock and carbs then destroyed all the rubber o-rings and petcock disc.
 
A little update: looks like the carb cleaner didn't just kill the petcock, but the carb bowl gaskets. Going to order some new carb gaskets.

Also I did a valve adjustment which turned out well, but for some reason I guess I didn't install the valve cover gasket well, or maybe a screw backed out, but when I put my bike into gear a huge plume of white smoke came up from my bike and pissed off the whole apartment building who had their windows open.

What I'm guessing is that the valve cover came up and started spewing oil onto the exhaust, causing the smoke. Needless to say the bike is out of commission until I get my next day off to redo the valve cover, top off the oil, and then probably install the petcock kit Bud graciously sent me.

After all that, the bike *should* be fully functional. I'll probably add some high temp loctite to the valve cover screws so they don't wiggle out again.
Check the condition of the rubber grommets on the valve cover bolts. That will affect how much pressure is put on the gasket. Make sure the gasket is seated properly as it isn't the easiest to install it and the valve cover. You'll get there David. Hang in there.
 
David,

Also, make sure the gasket seals properly along the front. There is a plastic deflector there. When you have everything in place, try to diagonally rock the cover (no cover bolts installed). An LED flashlight can help looking along the front. No lock-tite needed
Be careful to not over-tighten the cover bolts, just snug will be fine as long as the seals are not rock-hard. If the seals are hard, replace them. HTH

Larry
 
The gasket is probably not in the groove in the valve cover.
Cover will need to be removed and gasket location corrected.
(You can put a little silicone rubber glue in the valve cover groove).
Use it to help hold the gasket in the valve cover, not to seal. So, it best to let it cure if you have time.
Check the gaskets around the spark plugs too.
Be absolutely sure that they all have the metal guides in them.
(Dropping one of them into the engine is not good)


I'm repeating Larry's warning as it's very important;
Be careful to not over-tighten the cover bolts, just snug will be fine.
Also, do not use Loc Tite.
The cover bolts won't wiggle out as there are rubber seals that will prevent vibration issues, and (more importantly) you don't want the thread's broken off in your head when you do the next valve adjust.

Ride safe, Ted

PS: If the carb/bowl gaskets are leaking fuel, the float levels are probably too high.
 
Last edited:
A couple of times when reassembling after a valve adjustment, I pinched the rubber seal that's part of that air deflector with the valve cover and got the oil smoke scenario you experienced. It's really easy to do that....
 
to clarify Ted's comments about the cover bolts. Looking at the bolt, you'll see a shoulder above the threads. When the shoulders contact the head, that's as far as they will go. Further tightening can sreip the threads in the head - not good. Reasonably soft sealing gaskets will prevent this happening. PS - don't drop one of the short tubes either, just sayin. BTDT.

PS: If the carb/bJustowl gaskets are leaking fuel, the float levels are probably too high. Thanks, Ted. BTDT too.

Larry
 
The gasket is probably not in the groove in the valve cover.
Cover will need to be removed and gasket location corrected.
(You can put a little silicone rubber glue in the valve cover groove).
Use it to help hold the gasket in the valve cover, not to seal. So, it best to let it cure if you have time.
Check the gaskets around the spark plugs too.
Be absolutely sure that they all have the metal guides in them.
(Dropping one of them into the engine is not good)


I'm repeating Larry's warning as it's very important;
Be careful to not over-tighten the cover bolts, just snug will be fine.
Also, do not use Loc Tite.
The cover bolts won't wiggle out as there are rubber seals that will prevent vibration issues, and (more importantly) you don't want the thread's broken off in your head when you do the next valve adjust.

Ride safe, Ted

PS: If the carb/bowl gaskets are leaking fuel, the float levels are probably too high.
I over tightened one bolt and it snapped 🙃 its the bolt thats difficult to get to 🙃 I have some spare bolts on order now. Going to be fun getting that bit of bolt out of the engine next week...at least I didn't strip the threads in the engine.

But the petcock kit Bud sent me worked great! And I was able to get the valve cover and gasket properly seated.
 
to clarify Ted's comments about the cover bolts. Looking at the bolt, you'll see a shoulder above the threads. When the shoulders contact the head, that's as far as they will go. Further tightening can sreip the threads in the head - not good. Reasonably soft sealing gaskets will prevent this happening. PS - don't drop one of the short tubes either, just sayin. BTDT.

PS: If the carb/bJustowl gaskets are leaking fuel, the float levels are probably too high. Thanks, Ted. BTDT too.

Larry
Apart from the stripped valve cover bolt I just did

The carb bowls had two gaskets that were actually ripped. I don't know how that happened, but I replaced all the gaskets to be safe. Only the carb bowls with ripped gaskets were leaking, luckily.

This bike is a real project! And the worst part it's mostly my fault. Going to be hard sourcing blue cowlings for it.
 
You would be better off to get a wrecked or blown engine bike for parts. But here is a taste at finding parts for your 06.


Last edited:
You would be better off to get a wrecked or blown engine bike for parts. But here is a taste at finding parts for your 06.


Thank you. It's hard to find the other side of the blue cowling. Both you listed are the same side lol. I was thinking of just painting the whole bike once I get it done. I don't think I have the cash to buy a parts bike. I certainly don't have anywhere to put a parts bike in the first place. I live in an apartment
 
Wish we were closer. Have a complete set of body work including tank from a '02 Silver. Best of luck sorting things out!
 
Okay, got the snapped bolt out by taking off the valve cover and cam shaft holder thingy that the valve cover bolt screws into. Was able to get it out with some pliers.

I replaced all the rubber on the carbs and yet they are still leaking. Float level looked fine too. They're leaking from the black tubes that go between the carbs. They don't stop dripping too, though they seem to really get a steady leaky stream going with the engine running.

At least the valve cover bolts didn't back out and the gasket didn't blow out the front spraying oil all over the exhaust like last time.

I've about had it with these carbs. I'm about to send them off for a total overhaul since I can't do it right myself.

Edit: Nevermind, I tried again and the engine is smoking again with white smoke around the top of the engine. The top isn't leaking oil at all so I have no clue whats causing the issue.
 
Last edited:
I accidently put the fuel that's too high concentration back in the tank and it ate through the new rubber. I'm really kicking myself now. I've screwed up a second set of rubber seals within seconds just with the wrong fuel.

How do I dispose of bad fuel?
 
Drain the tank into a gas can or plastic jug. I'd probably run it out in one of my cars. Have plenty of untreated gas in the car to avoid any problems. I've had days like yours. You're going to have to slow down and be very methodical. Maybe even write a plan out so you don't forget things. Hang in there David. We're here.
 
Wish I were closer. Would be willing to help.
On the black tubes that go between the carbs, sometimes you can move them left or right a bit and help the seal.
(Those are the passages that fill the carbs)

If memory serves me, the fitting that is usually the leaker is the T where you attach the fuel hose.
(NOTE: My memory sux, but I think I have that right)

Ride safe, Ted
 
Last edited:
Thanks for all the support. The o-rings look fine pulling them off so I don't know where it was leaking from at this point. It looked like it leaked from the fuel tree when running and then kept leaking for a little while after shilutting it off. I'm not sure what size o rings are best for these. Might as well order the fuel tree/vacuum o ring kit from murph if I can't get the metric o ring kit to work right.

As long as I get these carbs to stop leaking, the petcock rebuilt (again), and don't put in the fuel with the high concentration of Berryman's B12 in it, I should be good to go after a carb sync. I think the light smoke I saw yesterday was a coolant leak onto some pipes or residual oil burning off as the valve cover wasn't leaking at all.
 
After leaving the petcock rubber pieces out to dry, they shrunk back to their original size. I didn't waste rubber after all! I guess the B12 makes it expand, but it evaporates out of the rubber after awhile.
 
Petcock still leaked everywhere the moment I stuck the fuel hose on it. But now I know the carbs are leaking from where the fuel line connects and not the other two tubes.

I think I should just order a brand new OEM petcock. Something has got to be wrong with this one if nothing can stop it from leaking no matter what position it's at with brand new gas. Unless there is somehow not enough force pushing down on the lever. In videos I've seen online I've assembled it properly...
 
Replaced petcock and o rings on carb. Put proper hose clamps on the fuel line so it won't leak.

Bike first started at 500rpm then died. Doesn't matter if I give it choke or not. It just will not start now.

Fuel flows freely in prime and I charged the battery last night. Starting to get sick of this bike. It's just one thing after another. I bought it in September and still I can't get it to work.
 
Is there anyone in California that could help David get up and running? He's been busting his butt trying. Let's not forget that he's a member in good standing. Bueller....... Bueller.
 
Is there anyone in California that could help David get up and running? He's been busting his butt trying. Let's not forget that he's a member in good standing. Bueller....... Bueller.
Ah it's okay. I'm going to take a break from it for now. I'm leaving the country for a few weeks over Christmas. I'll continue in the new year. I'm guessing it's running rich and I know it had a small vacuum leak somewhere.
 
Yup, they do go to the canister on the CA models so suggestion might not be applicable in your case with a CA bike.

They terminate as open ended tubes under the curved part of the upper frame for the 49 state bikes.

See tubes and frame clips indicated by the blue arrows.
View attachment 37229

Also shown highlighted in yellow on this parts diagram:
View attachment 37230

Looks like those go to the canister for the CA model.
View attachment 37232
I don't mean to hijack a thread, but is the proper routing of the vent tubes inside or outside of the frame? The photo above has them inside, but mine were outside, which looked to be a natural position. I have some Tygon leftover from my 600 I plan to use for replacement.

I did notice my fuel line was run up behind the carb racking bracket, instead of between the carbs in front of it, so I will be re-routing it (my 600 was run up between the carbs forward of the bracket too). I'm also replacing the line with some new clear line from Murph, and adding a Napa/Wix 33006 filter. My tank is clean and pristine, but I figure the filter is extra insurance, and the COG braintrust seems to indicate good results with that filter. BTW, the current fuel line is that cheap thick reinforced automotive stuff, and rock-hard. I hate that stuff.
 

Attachments

  • Screenshot 2023-12-18 133252.jpg
    Screenshot 2023-12-18 133252.jpg
    199.4 KB · Views: 19
Water in the gas tank...yay

I'm thinking this was there before I let it sit 3 weeks. Trying to get all the gas and water out is proving difficult.

How did it all get in there? Rain? I ordered a new gas cap so hopefully that might work.

Until then I will be trying to get the last of the water out of this thing.

If I can't recycle the fuel somehow I'll just take it to the hazardous waste facility.
 

Attachments

  • 20240111_183606.jpg
    20240111_183606.jpg
    86 KB · Views: 9
warning: i had a problem with the clear fuel line from murphs. too flexible and kinks too easily. i was having the same problem as you - fuel starvation at higher speeds (80+). replaced it with good ole stiff black fuel hose from autozone and problem went away. i called gary (murphs) on the phone and told him about it
 
warning: i had a problem with the clear fuel line from murphs. too flexible and kinks too easily. i was having the same problem as you - fuel starvation at higher speeds (80+). replaced it with good ole stiff black fuel hose from autozone and problem went away. i called gary (murphs) on the phone and told him about it
Thank you. I believe I solved the fuel starvation problem with the original gas cap mod. But I'm replacing that too now. I replaced all the gas line with good black reinforced line. I also turned the pilot screws to 1+3/4 turns instead of the 3 it was at since it ran kinda rich (massive pops on decel).

Gotta drain all that water before I try again though. Will be a task for Friday.
 
Good job on the bike. But yeah, I'd replace EVERYTHING having to do with fuel delivery starting with the petcock and working my way down to the fuel filter. This includes the fuel cap as well - cheap enough to replace. Also, if you have the skills, I'd completely tear the carbs down and rebuild them. Or, if you can afford it, send them to steve for an expert rebuild.

These bikes are old now. Never hurts to have new essential components such as water hoses, etc. I've had my bike for 1 1/2 years now and is my 3rd ZG1000. I so love these bikes and have put a couple of grand in this latest one to make it the best it can be - new cables, water hoses, engine block flush, wheel bearings, carb rebuild, delkevic pipes, overflow tubes in the carb bowls, windshield, LED headlight, plugs, plug wires, great dunlop tires, and now, a new seat cover, even. i have approx. 180,000 ZG1000 miles under my belt and have never once had a failure. Take care of a concours and the concours will take care of you.

Oddly enough, I belong to a BMW Owners club (only decent non-harley riding club I could find in the area) and it seems like these guys are always having issues with there bikes, but not me.

Might also mention that the concours is all I drive. haven't owned a car in some 15 years. I'm on the bike on the coldest day as well as the hottest and rainiest days, and again, the bike has never let me down. And this may explain why my bike runs so well. It's used every day, which means i have fresh fuel running through it all the time. It has been my personal experience that most running issues with a bike stems from the fuel system one way or another.

Again, good job with the bike.

This is my 2005 with the summertime shorty windshield:

20230726_194509.jpg
 
Also, if you have the skills, I'd completely tear the carbs down and rebuild them. Or, if you can afford it, send them to steve for an expert rebuild
I've done the carbs maybe 6 times lol

But the bad gas keeps gunking them or I would put too much B-12 and let it sit, destroying the o-rings.

Now I know there's water in the tank so the bike should be good to go by next week.

Just need to top up oil, check other fluids, and clean windshield of oxidation.

After it's been running awhile, I'll buy replacement panels for it and maybe give it a custom paint job since it's pretty scuffed.

Bought it like that. I was taken for a bit of a ride with how much work this bike needed and my technical skill, but hey we learn along the way.
 
Thank you. I believe I solved the fuel starvation problem with the original gas cap mod. But I'm replacing that too now. I replaced all the gas line with good black reinforced line. I also turned the pilot screws to 1+3/4 turns instead of the 3 it was at since it ran kinda rich (massive pops on decel).

Gotta drain all that water before I try again though. Will be a task for Friday.
Have used denatured alcohol as a final rinse which I think helps move H2O. Then used hair dryer blowing in tank for a few hours.
 
Last edited:
Make sure you take the tank off and slosh around the fresh gas or alcohol or whatever you are using to make sure you get any residual water out of the two low points on the sides near the petcock. Since they are below the petcock, they don't drain, and water will settle there and cause rust. It's an issue on other bikes too, including the GPZ-1000. Quite common to see tanks like that rusted out at those back corners.
 
Make sure you take the tank off and slosh around the fresh gas or alcohol or whatever you are using to make sure you get any residual water out of the two low points on the sides near the petcock. Since they are below the petcock, they don't drain, and water will settle there and cause rust. It's an issue on other bikes too, including the GPZ-1000. Quite common to see tanks like that rusted out at those back corners.
This is why a hair dryer is run into tank for couple hours before putting back in use.
 
Top