There is a lot of speculation about the C-14 valve adjustments, and how the valves seat and specs change with mileage. If we all try to post up results, we can hopefully gain some real insight into the behavior of the valve train. I'll share my experiences comapring the first early valve check/adjustment at 13,787 Miles and the second check at 39,984.
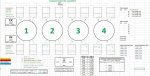
As you can see from the two shim maps I posted below, the first check at the early interval had two exhaust valves and four intake valves out of spec and tight. 9 other valves were on the tight end of the spec. I ended up changing or swapping 15 of the 16 shims to center all of the valves at .006 for the intakes and .009 for the exhausts.
The second valve check after running for 26,000 miles, showed that every exhaust valve did not change in clearance. Four of the intake valves actually loosened up nearly .001. It's possible that every intake valve did not change very much since I kept them on the loose side of the centered spec, but not all the way to .007. The fact that some valves could potentially loosen, gives credence to the centering them and not putting them all on the loose end.
So what is going on here? If I had to speculate based on these actual results, I would conclude that either the valves seat early and go out of spec and move tight, and/or, the factory sends out engines with some of the valves on the tight end of the spec, and they move out of spec early as they seat. I'm pretty confident with the results that I'm measuring since that feeler guage either fits or doesn't fit. So not really any guess work there.
A few notes after doing the procedure the second time:
-Definitely remove the radiator. It makes the job much easier and you can tighten the header bolts with ease. You can actually check the exhaust valves from the front side of the engine because there is so much room. The other benefit of removing the radiator is that you get a lot of extra dirty coolant out of the system that's trapped in the radiator and the vacuous hoses. The best bonus is that you can get in an really clean the radiator. Mine was really gummed up, and it was covered with a radiator guard.
-Even if you check the valves, and they are in spec, you are not wasting your time. I addressed the potential for oil leaks, and changed the spark plugs. Like others have reported, the plugs looked fine after 40,000 miles and still had a Gap of 0.35 IN. I replaced them anyway because I was already in there. The spark plug wrench sold by Kawi has to be the cheapest most effective tool you will ever use. It works perfectly in that tight space. I included the part number for that tool in the link below since it's not included in the Gen 2 tool kits.
-The second time around is easier because you have the shim map. If I would have had to pull the cams, the job would have taken half the time because that first shim measuring step is eliminated.
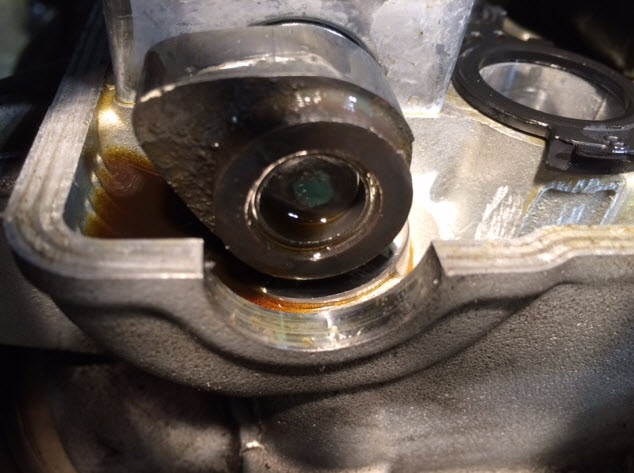
-I'm still impressed that my bike doesn't have the dreaded front left top end and cam sensor oil leaks. To hedge my bets, I did replace the valve cover bolt rubber washers, used a new gasket, new spark plug well gaskets and MOB's improved cam sensor o-ring. Watch me get an leak since I fixed something that wasn't broken? The old gasket was distressed in some places, so I'm glad I changed it.
-While I was in there, I flushed and changed the coolant, and bled just the clutch again (just did it this past spring) since the reservoir was gritty. I took my time since I'm not a dealer trying to make $$ and cleaned up everything in the inside the panels and replaced some bolts, a bunch of push rivets, and plastic washers.
-Also, after 40,000 miles it was time to replace the fuel filter. Note that this is not a serviceable item, but Fred's Concourior article and instructions below provide every step you need to change it. As you can see, it was REALLY dirty and worth the effort.
Fuel filter links:
http://www.zggtr.org/index.php?topic=17490.0;topicseen
http://www.pbase.com/fredharmon/c14fuelpump


The second time around is so much easier. I still used Fred's videos at times, but relied more on the service manual for the torque specs.
It would be great to hear about other valve check experiences, or speculate some more about how the valve train actually wears. In case anyone is wondering about how I ride, or how that factors in, I ride in a spirited manner but don’t bounce off the Rev Limiter or wind it out above 8K very often. I would say I'm more on the touring side of the Sport Touring scale. Probably an average C-14 rider I'm guessing?
Here is a link to the Part numbers and tools needed for the job:

 forum.concours.org
Here is a link to the first time I did the job, and needed to change out the shims:
forum.concours.org
Shim Map from Check/Adjustment at 13,787 miles

Shim Map from second check at 39,787 Miles

Hopefully this info helps someone else. I really appreciated all of the posts from others showing these service procedures.
As you can see from the two shim maps I posted below, the first check at the early interval had two exhaust valves and four intake valves out of spec and tight. 9 other valves were on the tight end of the spec. I ended up changing or swapping 15 of the 16 shims to center all of the valves at .006 for the intakes and .009 for the exhausts.
The second valve check after running for 26,000 miles, showed that every exhaust valve did not change in clearance. Four of the intake valves actually loosened up nearly .001. It's possible that every intake valve did not change very much since I kept them on the loose side of the centered spec, but not all the way to .007. The fact that some valves could potentially loosen, gives credence to the centering them and not putting them all on the loose end.
So what is going on here? If I had to speculate based on these actual results, I would conclude that either the valves seat early and go out of spec and move tight, and/or, the factory sends out engines with some of the valves on the tight end of the spec, and they move out of spec early as they seat. I'm pretty confident with the results that I'm measuring since that feeler guage either fits or doesn't fit. So not really any guess work there.
A few notes after doing the procedure the second time:
-Definitely remove the radiator. It makes the job much easier and you can tighten the header bolts with ease. You can actually check the exhaust valves from the front side of the engine because there is so much room. The other benefit of removing the radiator is that you get a lot of extra dirty coolant out of the system that's trapped in the radiator and the vacuous hoses. The best bonus is that you can get in an really clean the radiator. Mine was really gummed up, and it was covered with a radiator guard.
-Even if you check the valves, and they are in spec, you are not wasting your time. I addressed the potential for oil leaks, and changed the spark plugs. Like others have reported, the plugs looked fine after 40,000 miles and still had a Gap of 0.35 IN. I replaced them anyway because I was already in there. The spark plug wrench sold by Kawi has to be the cheapest most effective tool you will ever use. It works perfectly in that tight space. I included the part number for that tool in the link below since it's not included in the Gen 2 tool kits.
-The second time around is easier because you have the shim map. If I would have had to pull the cams, the job would have taken half the time because that first shim measuring step is eliminated.
-I'm still impressed that my bike doesn't have the dreaded front left top end and cam sensor oil leaks. To hedge my bets, I did replace the valve cover bolt rubber washers, used a new gasket, new spark plug well gaskets and MOB's improved cam sensor o-ring. Watch me get an leak since I fixed something that wasn't broken? The old gasket was distressed in some places, so I'm glad I changed it.
-While I was in there, I flushed and changed the coolant, and bled just the clutch again (just did it this past spring) since the reservoir was gritty. I took my time since I'm not a dealer trying to make $$ and cleaned up everything in the inside the panels and replaced some bolts, a bunch of push rivets, and plastic washers.
-Also, after 40,000 miles it was time to replace the fuel filter. Note that this is not a serviceable item, but Fred's Concourior article and instructions below provide every step you need to change it. As you can see, it was REALLY dirty and worth the effort.
Fuel filter links:
http://www.zggtr.org/index.php?topic=17490.0;topicseen
http://www.pbase.com/fredharmon/c14fuelpump
The second time around is so much easier. I still used Fred's videos at times, but relied more on the service manual for the torque specs.
It would be great to hear about other valve check experiences, or speculate some more about how the valve train actually wears. In case anyone is wondering about how I ride, or how that factors in, I ride in a spirited manner but don’t bounce off the Rev Limiter or wind it out above 8K very often. I would say I'm more on the touring side of the Sport Touring scale. Probably an average C-14 rider I'm guessing?
Here is a link to the Part numbers and tools needed for the job:
Part Numbers for the C-14 Valve Adjustment
There are few different threads listing the valve adjustment parts, but this one has the quantities and part numbers! Here is a list of parts with part numbers that are recommended or required for the C-14 Valve adjustment job. I also listed some of the specialty tools that are needed along...
forum.concours.org
Here is a link to the first time I did the job, and needed to change out the shims:
Valve Adjustment Tips for a First Timer
I wanted to share some tips for doing the Valve Clearance Adjustment on a Gen- 2 C-14. I hope others will chime in with their own tips. This is not intended to be an expert opinion or a step by step guide, but rather the intent is to help out a newbie that might have the same question and...
forum.concours.org
Shim Map from second check at 39,787 Miles
Hopefully this info helps someone else. I really appreciated all of the posts from others showing these service procedures.
Last edited: