I installed my freshly flashed (Thanks Steve!) ECU and turned the key on to confirm I had everything plugged back in nice and tight. I thought about a quick ride, but decided freezing rain and 28 degrees wouldn't be much fun!

-
WOULD YOU LIKE TO BE ABLE TO POST? REGISTER FOR COG MEMBERSHIP
All registration must be done through the club's main webpage: To register / join COG, click here
For instructions to convert to full membership, click here
-
Can't post after logging to the forum for the first time... Try Again - If you can't post in the forum, sign out of both the membership site and the forum and log in again. Make sure your COG membership is active and your browser allow cookies. If you still can't post, contact the COG IT guy at IT@Concours.org.
You are using an out of date browser. It may not display this or other websites correctly.
You should upgrade or use an alternative browser.
You should upgrade or use an alternative browser.
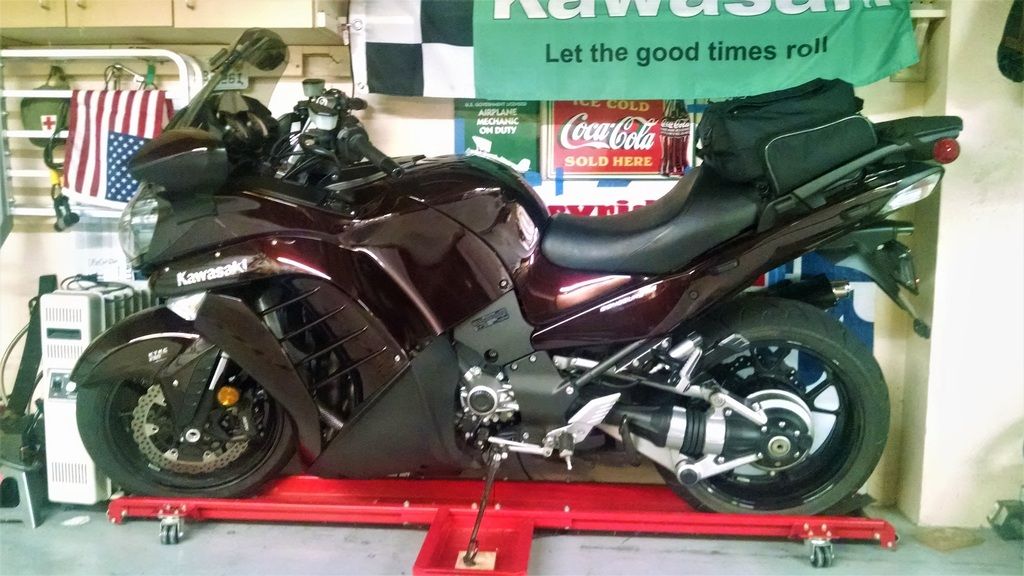
What have your done to your C14 today
- Thread starter COGnosticator
- Start date
Topped off my tank with Sta-bil and fuel. Recieved my Maxima coolant and Brake fluid in the mail. Need to order speed bleeders and get a air filter still.
A balmy 13deg here in Conn. Lol
C.P. 🏍
A balmy 13deg here in Conn. Lol
C.P. 🏍
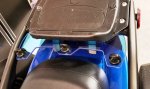
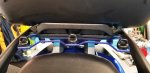
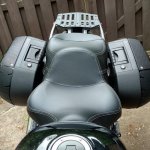
I modified my original bungee cord anchor point to the one shown in the photos below. I have the Phil's Type C rack plate with a Monokey plate on top of that, and just tapped two 1/4" X 20 holes to fasten the acrylic plate to the bottom of the aluminum plate with Bungee Buddies attached to the acrylic. Tested with some cargo yesterday, it is very solid. I used transparent Blue Acrylic, but have them in Soild Blue, Black, Smoke, and Clear if anyone is interested...
Cheers!
Gilbysan
Cheers!
Gilbysan
Attachments
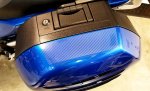
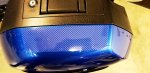
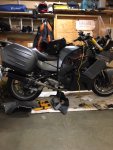
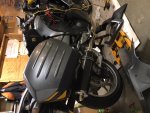
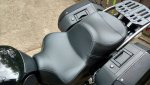
I used to have Snake Skins on my previous Connie, for this one I have tried clear vinyl like the stuff used to protect auto hoods, etc. That was ok, but not quite what I wanted. Tried some other vinyl made to look like Blue CF and I think it will do a pretty good job of protecting the case top from scuffs. It is very easy to apply and remove with a bit of heat. I may try the black CF as well but this blue matched the bike paint so well...
Don't get me wrong, I like Snake Skins, but for for $9. it is hard to go wrong, compared to the cost of snake skins, and I got enough to do 6 bags with each color...
The Blue is from eBay: https://www.ebay.com/itm/4Pcs-5D-Blue-Carbon-Fiber-Car-Scuff-Plate-Door-Sill-Cover-Panel-Step-Protector/273158992391?ssPageName=STRK%3AMEBIDX%3AIT&_trksid=p2057872.m2749.l2649
The Black is also from ebay: https://www.ebay.com/itm/5D-Carbon-Fiber-Car-Scuff-Plate-Door-Sill-Cover-Panel-Step-Protector-Vinyl-Black/323322924456?ssPageName=STRK%3AMEBIDX%3AIT&_trksid=p2057872.m2749.l2649
I just made a template that is sized to cover the Bag top and there you go.
Cheers!
Gilbysan
Attachments
Finished all three caliper rebuild, and new fork seals. 50,000 mi on my 09 ABS. One fork was leaking, and just felt it was time for preventative maintenance on the calipers, they all had at least one piston dragging a bit. As a side note, I’ve flushed brake fluid religiously every year. (Speed bleeders are awesome). On the forks, I did a fluid change at 25,000 mi. About 5 years ago.
Rev Ryder said:Started it a few days back. That's about it for the past six months. ::
Be thankful that you could even do that :beerchug: Steve
What brand and model lights did you install?Tundra said:Installed LED position lights.

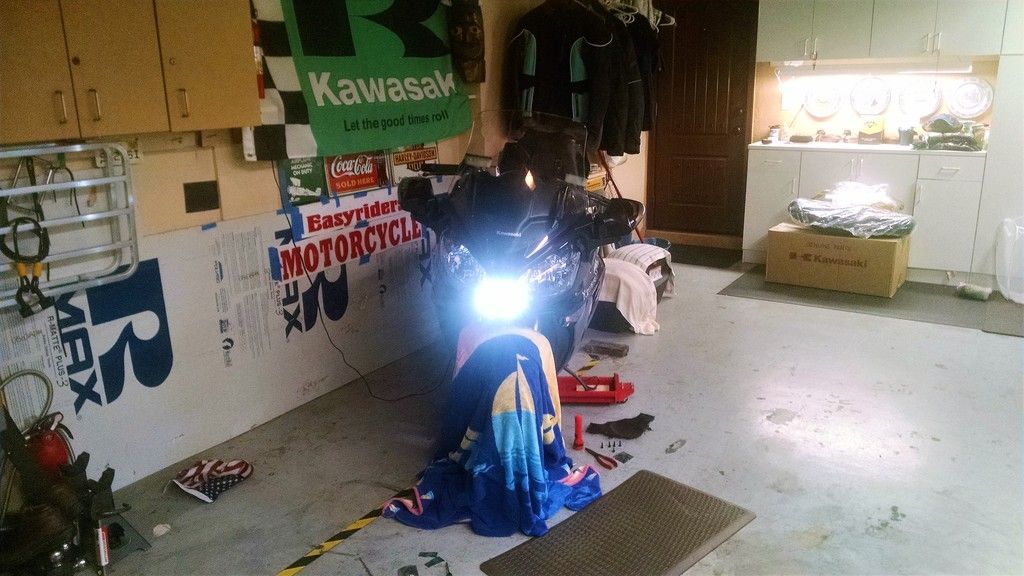
Installed LED Headlights, these were perfect install even with the rubber boot, no modification needed. It hurts to look at them, better seen than dead. Like torque & Horsepower, more is better.
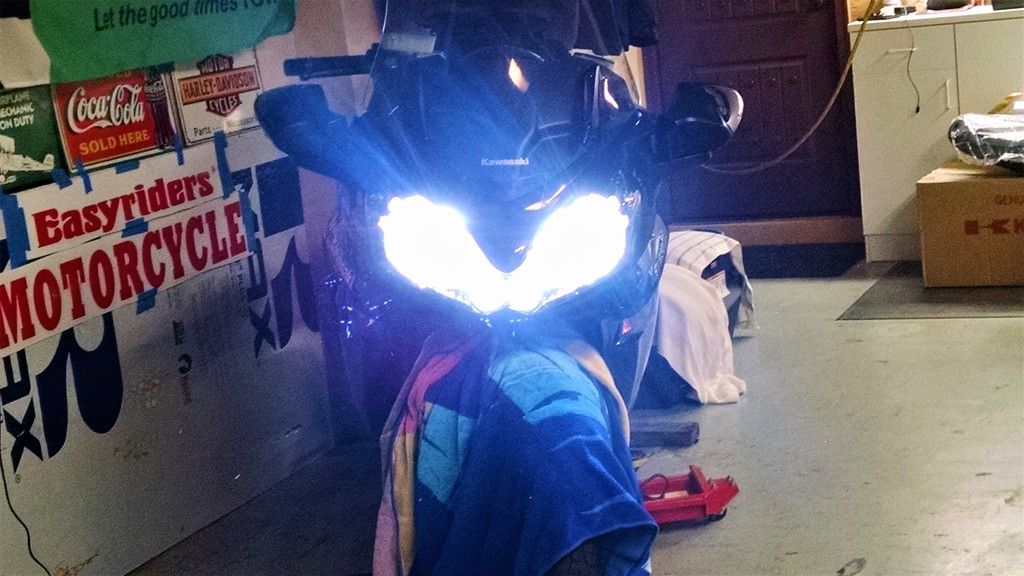
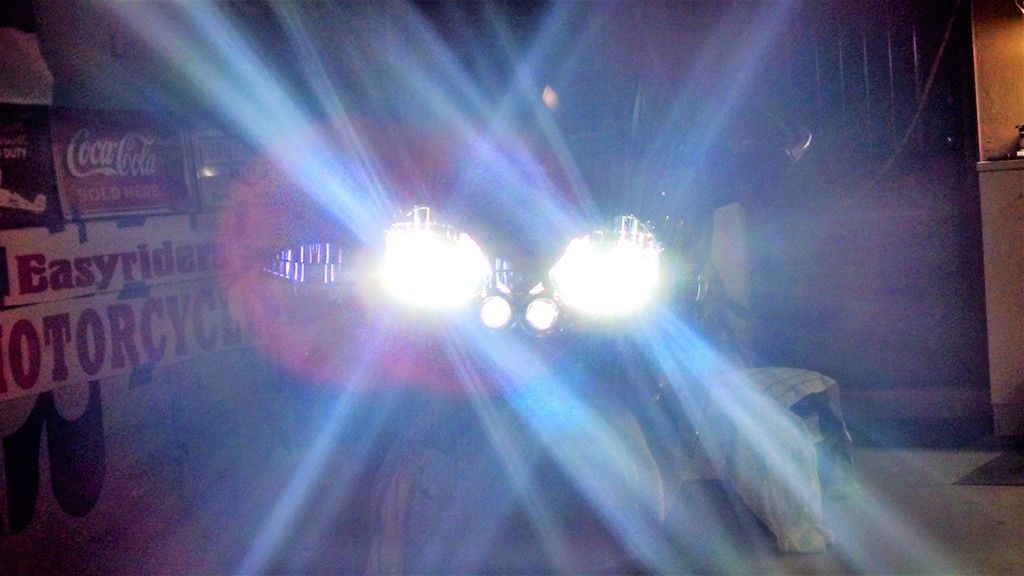
They are "Auxbeam" brand from Amazon, $32.00 bucks for the pair. Same lights in both of my 4Runners. What I like best is no external driver or resistor to mount/hide or fumble around with, no fan, no ballast, no noise, truly plug n play. These appear IDENTICAL to the lights pictured in this previous LED post.
http://forum.cog-online.org/accessories-c14/led-h4-bulb-pathfinder/
Use this description for your search...
Auxbeam LED Headlight Bulbs NF-S1 Series LED Headlights with 2 Pcs of H4 9003 HB2 P43T Philips CSP LED Headlight Conversion Kit 50W 8000lm 6000K Hi-Lo Beam
NOTE: If anyone goes this route please be carefull. The base of the bulb (heat sink) is crudely machined and sharp as razor blades. When you push and twist for final fitment/locking into the base I sliced finges wide open. I was wearing blue surgical gloves and when I looked down they were purple? I thought that's wierd? Then realized it was blood. Wear a quality mechanics glove that will allow youto feel/see with your finger tips and provide some protection.
Tundra said:Installed MRA tinted shield. (2.5 months wait time)
Let me know what you think of it. I'm 6'2" with a 34" inseam and have been seriously thinking about this screen. The stock unit just isn't tall enough to keep my helmet out of the wind...
Eric said:Tundra said:Installed MRA tinted shield. (2.5 months wait time)
Let me know what you think of it. I'm 6'2" with a 34" inseam and have been seriously thinking about this screen. The stock unit just isn't tall enough to keep my helmet out of the wind...
I'd like to know as well. 6'4", 35" inseam. I ride in summer with shield all the way down, but the higher it goes, the louder the blast.
Tundra said:Installed MRA tinted shield. (2.5 months wait time)
Add some Madstad brackets to it & you'll be amazed at how much smooth clean air you get.
Just Cliff said:Tundra said:Installed MRA tinted shield. (2.5 months wait time)
Add some Madstad brackets to it & you'll be amazed at how much smooth clean air you get.
+1 on this advice.
A somewhat lengthy reply to Buds posting with those really nice bright position lights. I agree more light is better to be seen. I did some seat of the pants research about the high amount of glare I noted at night from oncoming vehicles; mainly cars, but some bikes. Cars that have cheap aftermarket LED conversions were the worst for glare because the lights just project out in all directions and it makes it hard for oncoming traffic to see anything ahead. I noted that on the first set of LED headlights I tried. Plus the fans were annoying at traffic stops. You know the type. Then of course there are the lifted trucks with LED lights that are also high glare.
My Eye Dr. noted that it is the UV that causes the glare in our eyes and recommended that I try any lens that blocks UV and Blue light. I tried several types of sunglasses, including yellow, bronze, light rose colored (yes my world did get better looking temporarily) and finally settled on a transition shield and Oakley transition lenses on frames. They lighten in low light but retain their UV light protection and it helps with the glare on the roads nowadays. The combo of both the shield and glasses at night when roads are wet and lights are really reflective works much better than anything else I have tried.
So, super bright lights are good, and I really believe that the Denali DMs I have on the front of Connie help idiots and non-attentive people see me, during the day, I don't want to blind them in the process of riding because humans get that target fixation thing going and I don't want to be the target...
BTW, I use 7000K LEDs position lamps, which actually look light blue light. Drivers seem to move aside when I approach from behind and when they move over they get a nice wave of thanks from yours truly. I think they move due to the position blueish posit lights...
They may not be legal in some states including WA, however I have not had any issues with them and our friends in blue...
My 2 Cents...Safe Riding!
Gilbysan
Installed a set of Avon Spirit ST's..
Changed the oil and washed.
Ride safe, Ted
Changed the oil and washed.
Ride safe, Ted
After sub zero temps earlier in the week we finally broke 50 degrees, so I went for a short ride to check out Steve's flash. Full review to come after I have a chance to spend more than a few minutes with it, but first impressions were great. It just runs,...better! I merged onto the interstate and glanced down to find I was going 95. I'm going to have to do some mental recalibration or end up getting familiar with local LE!
Nice pics. Care to tell the rest of the story as Paul would say?Craigmri said:I know this has been done many times before however here is my interpretation of the Saddlebag Key Knobs.


Craig
Tundra said:What was your knob source? Looks like an electronics control knob of some sort? Perfect size, looks great and functional!
Sorry for the delay guys....Moms in ICU and been at the Hospital like crazy...
Got the knobs on Amazon:
https://www.amazon.com/Uxcell-a15091400ux0842-Control-Rotary-Diamter/dp/B01FCUYWPQ/ref=sr_1_1?ie=UTF8&qid=1549510834&sr=8-1&keywords=Uxcell+a15091400ux0842+Bulb+Light+Lamp+Di+mmer+Control+Rotary+Knob+Cap%2C+2+Piece%2C+5+mm+Diamter%2C+Black
Basically got the KW14R blank keys online and brought them to my local hardware store to be cut to match the bikes key. I then cut off the head of the key then made a slot in the underside of the knob by heating up a flatblade screwdriver then inserting the key to the desired depth in the knob...Once I was happy with the depth and the perfect perpendicular angle of the key, I then filled the hollow knob back with epoxy then let set up.
Works like a champ!
Quote plagiarized from Cap 'n Bob: Key Blank - ILCO KW14R Note: Double check your keys and this information. There seems to be two types of keys, beginning with either an "A" or "B". If you have an "A" key it should be a "KW14R" key-blank. If you have a "B" key, it should be an "KW14" key-blank.
Craig
Tundra said:No worries Craig and thanks for sharing, nice little inexpensive addition.
Sorry about your Mom, wish you and yours the best in this situation. I'm going through the same.
Thanks brother.....Wishing you the best as well!!
Craig
Tpms battery replacement, oil/filter change, drain and flush radiator. Omg clean the rad, its SOOO.... grimmie, replace cooling hoses, and on to a valve check/adjust. Gotta love the southwestern Georgia weather.....no more freezing my tookus off doing winter maintenance anymore...
Took it to the track day at Jennings and ran the heck out of it!!
Ride safe, Ted
Ride safe, Ted
Removed the fairing pieces to get at the headlight nacelle so that I could take it apart and clean the inside which had become hazy on the reflector and inside the lens. Bought a roll of butyl rubber for headlights and figure it all out. Now not so concerned about taking the headlight apart again. Took the opportunity to run some wires more efficiently around the chassis that I should have done before...
Thinking about doing a paper on how best to take off the front end pieces, headlight, etc.
Cheers!
Gilbysan
Thinking about doing a paper on how best to take off the front end pieces, headlight, etc.
Cheers!
Gilbysan
I flushed the clutch fluid using a home made vacuum system. The bike only has 3,600 miles on it, and I've owned it for less than a year, but it was a left over new 2012. Let me tell you, that fluid was nasty looking! No chunks or visible water, but it was the color of weak coffee. The biggest pita was getting the rubber piece slid back onto the lower fairing panel, and what a pain it was! I'll be doing the brakes this weekend, but did the clutch first since the fluid in the reservoir was noticeably darker than the other 2.
I put a Murph o ring on the exhaust cam position sensor, Valve clearance check and throttle body sync. Took a few days but it is fresh in my mind today. Then it snowed.
Would be interesting to many to know the miles on the bike and what the clearances were.bezier kid said:I put a Murph o ring on the exhaust cam position sensor, Valve clearance check and throttle body sync. Took a few days but it is fresh in my mind today. Then it snowed.
Bud said:Would be interesting to many to know the miles on the bike and what the clearances were.
2008. I'm just over 80K. I believe this is the 4th valve adjustment I've done. I've had it since 30K.
All the intake valves were within spec this time from .0055" in to .0065".
All the exhaust valves were slightly tight except 1 at .008". Most of the valves were between .007 and .0075.
I can give you the exact numbers if you need them, I just don't have them with me. It was a lot less adjusting this time compared to previous jobs.
Re-installed my re-flashed (updated to Steve's latest Full Area P MR flash) ECU. Started the bike up for the first time since leaving Germany last fall. Got temporary registration plates (paper tags). Been pretty busy since moving into the new house and being on the road (work) so much.
:motonoises:
:motonoises:
Replaced Air filter (15k), Took off the bolts holding the grounds and put some dielectric grease on the eyelets.. Still need to put the fairings back on. This is the 1st time I've had em all off, Is there a trick to the sequence? I was thinking start front the top and working my way down.
Christopher said:Replaced Air filter (15k), Took off the bolts holding the grounds and put some dielectric grease on the eyelets.. Still need to put the fairings back on. This is the 1st time I've had em all off, Is there a trick to the sequence? I was thinking start front the top and working my way down.
The bottom up works best for me. I have an 08.
On my 2012 it's way off. Like 4 mph off at an indicated 65 mph.mirage said:Have speed bleeders (not installed). Installed tank protector and ordered Canyon Cages. Installed Ram mount for cell phone. Looking forward to seeing how accurate the speedo is.
Just added a pair of LED headlight bulbs yesterday- https://www.superbrightleds.com/moreinfo/led-headlight-bulbs-conversion-kits/h4-led-fanless-headlight-conversion-kit-with-internal-drivers-4000-lumensset/5321/11896/?year=2012&make=97&model=3812&scc_id=1940&utm_source=googlebase&utm_medium=base&utm_content=H4-HLV7&utm_campaign=GoogleBaseChild&gclid=Cj0KCQjw1pblBRDSARIsACfUG11lENcv3RnPkJgoZ-6CMT8y5MOQKCzwFc9T4KESepbydA01PX1McvkaAgDDEALw_wcB as well as the matching city lights - https://www.superbrightleds.com/moreinfo/miniature-wedge-base/194-led-bulb-5-smd-led-tower-miniature-wedge-retrofit-car/206/919/
It rained last night, so didn't get a chance to check them out. Hopefully tonight.
It rained last night, so didn't get a chance to check them out. Hopefully tonight.
Just finished my first valve check at about 26K on the clock. I guess I don't bounce off the rev limiter enough because everything was within spec (if the dealer told me that, I would NOT have believed him :??. But here is a question for the group...the second intake valve on cylinder 3 was the tightest...measuring at 0.13mm...just above spec min. Would you guys pull the cam and adjust it anyway or just leave it alone and check again in another 15K miles or so? Feedback much appreciated. :beerchug:
. But here is a question for the group...the second intake valve on cylinder 3 was the tightest...measuring at 0.13mm...just above spec min. Would you guys pull the cam and adjust it anyway or just leave it alone and check again in another 15K miles or so? Feedback much appreciated. :beerchug:rogracer said:Would you guys pull the cam and adjust it anyway or just leave it alone and check again in another 15K miles or so? Feedback much appreciated. :beerchug:
Personally, I would leave it.
Thanks Bezier I will likely follow that route and button her back up, but I'll wait a day or two and see if I have a change of heart. Im still curious what the others might do in this situation. I guess pro shops would just go by the manual and if its "within range" that means "no adjustment". That would imply there must be a little safety margin outside the spec range, but I have no idea what that margin might be on this motor. In my case I would likely just use a shim 0.001 in thinner and that dosen't seem worth it.
Tupperware back on! No extra fasteners lol Took me about an hour, not bad for the 1st time. I was fretting it...
642mirage
Training Wheels
My 2014 appears to be off by 2 mph at 70.Eric said:On my 2012 it's way off. Like 4 mph off at an indicated 65 mph.mirage said:Have speed bleeders (not installed). Installed tank protector and ordered Canyon Cages. Installed Ram mount for cell phone. Looking forward to seeing how accurate the speedo is.
I rode my C-14 today. First time since January.
Then it got a bath and a coat of Surf City Speed Demon spray wax. Makes the faster green even faster....
Then it got a bath and a coat of Surf City Speed Demon spray wax. Makes the faster green even faster....
Took the 7yr old Yuasa battery out, cleaned up the connections and replaced it with a new SHORAI LFX battery. Superlight, only 3lbs, compared to the 12 lbs Yuasa, 310CCA vs 210. The Yuasa is a great battery, I've used them in all my other bikes over the years but I just had to try out the SHORAI. Noticable difference when the bike cranks over, and no problem charging it up with the Battery Tender.
Been a busy weekend.
Friday: Went to Bitchn Stitchn in Lakewood CO and they reformed the seat to fit my butt for better support and comfort. When I put some more miles on it I will start a new thread with a review.
Saturday: Been 10 years since I've changed a set of MC tires. This turned out to be a not fun exercise. In a previous thread on the HF tire changer I mentioned I had seen a video of a guy using a duck head on a bar and it looked like it worked well. My attempt did not. By the time I gave up on that experiment I was tired. Went back to tire irons and got the front tire changed but it was a chore for me. Little practice, probably poor technique, cool stiff tires and old tired muscles....
Sunday: Changed the rear tire with the tire irons. Last sentence above still fit. I need somebody to teach me how to do this properly!!
So a new set of Shinko 016 Verge 2X are on. Both are balanced with the same amount of weight in the same spots as the PR4 GTs that just came off. Of course I took the old weights off prior to mounting the new tires just to put new ones on in the same spots..... Went for a 10 minute test ride and all feels good, holding air and WOW, what a difference in feel. Didn't realize what I was not getting with the old tires.
I'm tired. Time for another beer. :beerchug:
Friday: Went to Bitchn Stitchn in Lakewood CO and they reformed the seat to fit my butt for better support and comfort. When I put some more miles on it I will start a new thread with a review.
Saturday: Been 10 years since I've changed a set of MC tires. This turned out to be a not fun exercise. In a previous thread on the HF tire changer I mentioned I had seen a video of a guy using a duck head on a bar and it looked like it worked well. My attempt did not. By the time I gave up on that experiment I was tired. Went back to tire irons and got the front tire changed but it was a chore for me. Little practice, probably poor technique, cool stiff tires and old tired muscles....
Sunday: Changed the rear tire with the tire irons. Last sentence above still fit.
I need somebody to teach me how to do this properly!!So a new set of Shinko 016 Verge 2X are on. Both are balanced with the same amount of weight in the same spots as the PR4 GTs that just came off. Of course I took the old weights off prior to mounting the new tires just to put new ones on in the same spots..... Went for a 10 minute test ride and all feels good, holding air and WOW, what a difference in feel. Didn't realize what I was not getting with the old tires.
I'm tired. Time for another beer. :beerchug:
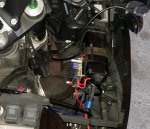
Installed a Fuzeblock to clean up connections for battery tender, driving lights, GPS power and a USB port.
I ended up using some 3M hook/loop and a zip tie to attach it to the charcoal canister(?) under the right side. Easy access to battery and close to whatever accessories I will install.
Cleaned last year's bugs off. Time to start a new collection.
I ended up using some 3M hook/loop and a zip tie to attach it to the charcoal canister(?) under the right side. Easy access to battery and close to whatever accessories I will install.
Cleaned last year's bugs off. Time to start a new collection.
Attachments
Went to take my wife out to eat Saturday. Promised we'd take the Harley because its more comfortable for her. Despite being on a tender all winter and zero issues last year, battery was dead as a door stop.
HOWEVER > The Concours fired up like I'd just shut it off. :rotflmao:
She got along just fine and stopped complaining when the appetizer showed up. :great:
HOWEVER >
The Concours fired up like I'd just shut it off. :rotflmao:She got along just fine and stopped complaining when the appetizer showed up. :great:
luv2fly said:Went to take my wife out to eat Saturday. Promised we'd take the Harley because its more comfortable for her. Despite being on a tender all winter and zero issues last year, battery was dead as a door stop.
HOWEVER >
She got along just fine and stopped complaining when the appetizer showed up. :great:
I should have had mine on a "render"...did show full chrge, but just the same, the batt pulled outlast year, which was charged, sittin on the bench, was perfect...
i'm charging the one on bike now....
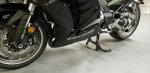
I've been saving my pop bottle money, and finally pulled the trigger. Added my Top Block tip over protection including the front axle sliders and single swingarm slider (single because the other side has been known to cause muffler damage).
A couple of things ..
A couple of things ..
- Thanks Murph ! for the super fast delivery and for stocking this stuff :great:
- These are very strong and really look like they will do the job.
- If you are considering these, Don't be intimidated about cutting the holes in the lower fairings, the process is very easy and if you follow the directions, it would be hard to get these wrong. I used an inexpensive 1" hole saw.
Attachments
Took both wheels off. Going to the local shop tomorrow to get rubber spooned off and put new batteries in the TPMS. Hope to have her back on the road before dinner.
 Lift https://www.flickr.com/photos/90916045@N02/
Lift https://www.flickr.com/photos/90916045@N02/Last year I had a fall at a rally while going down a drive way using the front brake. The drive way had some what bigger rocks than I would have used and slightly damp. I was going slow, both feet out when the front wheel locked. I must have been going too slow for the ABS. Any way I could not hold the bike up right and scratched some paint. My paint guy who used to work auto body found some paint, A Mazda color which needed more metal flake added that is pretty darn close to the 09 red. Got everything back on. While the bike was down for paint, I set the tire sensors off to Fred Harmon and had the batteries replaced. Run good now. I was glad I had some of Murph's well nuts. It seems like there a couple that need to replaced every time the fairing comes off.
I bought insurance for the season - live in Canada (North-East BC) and now we have a freaking snow warning. Probably not going to happen in town but don't even think of going over the passes. Because I am now a senior my insurance went from$739 to $523 for 6 months. My new tires should be in the Kawasaki dealer's shop by now. Phoning in the morning to arrange a time to install them. Love it when a plan comes together.

Didn't do it today but since Wednesday I changed the coolant, got the vacuum hoses installed on the Throttle Body and Flushed all of the Brake/Clutch fluid and Re-installed the old secondary fly plates so I can get my ECU Flashed by SISF when I get my coins stacked high enough..
I'll be synching the Throttle Body later this week.....too much new snow to drive
I'll be synching the Throttle Body later this week.....too much new snow to drive
Finished my Fenda-Extenda...had to scrape off the ABS plastic adhesive (didn't work) and re-apply what has worked for me in the past on three bikes. I refuse to drill holes in a Concours and put screws in the fender.

Can barely see it, which I like. Hopefully it will keep all the small stones/sand out of my radiator. I think it will serve it's purpose well.

Then installed my new grips over my heated grips, heat still works well. Royal PITA to get on, especially the throttle side.

Needed to cut the ends off.


I have large hands and the skinny little grips were to small diameter and too hard on long rides.

Can barely see it, which I like. Hopefully it will keep all the small stones/sand out of my radiator. I think it will serve it's purpose well.
Then installed my new grips over my heated grips, heat still works well. Royal PITA to get on, especially the throttle side.
Needed to cut the ends off.
I have large hands and the skinny little grips were to small diameter and too hard on long rides.
Tundra said:Finished my Fenda-Extenda...had to scrape off the ABS plastic adhesive (didn't work) and re-apply what has worked for me in the past on three bikes. I refuse to drill holes in a Concours and put screws in the fender.
Can barely see it, which I like. Hopefully it will keep all the small stones/sand out of my radiator. I think it will serve it's purpose well.
Then installed my new grips over my heated grips, heat still works well. Royal PITA to get on, especially the throttle side.
Needed to cut the ends off.
I have large hands and the skinny little grips were to small diameter and too hard on long rides.
Super job Tundra! That fender extender looks familiar :great:
Front suspension re-valve/re-spring with Traxion Dynamics; Steering head bearing replaced; Coolant flush; Hella Supertone horn install (nice and loud); changed oil/filter; Delkevic slip-on installed (sounds fantastic!); New rear tire; worked overtime to pay for all this stuff. 34 degrees and rain today, so might as well do maintenance.
Attachments
Tundra said:I installed these deer whistle, radar antenna, GPs clamps. All in one unit... Pretty slick!
Seriously, my neighbor asked what I was doing, that's what I told him. "Oh nice" LOL
New fender extender..no screws of course.
I used Permatex Plastic Bond to attach my Fenda. No screws also. So far so good.....
5
56taskforce
Guest
Guest
Changed the oil in preparation for the Bun Cooler.and rode it to work in the rain...
(After raising my bike back to semi stock height}
Replaced the {shortened} side stand with a full length one.
Then heated and bent it {to clear the left mid pipe} and get the lean right.
Still have a little tweaking to do, but it clears the mid nicely, and the bike leans over correctly now....
PS: If anyone has lowered their bike and needs a shortened side stand, I have 1.
My thought was to sell the Lowering Links and Side stand as a set. {if anyone is interested?}
Ride safe, Ted
I removed 1 inch from a stock side stand and reformed the toe loop to allow clearance of the foot peg.
Ride safe, Ted
Ride safe, Ted
MtnRider said:Ted, are EVER going to get that bike finished?!? :nananana: :rotflmao: :nananana:
Never mind, that was a dumb question...... I just reread my signature comment! :-[ :rotflmao: :beerchug: :rotflmao: :beerchug:
Finish it?? "Heck",,, I just took it apart {again}...…..
"and" Steve has just announced a "new" Mountain Runner/Premium Flash..
Soooo, I've been in contact with him. {don't tell my wife}
I WANT ONE!!!!
>
Ride safe, Ted
My custom dynamics felxable LED strip light was down to only two blocks of working LEDs. Rather than replace it with another one that would only last one riding season, I installed a set of DENALI B6 Dual License Plate LED Auxiliary Brake Lights.
https://www.twistedthrottle.com/denali-b6-dual-license-plate-led-auxiliary-brake-lights
I ended up using a dremel to cut out a half moon on the plate light assembly and ran the wires under the fender. The additional wires were zip tied to the existing plate light wire.
After the install, at dusk, I stood about 6 feet away and could barely look straight at them. Overkill? probably. But I will be seen.
Over the past several weeks... Installed my Baldwin seat. I like it a lot. It is firm with an expanded seating area. It is a bit taller than stock. Loren did an excellent job. Installed speed bleeders from Murphs. Flushed front and rear brakes and the clutch. The speed bleeders work as advertised making the job an easy, one person proposition. Next up on my 2011 with 30K miles is to pull the tank and replace the fuel filter. Did you ever notice that as forum members bring up "things they have done" that you end up with a "to do list"? I really appreciate all the information on this forum over the years.
Attachments
Did Loren recently build your seat?
I wasn't aware he was currently doing seats?
Ride safe, Ted
I wasn't aware he was currently doing seats?
Ride safe, Ted
Yes, I placed the order mid-March '19 and received it approximately two weeks later. I was ready to place the order at the end of last year when I found out the site was on a bit of a hiatus. I kept monitoring the site over the winter and placed the order when I saw he was taking orders. I am happy I waited. Next I will ask him to recover my Pirate's Lair backrest using the same materials/design.
I "stealthed" my potato launcher.
I'm not really interested in getting an aftermarket muffler as I like how quiet the bike is. And I can't see the over-sized OEM when I'm riding anyway. ;D
But those silver front and rear caps really draw attention to it on a black bike. So:
[smg id=2110]
[smg id=2114]
May have to paint the heat shield under the footpeg. Yes or no?
Oh yeah, used Duplicolor Ceramic Engine Paint (semi-gloss black) that's good to 500 degrees and supposed to be tough.
I like the stealth look... :great:
But, I think too quiet... :-[ <evil grin>
See ya on the road buddy.
Ride safe, Ted
But, I think too quiet... :-[ <evil grin>
See ya on the road buddy.
Ride safe, Ted
Washed it? Arghhhhhhhhhhhhhhhhhhhhhhhhh!!!! :-[
Ride safe, Ted
Ride safe, Ted
She got a workout Saturday Ted. Besides she was dirty dirty dirty. Actually I washed the C10 and Suzuki as well. I even washed a couple of decades of dirt off of the old windjammer hanging on the wall. :nananana: ;Dconnie_rider said:Washed it? Arghhhhhhhhhhhhhhhhhhhhhhhhh!!!! :-[
Ride safe, Ted
Removed the ECU and shipped it to Steve so he can apply his Mountain Runner "Premium" flash.
Looking for the "new" (awakened) bike.
Looking for the "new" (awakened) bike.
Installed a ProjektD Handlebar Stick for my Sena Remote and Ram Cell Phone Mount. I did not like the the Sena Remote on my grip as it makes reaching the horn and turn signal buttons not as convenient. I even tried the new more slim RC4 remote. It was better but not ideal. Besides I like the functionality of the SC-HR-01 remote better.
Attachments
Installed my "Mountain Runner Premium"-flashed ECU BUT have not had a chance for ride'er yet due to priority house issues.
Maybe tomorrow (Mem. Day) ... we'll see.
Maybe tomorrow (Mem. Day) ... we'll see.
Good luck with getting a day to ride.
We'll be waiting for your ride report.
Ride safe, Ted
We'll be waiting for your ride report.
Ride safe, Ted