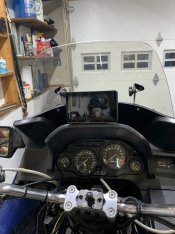
In summer 2019, found a slow leak out of the petcock on my '93. Weeping. Hard to see where. Turned out the plastic washers on the petcock bolts were deteriorated, and one was leaking. Picked up two nylon washers from Lowes. Easy to reach the bolts, to feel if any weeping. So far, so good.Well, pulled tank and finally tightened up the petcock now minor leak has decreased to almost no leak. I think I am using wrong washers for
petcock bolts. I think originals were hard plastic and now they are rubber. Will order these along with some other minor fasteners and washers.
Ya. Leak is so slow and intermittent that I think it gathers on bolt head until its large enough for gravity to take over. Have ordered new washers. Gonna run tank down to near empty then I think I will be able to replace without having to empty tank.In summer 2019, found a slow leak out of the petcock on my '93. Weeping. Hard to see where. Turned out the plastic washers on the petcock bolts were deteriorated, and one was leaking. Picked up two nylon washers from Lowes. Easy to reach the bolts, to feel if any weeping. So far, so good.
What was your final oil level in that SS recipe? And how much do you weigh when riding?"#2) I wanted him to evaluate the work I did on my suspension. {Using Steve Sefsik's Recipe}
,,,,,Cut springs, changed oil level, drilled holes in emulsion tube, added spacer and Emulators to the front.
,,,,,Installed C-14 shock and a Lowering rocker to the rear.
,,,,,,,,Adjusted sag and rebound damping on both ends...
Ted"
Best of luck on the project.Slowly, but surely whacking on a Unigo hitch I was given so it would adapt to the Delkevic slip-ons I won at the Helen National a few years back. My original HitchDoc had to come off because the up-swept config. of the pipes interfered with it. Not so sure it would have worked anyway with the OEM mufflers because of the oversize rear bias Shinko I mounted after repeated failures of the Avon Azaros. The main body of the HitchDoc sat between the tire and the inside of the fender. Made for a nice neat installation, but I still had to use a shorter bolt in the hitch where one of its bolts would rub the rear of the tire on suspension compression.
Some thick walled tubing and flat bar were ordered earlier today, so once those items arrive we’ll be back in business to try and get it finished up.
Originally began this process with a note in the Accessories thread trying to identify the hitch, With that problem solved, we moved on.
Thanks for the summary update Ted! Always a pleasure.I used 15 wt hydraulic fluid, set the level at 6 1/4" (with forks compressed and no springs in the tubes).
The Top plate in the emulator now has 4 holes. (Originally had 1}
The Emulator (spring) preload is now set at 2 1/4 turns.
I weigh about 210 without gear, and ride will helmet/mesh jacket/riding pants/boots/gloves.
(So, mebbe 230 with gear?}
Ride safe, Ted
PS: The springs I cut were Progressive "Brand". (Not OEM)
I removed (I think) 5" of the tightly coiled section, and (to set the sag) the front end requires very little preload adjustment.
NOTE: We tried cutting the same 5" from a set of OEM springs and felt it was too stiff. {too little sag}
,,,,,,,,,,,,,,,,,{we shortened the spacer to improve sag/decrease stiffness}
Not sure if Unigo is still in business. Email questions have gone unanswered, trying to place an order through their site comes back with some IT error response, and their Sales office has never returned any of my calls. The main line does pick up, but it’s a recorded message saying to dial such and such a number for this or that.Making a little progress with the modification of the Unigo hitch. I cut the arms off each side that connect to the rear pillion peg/muffler supports so I could easily manipulate each one, individually, to clear the Delkevics and the bags. Fabricated new ears (originals were too short and on the wrong side) that will ultimately be welded to each arm and bolt to the pillion peg supports. Going to hold off doing that because they will need to be formed to insure that the arms clear everything as they extend to the rear. The ends of those will be welded to the, now, U-shaped piece that has the hitch plate welded to it. The tubing and bar stock will be here on Monday, and once that stuff arrives, we can move forward and piece everything together and, hopefully, have a functional hitch in short order.
Did take the time to replace all the trailer rear incandescent bulbs with LED replacements. If you will recall, I swapped out the bike’s brake and tail with LEDs awhile back, and installed a flasher so the brake light would cycle for a period of time before going solid. That device isn’t compatible with incandescent bulbs, so they had to come out. Figured I might as well change them all out (brake, tail, turn, & license plate). The corner running lights are specialty lamps, but they don’t affect the brake lights. Had to clean up the harness plugs, since they hadn’t been joined together for a number of years. Once that was taken care of, all worked as advertised.
Now, we wait.
Make one. It's been done.Worked on removing scratches and haze from windshield. Used rubbing compound. Then turtle wax - diluted then polishing
compound. Much improved but also revealed more scratches. Will be a winter project to see how clean I can get it. Not a major item as
screen is 19" and I can see well over it. But will try to locate a 21" for winter riding that needs come TLC and cheap and working on my present
windshield is practice for next used one.
The last time I did that it came off while I was doing 80 on the highway. Thank god it only hit the top of my helmet as it flew over me. LOL. I think the plexiglass was slightly too thin.Make one. It's been done.
Thanks. Thats a great idea about the pillow. Mine was so bad that I used a drill and buffer attachments. It worked so now only the deepestI have had good luck with the plastic polishes specific for screens. Lots of polish on polish off with elbow effort. Best to work 2 inch areas at a time with overlapping areas. Usually watch a couple of movies over a couple of winter nights. I use an old pillow in lap for support. Is it worth it? Yes for me anyway. But hey, I like the stock screen just fine. Sure want it to last a lifetime if can.
That sounds exciting!The last time I did that it came off while I was doing 80 on the highway. Thank god it only hit the top of my helmet as it flew over me. LOL. I think the plexiglass was slightly too thin.
Very close to the final config. (sans the protective rags) for the modified Unigo hitch. Still want to shorten the rearward arms about an inch, tack things together for a final fit, mount the two support arm brackets, then cut and drill them to fit. Once happy, we’ll weld it all together.Not sure if Unigo is still in business. Email questions have gone unanswered, trying to place an order through their site comes back with some IT error response, and their Sales office has never returned any of my calls. The main line does pick up, but it’s a recorded message saying to dial such and such a number for this or that.
View attachment 28289
Frustrating.
Wanted to see if their (pricey) ball mount piece was available to adapt the rear of the hitch to a conventional coupler/ball arrangement, but if not, I can fab my own for a 10th of their price.
Installed the Fuel Level Sensor fix (resistor) I guess will need to run full tank to see if it works. I have the necessary items in hand to attempt the Free power mod. Gonna ride her today before I make this mod in case I screw it up and render Gold Rush powerless. Finally if that works gonna attempt to get grip warmers from PO working. Also put tank bra on. Future farkles are a manual petcock, installing either a remote fuse block or relay.This is usually a fun running post on most automotive boards, sorry if there is already one here.
I did do a search and came up empty.
Ok here we go, since my bike is multiple colors needing body work paint and I am currently not able to ride it because I am waiting for a new cooling fan. I have decided since I have to remove all the body panels in order to replace the cooling fan anyway I will start on the body work and panel repair while they are all off. I have cut my riding season short in order to Do complete maintenance and a repaint. I plan on adjusting the valves, possibly removing the carburetors and sending them off to Steve oh and of course replacing that cooling fan that started screaming at me the other day. To complete the project I ordered a complete Hardware kit from Murph as well as caliper rebuild kits, fairing extenders and a new windscreen.
If you're going that far, you should replace the bushings as well.R/R oil and OEM filter for 5k miles change out. Ordered parts for my front end upgrade:
Racetech .90 springs
Racetech Gold emulaters
All seals(OEM) for forks
Upper and lower (OEM) steering head bearings. Parts arrive, I’ll be ready
If you're going that far, you should replace the bushings as well.
| 2 | | | |
| 2 | | | |
| 2 | | | |
| 2 | | | |
| 2 | | | |
| 2 | | | |
| 2 | | | |
| 1 | | | |
| 1 | |
Modifying the Unigo hitch to work with my Delkevic pipes continues, but like many projects of this type where fab work is required, they don’t always move as fast as you’d like.
Got the basic frame and mounts for the hitch welded up. Amazing that it’s basically straight. Fab’d the down supports and mounts today and tack welded them in place. We’re happy. Need to transfer the existing hole pattern in the rear pad to the chunk of metal the ball is now mounted on, drill clearance holes, then bend it up approx. 90 deg. so it can be mounted to the rear pad. Will have to re-weld the pad to the frame first because I partially cut it loose so it could be tweaked back into a vertical position. The basic configuration of the hitch changed drastically and the pad just wasn’t useable as a result.
Finish/clean up the welds, hit it with an aggressive bead blasting, then give it a coat of paint. Like to think it’ll be done before the end of the week.
Those look great! Get a go cruise or something similar. It's easier to engage and can be moved from bike to bike.Actually made these last night but still want to show them off.
I’d love to make a throttlemeister style throttle lock but not sure exactly how I’d do it.
Yeah batteries are finicky about fluids like that......................I credit the TCW3 for that...
Ride safe, Ted
Can you tell me where you purchased your exhaust hangers? I'm working on adding some harley sportster slip-ons and would like to use a similar hanger. ThanksPARTING SHOTS:
Overall, it took almost a year, but finally done.........
Off to get another load of groceries:
Those hangers look like the ones that come with the Delkevic exhaust. Might be able to go to their website and access them???Can you tell me where you purchased your exhaust hangers? I'm working on adding some harley sportster slip-ons and would like to use a similar hanger. Thanks
Can you tell me where you purchased your exhaust hangers? I'm working on adding some harley sportster slip-ons and would like to use a similar hanger. Thanks
Those hangers look like the ones that come with the Delkevic exhaust. Might be able to go to their website and access them???
If you find that those Harley slip ons are not what you were looking for research Bafflectomy here . You may get better performance from that than the slipons .Can you tell me where you purchased your exhaust hangers? I'm working on adding some harley sportster slip-ons and would like to use a similar hanger. Thanks
Future project coming up – replace the fuel level meter in the instrument cluster.
Just noticed that the one on the bike started to read really erratic. Reads full, reads half, reads something less than half, depending on the attitude of the bike when stationary, or under way….. all this with a slightly less than ½ full tank. This just started for no apparent reason. Not sure of the actual cause, but I found a NOS gauge on eBay for a really good price, so figured I’d better scarf it up while it was still available. It’s on the way and we’ll swap it out once it arrives. If that’s not the issue, and it’s the actual sending unit, we’ll deal with that if I can find one at a reasonable price.
Secondary reason/excuse to pull the cluster – swap out the colored plastic inserts for the turn signal/emergency flasher indicators. My original instrument cluster’s speedometer faceplate was really faded in the upper quadrant due to a bulb I stuck in there. It apparently had too high a wattage and the plate couldn’t handle the added heat. I found a replacement cluster a local was selling that was really clean and reasonably priced, so went ahead and picked it up. The replacement cluster only had 35K, or something on the odometer, but since my bike was close to flipping over 200K, I wanted to have the correct, indicated mileage on the display. I sent it out to Palo Alto Speedometer Repair to have them advance the mileage. I looked at doing it myself, but the mechanism wouldn’t allow simple rotating the wheels, so I backed off not wanting to damage anything. The remote effort was a little pricey, but they got the job done in pretty short order. Once back, the cluster was swapped out and I was a happy camper.
Almost.
My original cluster had amber turn signal indicators, the ones in the replacement were green. I didn’t think that would make any difference, but they do – at least for my eyes. I find that the greens don’t stick out in the daylight as well as the ambers did, and I find myself going along fat dumb and happy after making a turn leaving the turn signals on doing their thing. NOT a safe thing to do if a cage mis-reads your intentions.
I dragged out my old cluster to see how hard it was going to be to swap out the fuel gauge, but to also see how hard it was going to be to swap out the indicator lens. Fortunately, it looks to be pretty easy for both. The three connection screws on the back of the cluster housing secure the gauge. Remove them and the gauge lifts right out. The lens are held in place by thin metal caps. Slip them off, remove their respective bulb sockets and poke through the hole with a pencil (eraser end) to dislodge the lens. Fit the replacement in position and replace the caps. Done.
I’ll shoot some pix for this adventure.
Honest.
Old cluster escutcheon/cover removed:
Did this change fuel monitoring? Was the problem resolved with this replacement? Thanks for posting all.The replacement fuel gauge came in the other day, so decided to do the deed.
It did. The gauge is now as steady as a rock. I had about ¼ tank when I first installed the gauge; steady reading on a quick test run yesterday. Topped it up to close to full after I got back, then took the bike out again today to pick up a load of groceries. Still steady and pretty close to the actual fuel level now in the tank. If I get motivated, I may drop the fuel level down in a catch can with the petcock in the MAIN position using my MityVac until fuel flow stops. Using a 10-turn shunting resistor across the sending unit leads, I can tweak the gauge so it reads as the needle is about to enter the gauge’s red level. That’s anal, but may do it just for grins.Did this change fuel monitoring? Was the problem resolved with this replacement? Thanks for posting all.
What is this "snow" thing you speak of?Sadly, because it might snow this weekend which means TONS AND TONS of salt and brine will be placed on the roads, I put the bike away till next Spring.
What is this "snow" thing you speak of?
Liberal use of WD40 cleaned up the switch for me.Unstuck the sidestand switch so I could go for a ride. Going to have to address that before it gives up entirely.
Switch boot was pretty hard and has some cracks. I pulled it off. WIll have to come up with some type of replacement.
Mounted my Zumo XT.
I wanted it “up” in my field of view.
Madstad base facilitated that pretty well.
Power connection tomorrow.
If I recall correctly there is a switched line line in the dash???
Seems like missing during idle. Dies when choke is turned off. Have remove tank and ignition coils. Will check plugs and coils. Need to find instructions on how to test coils. Also need to check kill switch on kick stands. One of the mounting bolts was lose on a coil and one of the plug wires was lose where it was connected to coil. Plug connector was bright and shinny. Haven't seen any corrosion anywhere.This is usually a fun running post on most automotive boards, sorry if there is already one here.
I did do a search and came up empty.
Ok here we go, since my bike is multiple colors needing body work paint and I am currently not able to ride it because I am waiting for a new cooling fan. I have decided since I have to remove all the body panels in order to replace the cooling fan anyway I will start on the body work and panel repair while they are all off. I have cut my riding season short in order to Do complete maintenance and a repaint. I plan on adjusting the valves, possibly removing the carburetors and sending them off to Steve oh and of course replacing that cooling fan that started screaming at me the other day. To complete the project I ordered a complete Hardware kit from Murph as well as caliper rebuild kits, fairing extenders and a new windscreen.
There would be for the instrument lights. There may be others, but I don't have the bike's schematic handy at the moment.
YupYesterday I replaced the lid tethers to the JCW trunk that had broken. Does this count?